
WWDC25: Elevate an App with Swift Concurrency
In this article, we will talk about Concurrency, which was introduced by Apple at WWDC25 and is very popular and exciting for developers. Thanks to this technology, we can do multiple tasks simultaneously over different threads. So how exactly can we do this? If you are as curious as I am, let’s get started!
Asynchronous Code

Often, when developing a mobile app, we want to do more than one thing at the same time. For example, we want to make a network call while at the same time updating the data in the user interface. It would be quite annoying to have processes waiting for each other, wouldn’t it?
That’s when Asynchronous programming, Concurrency in Swift comes to our aid. comes to our aid. Let’s start without wasting any more time about how we can use this structure in our projects.
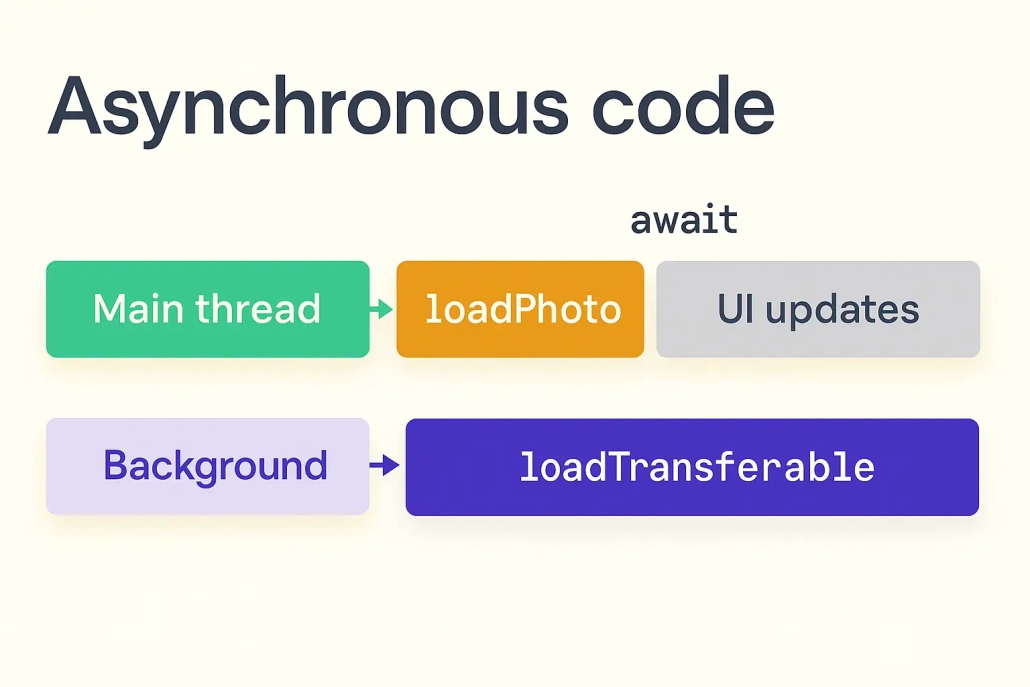
As you can see from the photo, there is only one way to do multiple things at the same time. Working with different threads!
In the main thread we do things like updating the user interface, while in the background thread we try to upload the photo we need. Since these operations are executed on different threads, they do not wait for each other to complete. Let’s go deeper into this topic by giving a code example.
    func loadPhoto(_ item: SelectedPhoto) async {
        var data: Data? = try? await item.loadTransferable(type: Data.self)

        if let cachedData = getCachedData(for: item.id) { data = cachedData }

        guard let data else { return }
        processedPhoto[item.id] = Image(data: data)

        cacheData(item.id, data)
    }
In the Swift code example you see, in our loadPhoto() method, we load the image data asynchronously and assign it to a variable named data. If this image data is already cached, we assign this data to our data variable.
Then we check whether we have a data variable with the guard-let structure. If our data variable is empty, the method terminates, if not, we assign the value of our processedPhoto dictionary by converting our data variable to image format and cache the related image.
Finally, I would like to draw your attention to the await and async keywords. These are our main heroes in asynchronous programming. When we add async to the loadPhoto() method, this method will now run asynchronously and will not wait for other operations. The reason we used await is that it will take some time to load the image data, so we used await.
Now, before closing this section, let’s understand Asynchronous Programming better by giving a live example.
import SwiftUI

struct GradientSticker: View {

    @State var processedPhoto: ProcessedPhoto

    var body: some View {
        VStack {
            ZStack {
                LinearGradient(
                    gradient: Gradient(colors: processedPhoto.colorScheme.colors),
                    startPoint: .topLeading,
                    endPoint: .bottomTrailing
                )
                .opacity(0.7)

                processedPhoto.sticker
                    .resizable()
                    .aspectRatio(contentMode: .fit)
                    .padding(8)
            }
            .clipShape(RoundedRectangle(cornerRadius: 16.0))
        }
    }
}
First of all, we designed an elegant interface component to display the uploaded image, which looks like a card with a gradient background.
import SwiftUI
import PhotosUI

struct StickerCarousel: View {

    @State var viewModel: StickerViewModel
    @State private var sheetPresented: Bool = false

    var body: some View {
        ScrollView(.horizontal) {
            LazyHStack(spacing: 16) {
                ForEach($viewModel.selection) { selectedPhoto in
                    VStack {
                        if let processedPhoto = $viewModel.processedPhoto[selectedPhoto.id] {
                            GradientSticker(processedPhoto: processedPhoto)
                        } else if $viewModel.invalidPhotos.contains(selectedPhoto.id) {
                            InvalidStickerPlaceholder()
                        } else {
                            StickerPlaceholder()
                                .task {
                                    await viewModel.loadPhoto(selectedPhoto)
                                }
                        }
                    }
                    .containerRelativeFrame(.horizontal)
                }
            }
        }
    }
}
Here, we first pull the image according to the ID number of the selected image from the processedPhoto dictionary we stored in StickerViewModel.
If the image is empty, we load the image again asynchronously by giving the selected image to our loadPhoto() method in StickerViewModel.
If the image already exists, we give the rendered image as a parameter to the GradientSticker interface component we designed.

Here is the user interface we designed as a result of the image we uploaded. Isn’t it great?
Paralellism
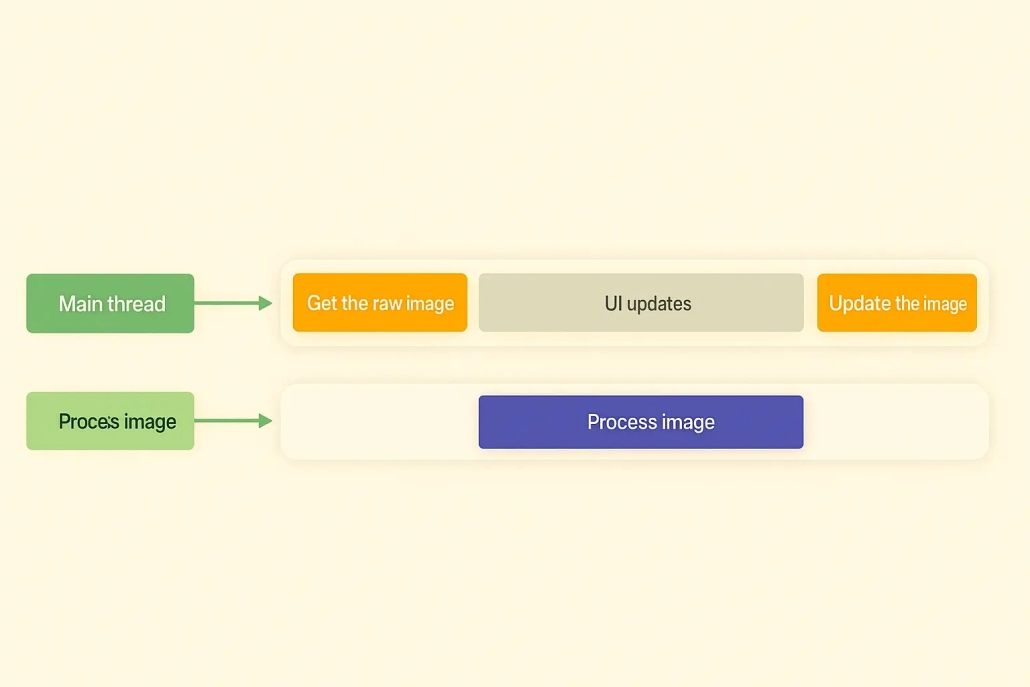
Concurrency and Paralellism are often confused because they are quite similar in flow. In fact, they both play a very important role in asynchronous programming. Let’s explain the difference between them in one sentence.
Concurrency: The simultaneous launching of multiple tasks in the same time period.
Paralellism: Multiple processes running on different cores in the same time period.
It is hard to understand Concurrency and Parallelism just by looking at the diagram above. Let’s make it a bit more concrete by doing a live example.
import SwiftUI
import PhotosUI
import Vision
import CoreImage.CIFilterBuiltins
nonisolated struct PhotoProcessor {
let colorExtractor = ColorExtractor()
@concurrent
func process(data: Data) async -> ProcessedPhoto? {
let sticker = extractSticker(from: data)
let colors = extractColors(from: data)
guard let sticker = sticker, let colors = colors else { return nil }
return ProcessedPhoto(sticker: sticker, colors: colors)
}
private func extractColors(from data: Data) -> PhotoColorScheme? {
return colorExtractor.extractColors(from: data)
}
private func extractSticker(from data: Data) -> Image? {
guard let image = CIImage(data: data) else { return nil }
let handler = VNImageRequestHandler(cgImage: image)
let request = VNGenerateForegroundInstanceMaskRequest()
do {
try handler.perform(request)
guard let result = request.results?.first else { return nil }
}
}
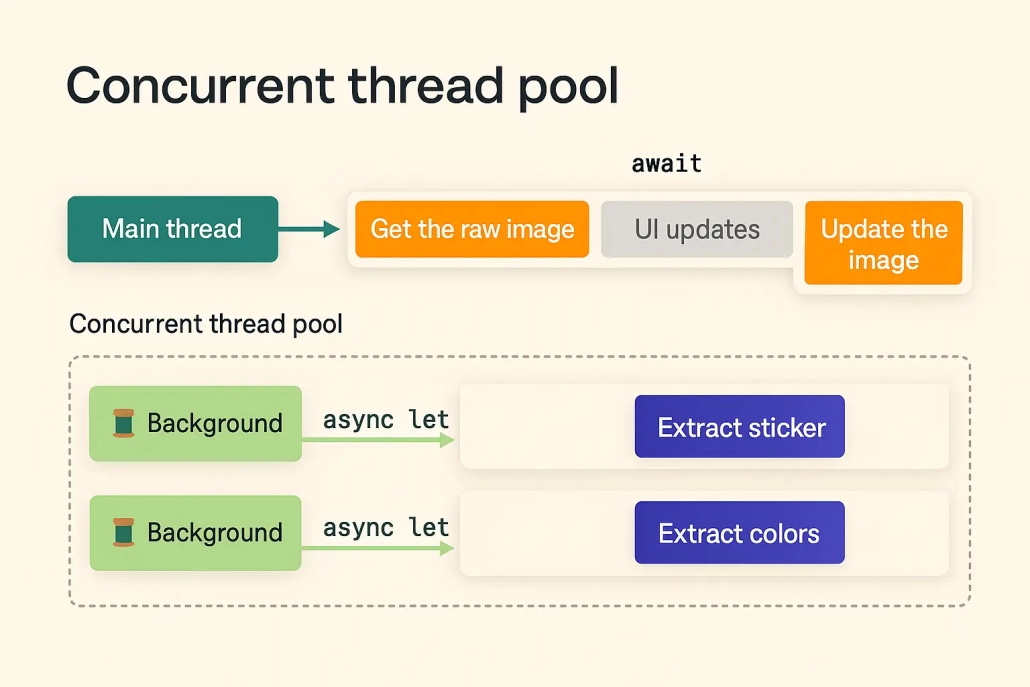
}First of all, we used the nonisolated keyword because our PhotoProcessor structure does not change any common state, nor is there any need for concurrent data security.
Then we use the concurrent keyword to specify that the process() method has concurrent processing. In this function we process our image and its color palette simultaneously.
Finally, we return these processed variables as parameters to a data model called ProcessedPhoto.
Everything looks great, but we try to process our image and the color palette of the image at the same time. We don’t think about the Data Race at all. Let’s talk about it in the next chapter and make this Swift code even better!
Data-Race Safety
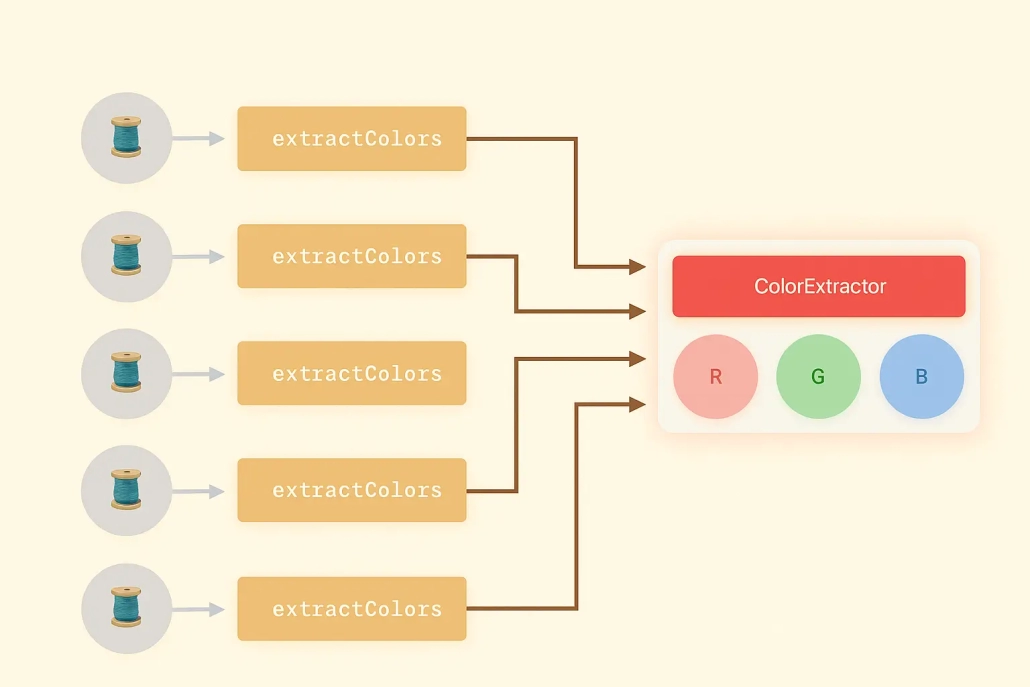
In our live example, it’s actually not difficult to solve this problem. In our example we are trying to process the image and the color palette. In order to ensure Data Race security, we need to process the image first and then the color palette. So how do we ensure Data Race security in this case?
I can hear you saying that we should use await. The await keyword is exactly what will solve our problem. Let’s apply it and see what changes!
// DATA RACE NON-SAFETY ❌
@concurrent
func process(data: Data) async -> ProcessedPhoto? {
    let sticker = extractSticker(from: data)
    let colors = extractColors(from: data)

    guard let sticker = sticker, let colors = colors else { return nil }

    return ProcessedPhoto(sticker: sticker, colors: colors)
}
Data Race is not secured in this function. I want to draw your attention to our sticker and colors variables. If we want to explain the flow here;
- sticker and colors variables are created and processed at the same time.
- is checked if it is empty and new sticker and colors variables are assigned.
- The variables created in the ProcessedPhoto data model are given as parameters and returned.
// DATA RACE SAFETY ✅
@concurrent
func process(data: Data) async -> ProcessedPhoto? {
    async let sticker = extractSticker(from: data)
    async let colors = extractColors(from: data)

    guard let sticker = await sticker, let colors = await colors else { return nil }

    return ProcessedPhoto(sticker: sticker, colors: colors)
}
This function ensures Data Race security. Let’s explain the flow here and see the difference.
- sticker and colors variables are created and processed asynchronously with the async keyword.
- wait for each other to complete while checking if they are empty. New sticker and colors variables are assigned.
- The variables created in the ProcessedPhoto data model are given as parameters and returned.
As you can see, in asynchronous programming, async and await keywords can sometimes save lives. Because Data Race Safety is very important and annoying at the same time!
Summary
In this article, we discussed Concurrency, which Apple introduced at WWDC25. This topic, which is the basis of asynchronous programming, has given a new impetus to iOS development. Mastering Concurrency makes you more expert compared to other developers. You have now mastered topics such as Concurrency, Paralellism, Data Race Safety. An exciting and enjoyable development process awaits developers!
For more information, you can visit Apple’s documentation.
F.A.Q.
What is Concurrency?
Concurrency allows multiple tasks to be executed simultaneously. In this way, the user interface in Swift does not freeze due to long operations such as network request, file reading, etc. and continues to work fluently.
When was Concurrency introduced?
Concurrency was introduced at WWDC21. But the ability to process image data was introduced at WWDC25.
When to use Concurrency?
If there are time-consuming flows in your project, you should definitely use it. For example;
- Network call
- File reading
If such operations are frequently present in your project, the user interface should not wait for these operations. Otherwise freezes may occur.

