Posts

Kotlin Data Objects

Data objects just landed in with the Kotlin version 1.7.20 as an experimental feature.

You can try them out using Kotlin compiler with version 1.7.20 and -language-version 1.8 compiler argument.

Before checking out what a “data object” is and how it can be helpful, let’s remember what is an object declaration in Kotlin.

Object Declarations

An object declaration in Kotlin is a convenient way to create a well-defined singleton. They don’t have any constructors, can hold data, and can inherit from classes.

So when we only need to define a special instance of a class with some preset configuration, we inherit from that class and create an object instead of creating another subclass explicitly.

Also, creating another subclass means we may create multiple instances out of that subclass and that’s not always necessary.

Objects are great but they don’t pretty print their names.

Let’s see an example:

A common scenario for using objects is to create zero-property sealed class implementations.

AsyncResult sealed class and their implementations

The code above shows an AsyncResult sealed class and their implementations.

Objects are great here since using a subclass with zero constructors would be an overkill. However, when it comes to print them, they don’t look good.

AsyncResult sealed class and their implementations

To overcome this, one might override the toString() function and return a name but this also brings some boilerplate with so little value.

AsyncResult sealed class and their implementations

Data Objects

Kotlin intends to solve this with data objects.

Data objects have toString() functions implemented like data classes so that you don’t need to override toString() in objects anymore.

Data Objects

Overall, data objects are just objects with better toString() implementations which could be useful in logging or debugging.

Their equals() and hashCode() methods are not different than a normal object and also you can’t run copy() or componentN() functions on data objects like you can do on data classes.

You can read this chapter in Kotlin 1.7.20 changelogs or watch this video to learn more on the topic.

Please note that the data object feature is still experimental at the time this post is being written and may be subject to change.

Transforming Kotlin Collections – Functions with Examples Header Image

Transforming Kotlin Collections – Functions with Examples

Knowing about the standard library functions in Kotlin saves a lot of time while working on complex data structures. Whether you are mapping the API response model into your business model or you are sorting, filtering, and manipulating data; knowing  these operation on Kotlin collections come really handy.

In this post, we are gonna go through some collection transformation operations that I use frequently.

Kotlin Collections – Transformation Operations

1. Mapping

Kotlin mapping

Mapping means to modify each item in a collection by applying a transformation lambda which results in the creation of another collection.

If you are working on lists of data that you need to transform from one model into another or if you want to convert the API response model into a domain layer model you should use mapping operations in Kotlin.

.map()

Kotlin Map function
Using the .map() function is the most common way to convert a collection of items into another. It applies the given transform lambda to each of the items of the receiver collection and yields them into a newly created list.

.mapIndexed()

Kotlin mapIndexed function

If you also need the index of each item when transforming them, you can use the .mapIndexed() function. It will feed the index of each item to the transform lambda so that you can utilize the order of the items.
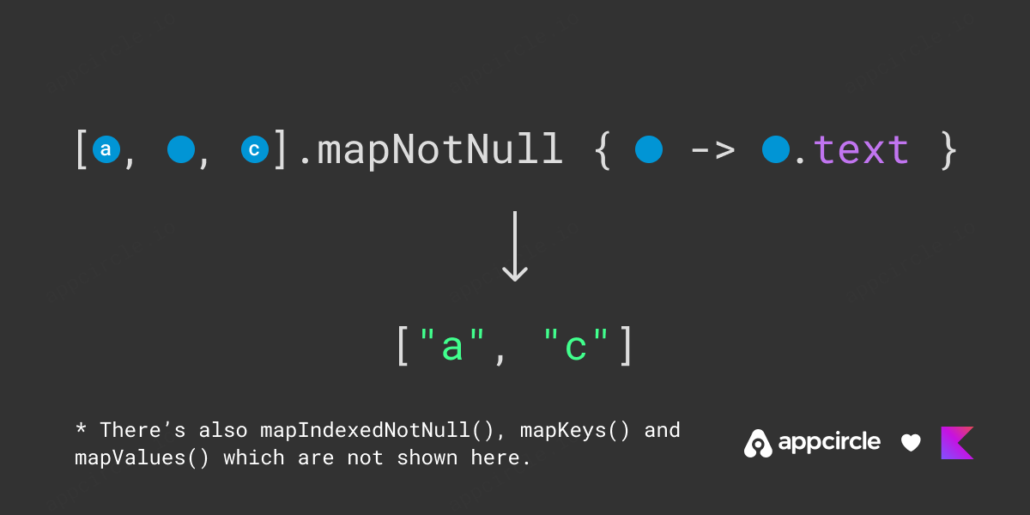
.mapNotNull()

Kotlin mapNotNull function

Another convenient mapping function is .mapNotNull(). You can use it if you want to filter out null items after the conversion.

For example, if you have a list of objects which may or may not have text property, you can use .mapNotNull() to get a list of texts without any nulls being in it.

Kotlin’s standard library also has .mapIndexedNotNull() method which combines .mapIndexed() and .mapNotNull().

Also you can find .mapKeys() and .mapValues() methods which are defined on Maps.

Please check out the official documentation if you need more information on the topic.

2. Zipping

Kotlin zipping

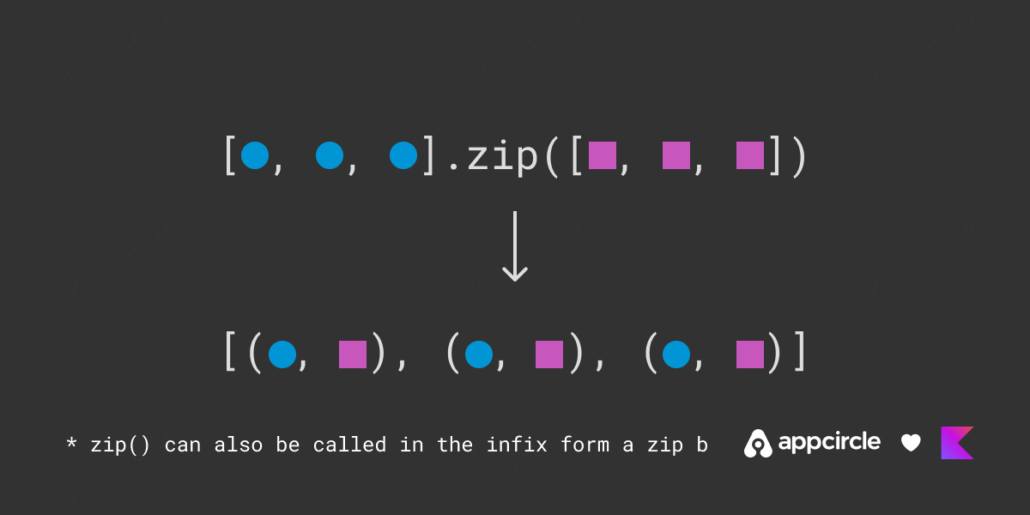
When you have two lists of the same size and you want to merge each item from the first list with the corresponding item coming from the second list you want zipping.

Kotlin standard library has convenient functions to zip and unzip collections including Lists, Arrays, and Sequences.

Let’s take a look at what we have:

.zip()

Kotlin zip function

You can use .zip() without any transformation to create a list of pairs. The pairs have their first item from the receiver list and the second from the argument. If you want to combine two different data sources into one and if the sources has the same number of items, the function .zip() is really useful.

.zip() with transform lambda

Kotlin zip with transform lambda

If you don’t need pairs but you want to define your own zipping logic, good news: .zip() can also take a transform lambda as an argument. So you don’t need to chain a .zip() command with a .map(). Instead, pass a lambda and combine two items coming from two data sources in a way you would prefer.
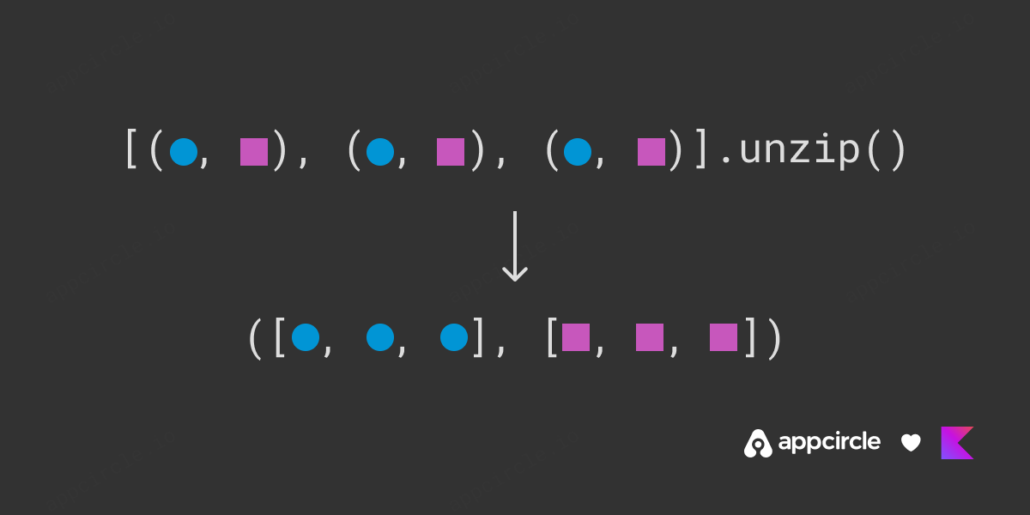
.unzip()

Kotlin unzip function

Another great function in Kotlin is the .unzip(). The name gives it all away: it does the opposite of .zip(). If you have a list of pairs and want to create two lists that contain the firsts and seconds of each item, then just .unzip() it!

If you want to see some examples please check out the official documentation.

Now let’s check out another group of transformation operations:

3. Association

kotlin association

Association is when you want to traverse a List and convert it into a Map by associating each item with one of its properties. Understanding association operations is easier to show than tell, so let’s take a look at what sort of functions we have in the standard library:

.associateWith()

Kotlin associateWith function

The .associateWith() function, structures the items of the List as keys of a Map. The values for each key are computed by running the given lambda on the item. Please note that maps cannot have duplicate keys, so if the receiver collection has repetitive items, only the last one will remain in the map.

.associateBy()

Kotlin associateBy function

Kotlin also has .associateBy(), which functions almost the same. The difference is items of the receiver collections are not used as keys but values.

That means if the lambda returns the same values for different items, only the last one will be present in the resulting map.

.associate()

associate function

The last associating function in the standard library is .associate().

Using this function, you can define the logic of building the map. You need to pass a lambda that returns Pairs and a Map will be built for you using these Pairs.

Please note that this function has some performance implications since it generates Pairs as an intermediate step.

If you want to learn more on association you can take a look at the official documentation.

Now, let’s see how we can flatten collections:

4. Flattening

kotlin flattening

Flattening in general is removing the nestedness in a collection. Consider you are given a list of lists. If you want to remove all child lists and get their elements into one single-level list, you need to flatten that list.

Let’s begin with:

.flatten()

flatten function

This is the most simple way of flattening a list of lists into just list. Just call .flatten() on the receiver collection to have a flat list.

.flatMap()

flatMap function example

Or, if you want to apply some kind of transformation whilst flattening, you can use .flatMap().

Please note that .flatMap() is just a shorter form of .map().flatten() chain.

flatMap function example

If you want to see some code examples, you may check the official documentation on flattening.

Now let’s check out last chapter:

5. String Representation

Kotlin string representation

If you are generating user-visible text out of Kotlin collections or trying to log an internal state you will need to represent collections as strings. I really liked when I learned that Kotlin standard library has a function just for this reason:
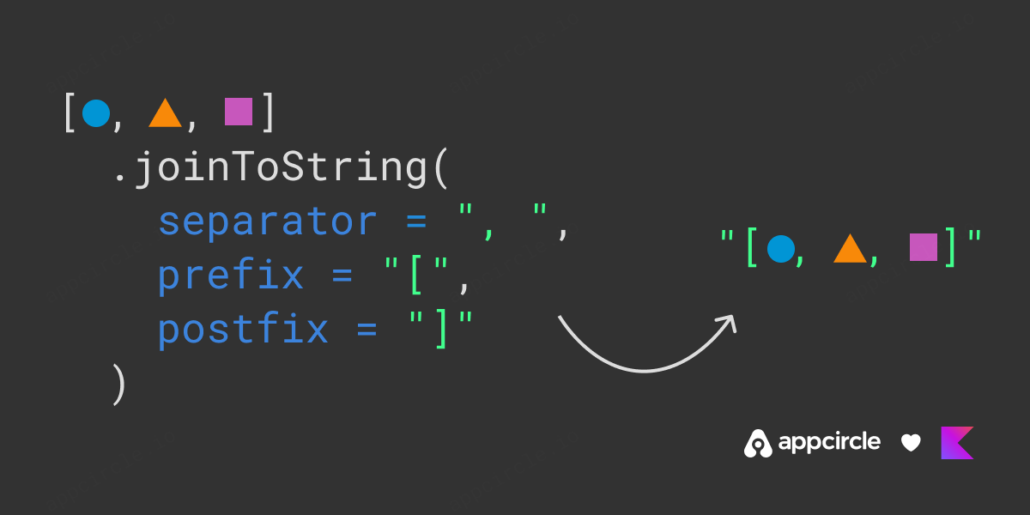
.joinToString()

joinToString function example

If don’t pass any parameters to .joinToString(), string representations of each items will be concatenated in a string and separated by commas with spaces by default.

Customizing the separator, prefix and postfix strings

joinToString function example

However, if you need to change the separator strings or add some more useful information to the start or to the end you can pass some arguments for separator, prefix and postfix parameters.

The limit and truncated arguments

limit and truncated arguments

.joinToString() also support limiting and truncating the list. If you have a long list and don’t want to print everything and make a mess, you can limit how many elements you want in the resulting string and what string to use in the place of an ellipsis.

Finally, it also supports passing a transform lambda if you also want to define how each item will be converted into a string.

You can study the official Kotlin documentation to learn more about the topic.

Left Icon

Empower Your Android Projects Now!

Right Icon Meet Our Experts

That was it! Now you have learned how to transform Kotlin collections using a handful of convenience functions.

If you like the article please share in your social media and if you want to learn more on Kotlin’s standard library functions, let us know!

FAQs

1. What are collections in Kotlin used for?

Kotlin collections are used to manage and manipulate groups of objects or data efficiently. They allow developers to store multiple values of the same type in a structured way and offer powerful tools for adding, removing, sorting, filtering, and transforming data.


2. What is the difference between array and collection in Kotlin?

In Kotlin, an array is a fixed-size container that holds elements of the same type, while collections are more flexible and feature-rich. Collections like List, Set, and Map offer advanced capabilities such as immutability, transformation, and function chaining, making them well-suited for handling complex data in modern Kotlin development.


3. What are the three different types of collections?

Kotlin provides three main types of collections:

  • List: An ordered collection that allows duplicate elements.

  • Set: An unordered collection that only includes unique elements.

  • Map: A collection of key-value pairs for associating and retrieving data.

Each of these collection types comes in both mutable and immutable forms, giving you precise control over how data is modified or protected throughout your Kotlin projects.

Jetpack Compose Side Effects – With Examples

Jetpack Compose Side Effects – With Examples

Recompositions and states are the main parts of Jetpack Compose. Here’s how to manage states without getting affected by recompositions. We’ll use Jetpack Compose Side Effects API’s and inspect each method one by one.

Why manage states outside composables?

In our Jetpack Compose State Management article we explained:

  1. What is state
  2. Manage state in Android
  3. Manage state in Compose

However, states can trigger in every recomposition and this might cause unexpected application behaviour such as:

  • Showing a snackbar more than once
  • Sending heavy load of network requests

Let’s give an example scenario:

In a login screen composable function implementation, a snackbar message is showing if network state is error and login request is making when boolean state is true.

If boolean state triggers true and request returns error application stucks in making a request and showing a snackbar.

To avoid such situations, we must manage states in Jetpack Compose’s side-effect APIs.

Jetpack Compose Side Effects APIs

As Developers Android states, Composables should be side-effect free(State shouldn’t get affected directly in composable function scope). Side-effect APIs are comes to our aid just right here. Here are the side effects with example usages:

Left Icon

Empower Your Android Projects Now!

Right Icon Meet Our Experts

LaunchedEffect:

Running suspend functions in composable lifecycle scope.
LaunchedEffect is one of the most used side effects. As the name suggests, it launches when composition starts for the first time and can call suspend functions. Moreover, we can relaunch it with giving a key parameter(It relaunches when given key changes).

Example:

LaunchedEffect(networkState) { //Relaunches if network state changes
  if(networkState.Success){
      //Navigate to Screen
  }
  if(networkState.Failure){
      //Show error message
  }
}

In the code above, composable screen only navigates or shows a message when networkState changes. Recompositions or changes on other states doesn’t affect it.

rememberCoroutineScope:

Coroutine scope to run functions outside of compose scope.
Since LaunchedEffect requires a composable scope to run, it can’t be used in cases such as onClick() of a button(onClick lambda function goes out of compose scope and doesn’t have coroutine scope). That is where rememberCoroutineScope comes into play. rememberCoroutineScope creates a coroutine scope to call our actions outside of compose. Moreover, this scope will be bound to composable’s lifecycle so that when composition leaves the screen(Navigating, app termination and etc.) scope will be canceled automatically.

Example:

 // Creates a CoroutineScope bound to the screen's lifecycle
    val scope = rememberCoroutineScope()

    Scaffold(scaffoldState = scaffoldState) {
        Column {
            /* ... */
            Button(
                onClick = {
                    // Create a new coroutine in the event handler 
                    scope.launch {
                    // getData is a suspend function and being called in coroutine
                        repository.getData()
                    }
                }
            ) {
                Text("Get data")
            }
        }
    }

In the code above, when “Get data” button is clicked repository’s getData() suspend function is called in a coroutine and since this coroutine is compose’s lifecycle aware, we make sure that coroutine won’t continue to run if screen’s lifecycle ends.

DisposableEffect:

Like LaunchedEffect but works while leaving the composition.
While working with fragments, onDestroy life cycle event was where we do our cleanup before leaving the fragment. In Compose we use DisposableEffect scope for the same purpose. DisposableEffect triggers while leaving the composition or if the given key is changes (like in LaunchedEffect).

Example:

DisposableEffect(key1 = startStop) {
      //Sending start event when screen starts or key changes
      firebaseEventSender.sendStartEvent()
      onDispose {
      //Sending stop event before leaving the screen or before starting
       the new effect due to key changes
        firebaseEventSender.sendStartEvent()
      }
}

SideEffect:

Running non-suspend functions in every recomposition.
SideEffect is basically, a kind of LaunchedEffect. It launches in every recomposition and saves us from creating a state for LaunchedEffect but it can’t run suspend functions directly.

Example:

var timer by remember { mutableStateOf(0) }

Box(modifier = Modifier.fillMaxSize(), 
  contentAlignment = Alignment.Center) {
  Text("Time $timer")
}

SideEffect {
  Thread.sleep(1000)
  timer++
}

In the code above, timer state is changing in every second. Since it’s a state recomposition and SideEffect triggers in each change. However, we couldn’t use any suspend delay functions such as delay() because SideEffect can’t run suspend functions.

produceState:

LaunchedEffect with its own key.
LaunchedEffect runs when the given key changes. So a key must be defined and has to change in composition. However, produceState comes with key, so it can run by itself.

Example:

val timer by produceState(initialValue = 0) {
  delay(1000)
  repository.sendSignal()
  value++
}

In the code above produceState sending a signal in every second without causing a recomposition to screen.

Conclusion

Firstly, we learned that side-effect APIs are here to help us connect our noncomposition aware code with our composable screens. Secondly, there are different type of side-effects to fit our cases. Finally, side-effects are not mandatory. For example, we can use viewmodels(init function) to have the same case that we have with LaunchedEffect.

Where to Go From Here

  1. Jetpack Compose: State Management
  2. Side-effects in compose

Kotlin Coroutines: A Detailed Introduction

Kotlin Coroutines is an async task library for Kotlin language. It was announced during KotlinConf 2017. Coroutines make asynchronous code easier to write and read.

It aims to prevent blockages caused by running tasks. This applies mostly to networking code where a task takes multiple seconds at least to complete. kotlinx.coroutines 1.0 is the library you need to import to use Coroutines. You can only use it within Kotlin projects, so if you’re developing your apps with Java, you can’t use it.

Kotlin Coroutines Features

Kotlin Coroutines Logo

Coroutines has 4 main features:

    • Lightweight: Multiple Coroutines can run on a single thread. Since a coroutine doesn’t block the thread it’s running on, you can run multiple Asynchronous tasks, which helps you save memory.
  • Built-In Cancellation Support: You can easily cancel a running coroutine.
  • Fewer Memory Leaks: When you cancel the scope of a coroutine, all coroutines under the same scope gets cancelled.
  • Jetpack Integration: Lots of Jetpack libraries support the coroutines model.

How to Integrate Coroutines in an Android App?

To start using Coroutines, we open an Android project and add these dependencies inside, build.gradle(app module) file:

implementation 'org.jetbrains.kotlinx:kotlinx-coroutines-core:1.6.4'
implementation 'org.jetbrains.kotlinx:kotlinx-coroutines-android:1.6.4'

Note: 1.6.4 was the latest version as of writing.

Creating a Coroutine

There are 2 functions we need to know before creating a coroutine:

  • launch: This is the builder function that doesn’t block its thread. It has to be inside a coroutine scope to work properly.
  • runBlocking: Lets you start a new coroutine. It blocks the main thread until the task is done.
        println("Run Blocking Start")
        runBlocking { 
            launch {
                delay(2000)
                println("Run Blocking Continue")
            }
        }
        println("Run Blocking End")

The result will be:

Run Blocking-Coroutine

Run Blocking-Coroutine

First the Start text is printed, which is before our runBlocking function. Then we block the main thread 2 seconds, print the text inside our function, then print the end text.

This is not what coroutines are useful for, and blocking main thread is not a good practice. So let’s add a scope to our launch function and remove runBlocking:

println("GlobalScope start")
GlobalScope.launch {
       delay(2000)
       println("GlobalScope continue")
}
println("GlobalScope end")

Now the our launch block will run in a GlobalScope. Main thread won’t be blocked and the result of the block will not be waited, making the launch block run asynchronously in a background thread.

GlobalScope-Coroutine

GlobalScope-Coroutine

The result is different now. we first print the start text, then our launch function is called, but since it has a delay for 2 seconds, our code prints the end text before the continue text.

GlobalScope is nice, but are there any other scope types?

CoroutineScope

CoroutineScopes are similar to GlobalScope. They run tasks on a background thread, but with CoroutineScopes, you can specify which thread the task will run on.

         println("CoroutineScope Start")
         CoroutineScope(Dispatchers.Default).launch {
             delay(2000)
             println("CoroutineScope Continue")
         }
         println("CoroutineScope End")
CoroutineScope-Coroutine

CoroutineScope-Coroutine

We get a result same as before. But this time we passed a Dispatchers.Default context inside our scope.

What are Coroutine Dispatchers?

Dispatchers are defining which thread a Coroutine will work on. There are 4 types of dispatchers:

  • Dispatchers.Default : Used for CPU operations. Standard coroutine functions such as launch , async use this dispatcher by default.
  • Dispatchers.IO : For use of Network and Disk based operations. Enterprise apps use this a lot.
  • Dispatchers.Main : Works on the Main Thread. All UI work is done here.
  • Dispatchers.Unconfined : Mostly uses Main Thread but its use is discouraged since it’s thread choice may change based on scope.

Here’s an example code that will print the thread names for different dispatchers:

GlobalScope.launch {
  
             launch(Dispatchers.Default) {
                 println("Default Thread: ${Thread.currentThread().name}")
             }
             
             launch(Dispatchers.IO) {
                 println("IO Thread: ${Thread.currentThread().name}")
             }
             
             launch(Dispatchers.Main) {
                 println("Main Thread: ${Thread.currentThread().name}")
             }

             launch(Dispatchers.Unconfined) {
                 println("Unconfined Thread: ${Thread.currentThread().name}")
             }
   }

The result is:

Dispatchers-Coroutine

Dispatchers-Coroutine

Nested Coroutines

You can nest Coroutines.

 runBlocking {

            launch {
                delay(5000)
                println("Run Blocking")
            }

            coroutineScope {
                launch {
                    delay(2000)
                    println("Coroutine Scope")
                }
            }
        }

Because of the delays, the second launch function is run before the first, even though they are inside a runBlocking script.

Nested Coroutines

Nested Coroutines

Suspend Function

You can cancel running tasks with the suspend function, without blocking its thread. Also, you can restart or pause Suspend functions. Don’t forget to use these functions inside coroutines.

Let’s define 2 different functions and call them from main():

 private suspend fun suspendFunction() {
        coroutineScope {
            delay(4000)
            println("Suspend Function")
            normalFunction()
        }
   }

 private fun normalFunction() {
        println("Hi, I'm a normal function!")
}
  • You have to mark functions with suspend to use coroutineScope inside.
  • You can use normal functions inside suspend functions, but not vice versa.
        runBlocking {
            delay(2000)
            println("Run Blocking")
            suspendFunction()
        }

We can easily callsuspendFunction() inside runBlocking and the result will be:

Suspend Function-Coroutines

Suspend Function-Coroutines

Coroutines Async

Coroutines Async is used for Asynchronous operations that return a value. The difference between it and launch is, it returns Deffered instead of a Job. To run it, we need to use await() function.

  private suspend fun downloadUrl(): String {
        delay(3000)
        val url = "https://www.brooklyn99.com"
        println("Url was downloaded")
        return url
    }

    private suspend fun downloadName(): String {
        delay(5000)
        val name = "Brooklyn Nine-Nine"
        println("Name was downloaded")
        return name
    }

Our example defines 2 suspend functions, which mock a network operation. Then we’ll call both inside runBlocking using the await() command and assign their return values to 2 separate constants.

        var url = ""
        var name = ""

        runBlocking {
            val downloadedUrl = async { downloadUrl() }
            val downloadedDate = async { downloadName() }
            url = downloadedUrl.await()
            name = downloadedDate.await()
            println("$url -> $name")
        }

Coroutines Job

launch functions return a Job value. Coroutines Job is for controlling the lifecycle of a coroutine. You can nest jobs. Defining completion blocks are also easy, just use  invokeOnCompletion:

runBlocking {
              val firstJob = launch {
                  delay(2000)
                  println("First Job")
                  val secondJob = launch {
                      println("Second Job")
                  }
              }
              firstJob.invokeOnCompletion {
                  println("Job finished")
              }
          }

The result will be:

Nested Jobs-Coroutines

Nested Jobs-Coroutines

If you call firstJob.cancel(), the job gets cancelled and invokeOnCompletion block will be called.

withContext

Coroutines run inside a CoroutineContext object. They are used to switch between different dispatchers. They let you run operations within the same thread, without changing the scope.

runBlocking {
     launch(Dispatchers.Default) {
          println("Context: $coroutineContext")
          withContext(Dispatchers.IO) {
              println("Context: $coroutineContext")
          }
     }
}

We can see which dispatcher we use:

withContext-Coroutines

withContext-Coroutines

You can download the samples from the repo below: 👇🏻

https://github.com/halilozel1903/Coroutines101

References 📚