
SwiftUI NavigationStack: How to Use the New Navigation View
SwiftUI has a new NavigationStack view, introduced by Apple at WWDC 2022. It will be available in iOS 16. It allows developers to manage navigation processes more easily by closing the deficiencies of the previously used NavigationView. Apple defines NavigationStack as:
Use a navigation stack to present a stack of views over a root view. People can add views to the top of the stack by clicking or tapping a NavigationLink, and remove views using built-in, platform-appropriate controls, like a back button or a swipe gesture. The stack always displays the most recently added view that hasn’t been removed and doesn’t allow the root view to be removed.
Before starting the details, I would like to remind you that you must use Xcode 14 and above to use all the features of NavigationStack. You can access Xcode 14 from this link.
Let’s start with an example.
A Simple SwiftUI NavigationStack Usage
NavigationStack {
            NavigationLink("Navigate", value: "AppCircle")
                .navigationDestination(for: String.self) { value in
                    Text("Second screen")
                    Text("Value is \(value)")
            }
}
We gave a string to our destination screen. Let’s convert it to a model object. The point here is that whatever the type of value we give in navigationLink is, we need to write that value type in the destination part.
Let’s improve our application by creating a model and add a method to generate some placeholder data.
struct Appcircle: Identifiable, Hashable {
let id = UUID()
let brand : String
let price : Int
let image : String
}
extension Appcircle {
static var dummyData: [Appcircle] {
return [
.init(brand: "iPhone 13", price: 799, image: "iphone13"),
.init(brand: "iPhone 4", price: 399, image: "iphone4"),
.init(brand: "iPhone 8", price: 599, image: "iphone8")
]
}
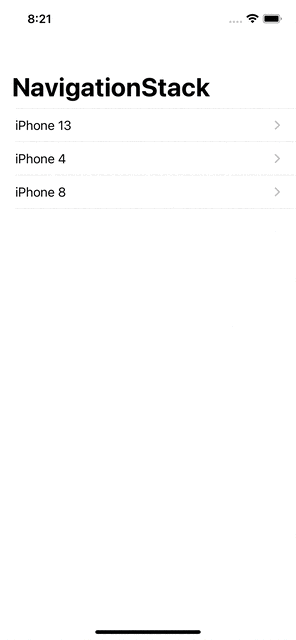
}The image values here correspond to image names I’ve imported to my project. Now let’s display these values in our interface:
NavigationStack {
            List(Appcircle.dummyData) { item in
                NavigationLink(item.brand, value: item)
            }
                .listStyle(.plain)
                .navigationDestination(for: Appcircle.self) { item in
                Text(item.brand)
                    .font(.largeTitle)
                    .bold()
                Text("\(item.price)$")
                Image(item.image)
                    .resizable()
                    .scaledToFit()
                    .frame(width: 300)
            }
                .navigationTitle("NavigationStack")
        }
This is the most basic form of using NavigationStack. Let’s take a look at how to manage programmatic navigation via NavigationPath.
NavigationStack can take a parameter named path. (NavigationStack(path: $path))
Let’s create a path and give it as a parameter to NavigationStack. Then, we’ll add a button to our detail screen so that it can reach different screens randomly. We’ll also print the path.count value on the screen to follow its depth easier.
After all these changes, our view code will look like:
struct ContentView: View {
    @State private var path = [Appcircle]()
    var body: some View {
        VStack {
            NavigationStack(path: $path) {
                List(Appcircle.dummyData) { item in
                    NavigationLink(item.brand, value: item)
                }
                    .listStyle(.plain)
                    .navigationDestination(for: Appcircle.self) { item in
                    Text(item.brand)
                        .font(.largeTitle)
                        .bold()
                    Text("\(item.price)$")
                    Image(item.image)
                        .resizable()
                        .scaledToFit()
                        .frame(width: 300)
                    Button("Navigate another page") {
                        path.append(Appcircle.dummyData.randomElement()!)
                    }
                }
                    .navigationTitle("NavigationStack")
            }
            Text("Screen count: \(path.count)")
                .bold()
        }
    }
}
At the moment, we can easily manage our navigation operations programmatically.
Let’s add another button that will return users to the root view. We can give path.removeAll() or path = .init() as an action to the button. Alternatively we can use path.removeLast(2) to go back a certain number of times on the path. This is the final version of our application!
NavigationPath is very effective on pop and push on different data types from the stack as well.

PS: NavigationView is deprecated with iOS 16. With this change, you can directly replace existing NavigationViews with NavigationStack. Still, don’t forget to review the init values. The NavigationLink(isActive:destination:label:) we currently use is now deprecated.
Conclusion
Building navigations in our SwiftUI apps was extremely easy with NavigationView. Now with SwiftUI 4.0’s NavigationStack we get more granular controls and the ability to navigate directly to a view that’s deeper in the hierarchy.
To to read our other posts about WWDC22, I highly recommend the Developing with Live Activities API article here.