
WWDC25: Bring Advanced speech-to-text capabilities to your app with SpeechAnalyzer
In this article, we will go on a pleasant journey on how to convert an audio file given as input data to text data, which was introduced at WWDC25. This was already possible with Apple’s Speech library. Now with SpeechAnalyzer, which was introduced at WWDC25, this is much more enjoyable!
SpeechAnalyzer API
While SFSpeechRecognizer has been used until now, as of WWDC25, the new SpeechAnalyzer introduced by Apple will be widely used by developers. So why SpeechAnalyzer will start to be popular now, what kind of advantage it has, let’s look at it together!
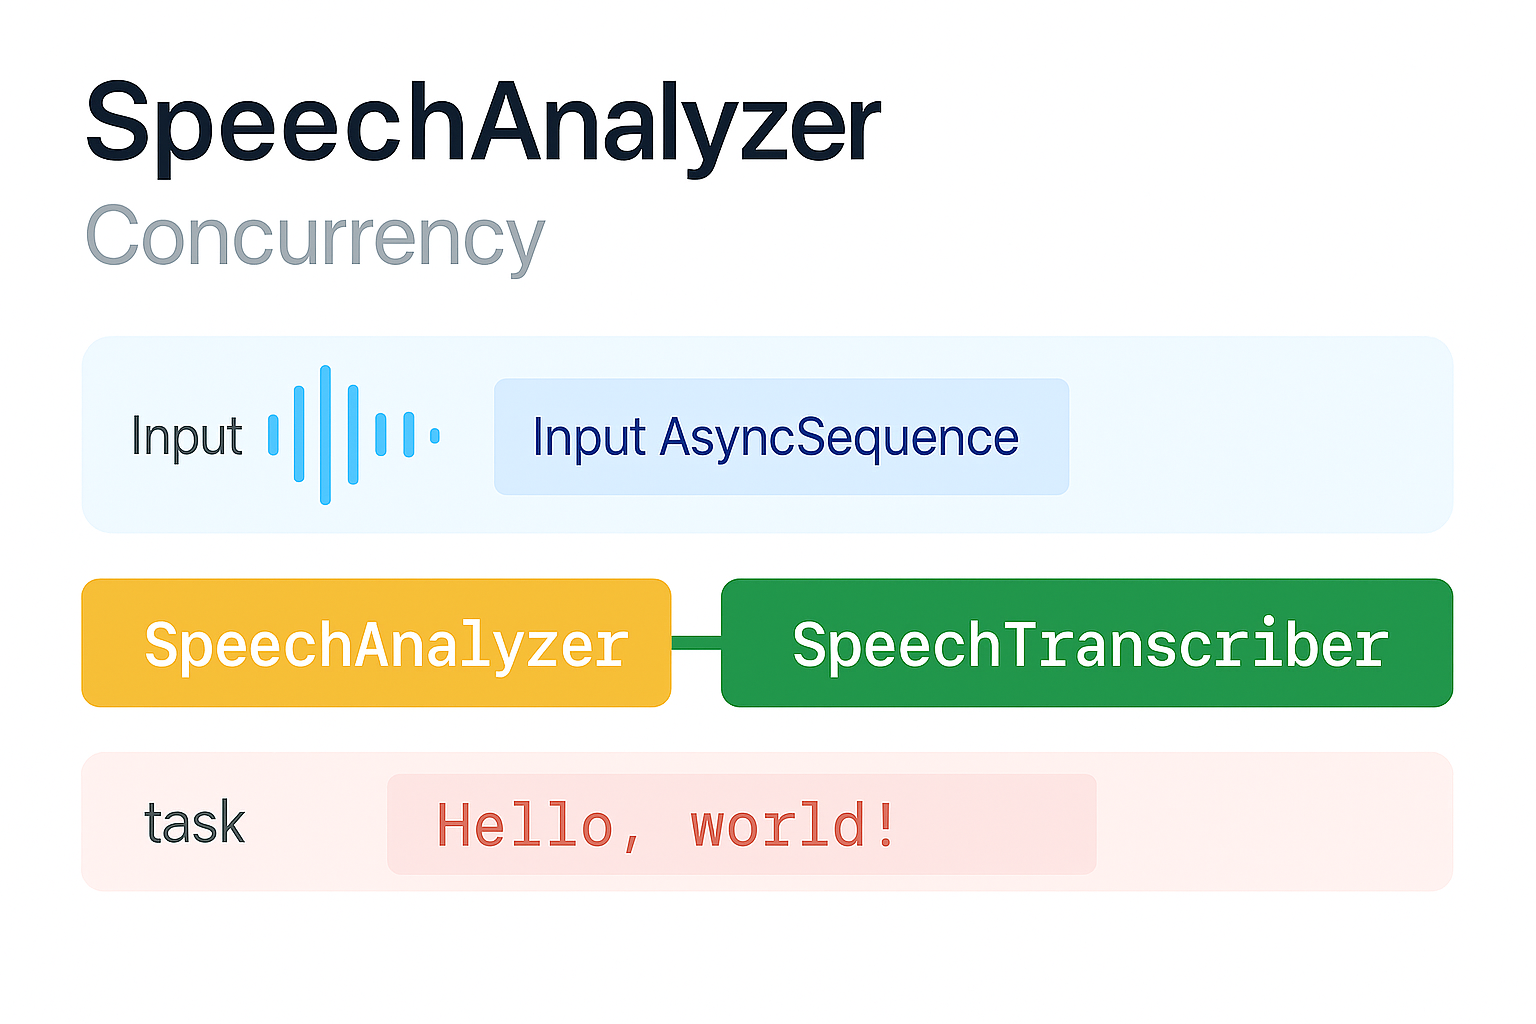
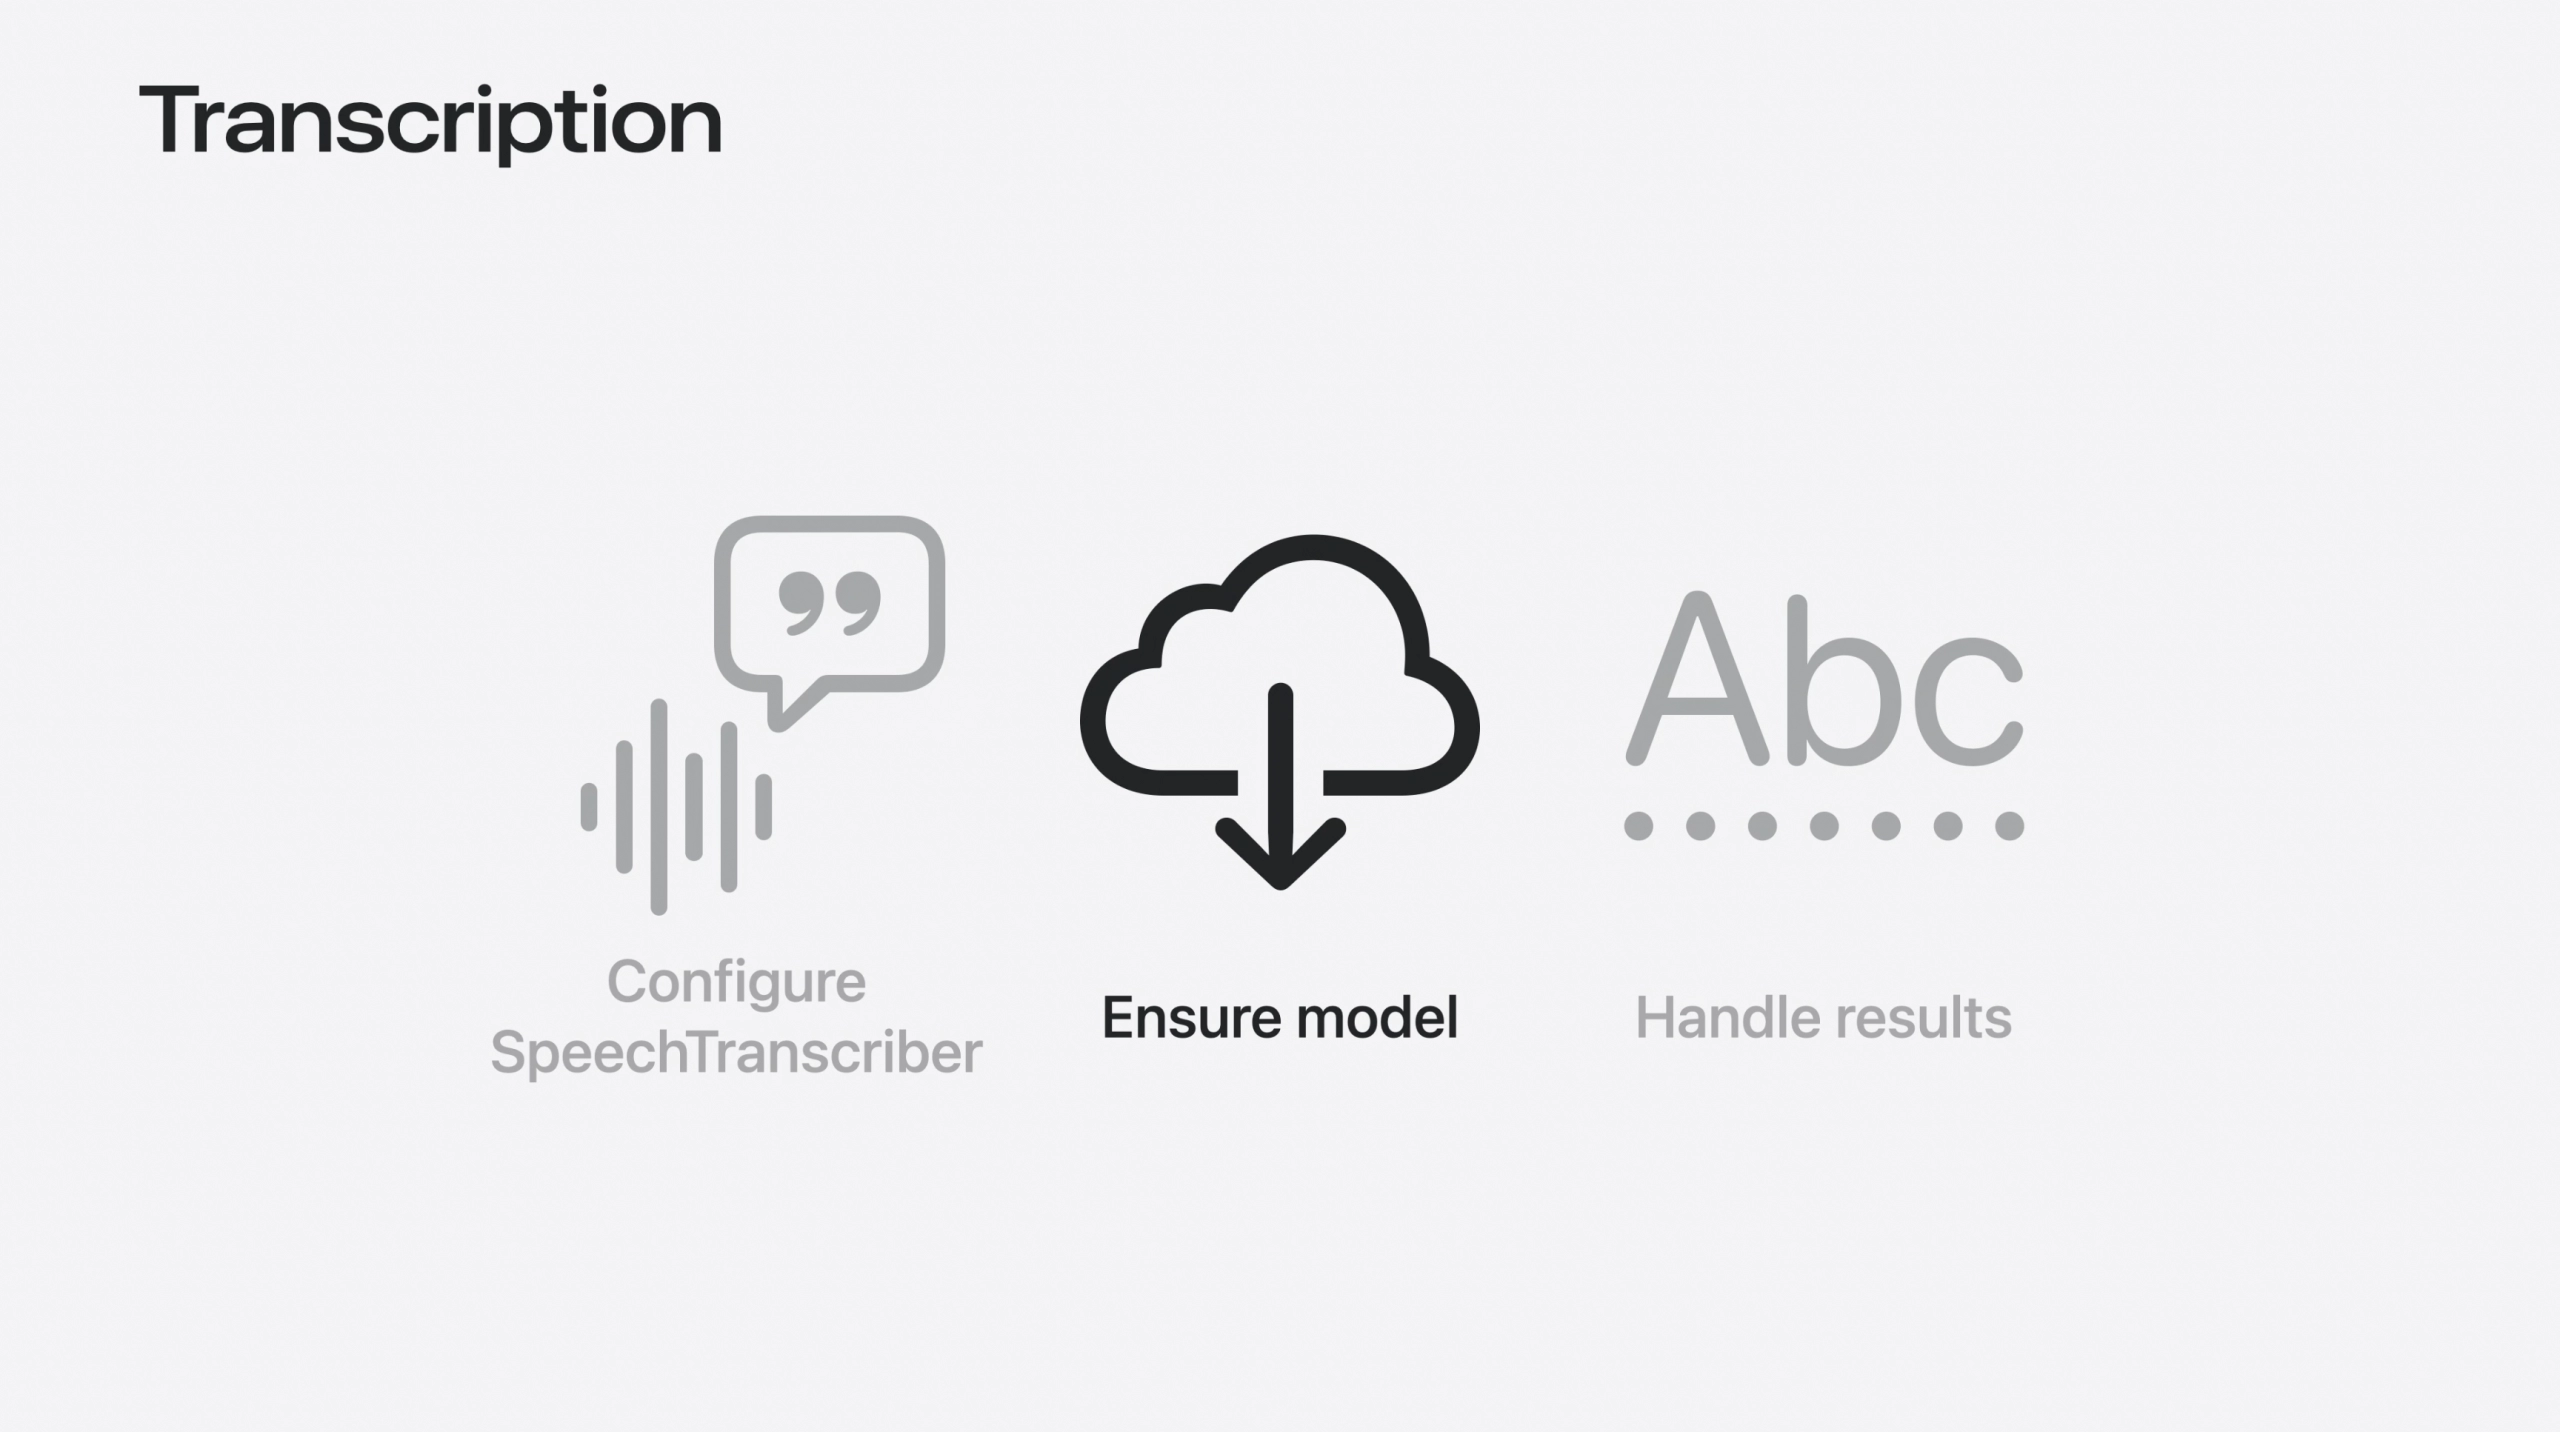
First of all, I would like to draw your attention to the diagram above. As you can see, the process of a voice becoming a text works like this;
- The audio file is given as input data.
- The audio file is analyzed and transcribed with SpeechTranscriber.
- Finally, the text data is sent to the UI and the process is finished.
Now let’s see how we can make this diagram with Swift step by step.
import Foundation
import AVFAudio
import Speech
First of all, let’s import our Foundation, AVFAudio, Speech libraries in our project.
guard let audioFile = Bundle.main.url(forResource: "exampleAudio", withExtension: "wav") else {
    fatalError("Cannot find example audio file!")
}

let locale = Locale(identifier: "en-EN")
Then let’s read our sample audio file that we uploaded to our project. Since we will process and convert this audio file to text later, we need to keep the audio file in a variable. To specify in which language we will process this audio file, we define it using Locale. We will then use it as a parameter when creating a SpeechTranscriber object.
let transcriber = SpeechTranscriber(locale: locale, preset: .offlineTranscription)

async let transcriptionFuture = try transcriber.results.reduce("") { partialString, partialResult in
    partialString + partialResult.text + " "
}

let analyzer = SpeechAnalyzer(modules: [transcriber])
We give 2 parameters to the SpeechTranscriber class, locale and preset;
- Locale: The parameter in which language we will process the audio.
- preset: The parameter where we preset that this model will also work offline.
Then we add each sentence from the transcriber word by word to our transcriptionFuture variable. There are 2 keywords that draw our attention in this flow. async and try
The reason we use async is that it allows us to do this asynchronously. The reason we use try is that we don’t know that there will be continuous words coming from the transcriber, so we prevent a possible crash with the try keyword. That would be very sad!
Finally, we give the transcriber module to analyze our variable called analyzer.
if let lastSample = try await analyzer.analyzeSequence(from: AVAudioFile(forReading: audioFile)) {
    try await analyzer.finalizeAndFinish(through: lastSample)
} else {
    await analyzer.cancelAndFinishNow()
}

let resultText = try await transcriptionFuture
print("RESULT TEXT: \(resultText)")
Here we assign the audio file we uploaded to our project to our variable named lastSample with the if let structure. If there is sound, the lastSample variable is assigned. If there is no sound, the analysis is stopped.
Finally, we assign the result of the audio processing to the resultText variable and print it to the console.
SpeechTranscriber Model
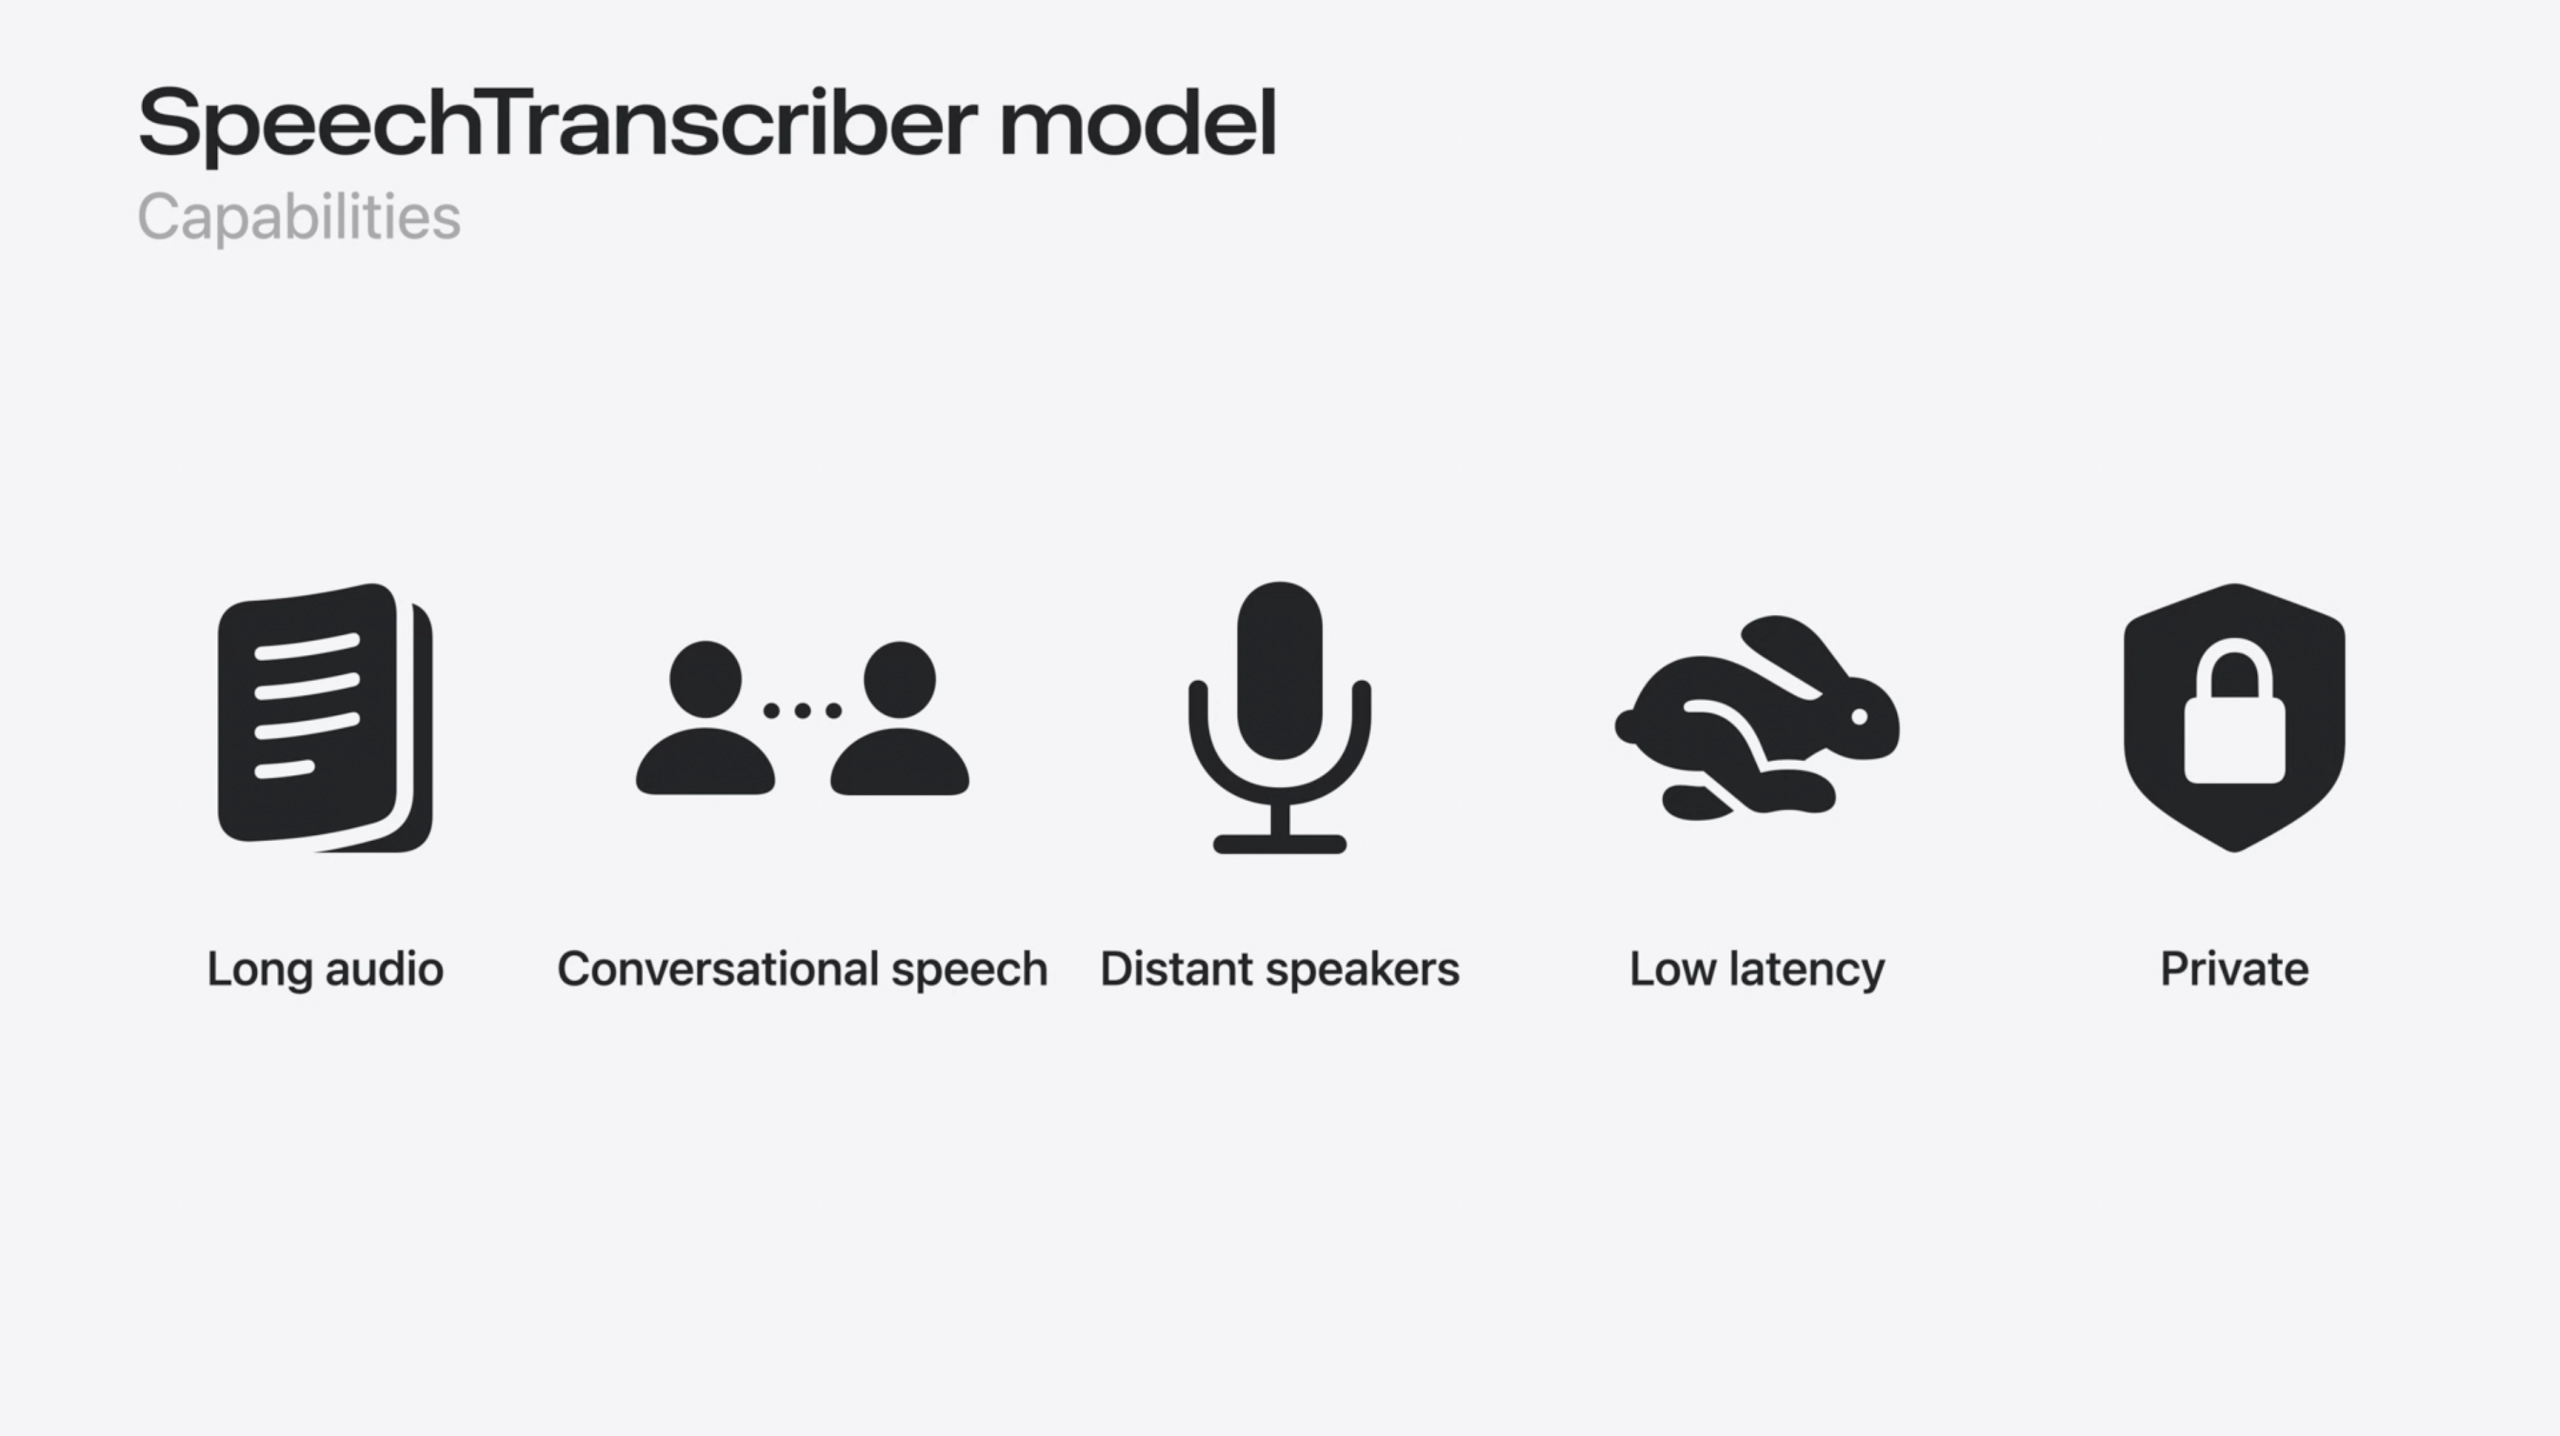
SpeechTranscriber, a new long-form, low-latency, long-distance speech-to-text transcription tool introduced at WWDC25, has received great acclaim. Let’s take a look at how we can use such a powerful framework in our projects.
If you are as curious as I am about how to build this structure, let’s get started!
func setUpTranscriber() async throws {
    transcriber = SpeechTranscriber(
        locale: Locale.current,
        transcriptionOptions: [],
        reportingOptions: [.volatileResults],
        attributeOptions: [.audioTimeRange]
    )
}
We use the async keyword to make our setUpTranscriber() function work asynchronously. The reason we use the throws keyword is that the model may not always load correctly. So our function should be able to throw an error when necessary.
Now that we have created our Transcriber object, let’s continue.
    guard let transcriber else {
        return throw TranscriptionError.failedToSetupRecognitionStream
    }

    analyzer = SpeechAnalyzer(modules: [transcriber])

    self.analyzerFormat = await SpeechAnalyzer.bestAvailableAudioFormat(compatibleWith: [transcriber])
We check whether our transcriber object exists. If such an object does not exist, we throw the failedToSetupRecognitionStream error from our enum structure called TranscriptionError. If we have such an object, we assign it to our analyzer variable by giving parameters to the SpeechAnalyzer class.
Then we use the bestAvailableAudioFormat(compatibleWidth:) method of the SpeechAnalyzer class to find the best audio format supported by this audio file and assign it to our analyzerFormat variable.
    do {
        try await ensureModel(transcriber: transcriber, locale: Locale.current)
    } catch let error as TranscriptionError {
        print(error)
        return
    }
Our ensureModel(transcriber:, locale:) method checks if our SpeechTranscriber model is installed on the device. Since we cannot be sure that the model will always be installed, we prevent a possible crash by doing this flow in do-catch blocks.
    (inputSequence, inputBuilder) = AsyncStream<AnalyzerInput>.makeStream()

    guard let inputSequence else { return }

    try await analyzer?.start(inputSequence: inputSequence)
Since AsyncStream<AnalyzerInput>.makeStream() will return the result as 2 different parameters, we capture it in a tuple. inputSequence is the parameter we will give to our analysis variable. inputBuilder is our variable that feeds the data stream. we check whether the inputSequence variable is created with the guard-let structure. Finally, we start the analysis by giving the inputSequence parameter to the start(inputSequence:) method of our analysis variable.
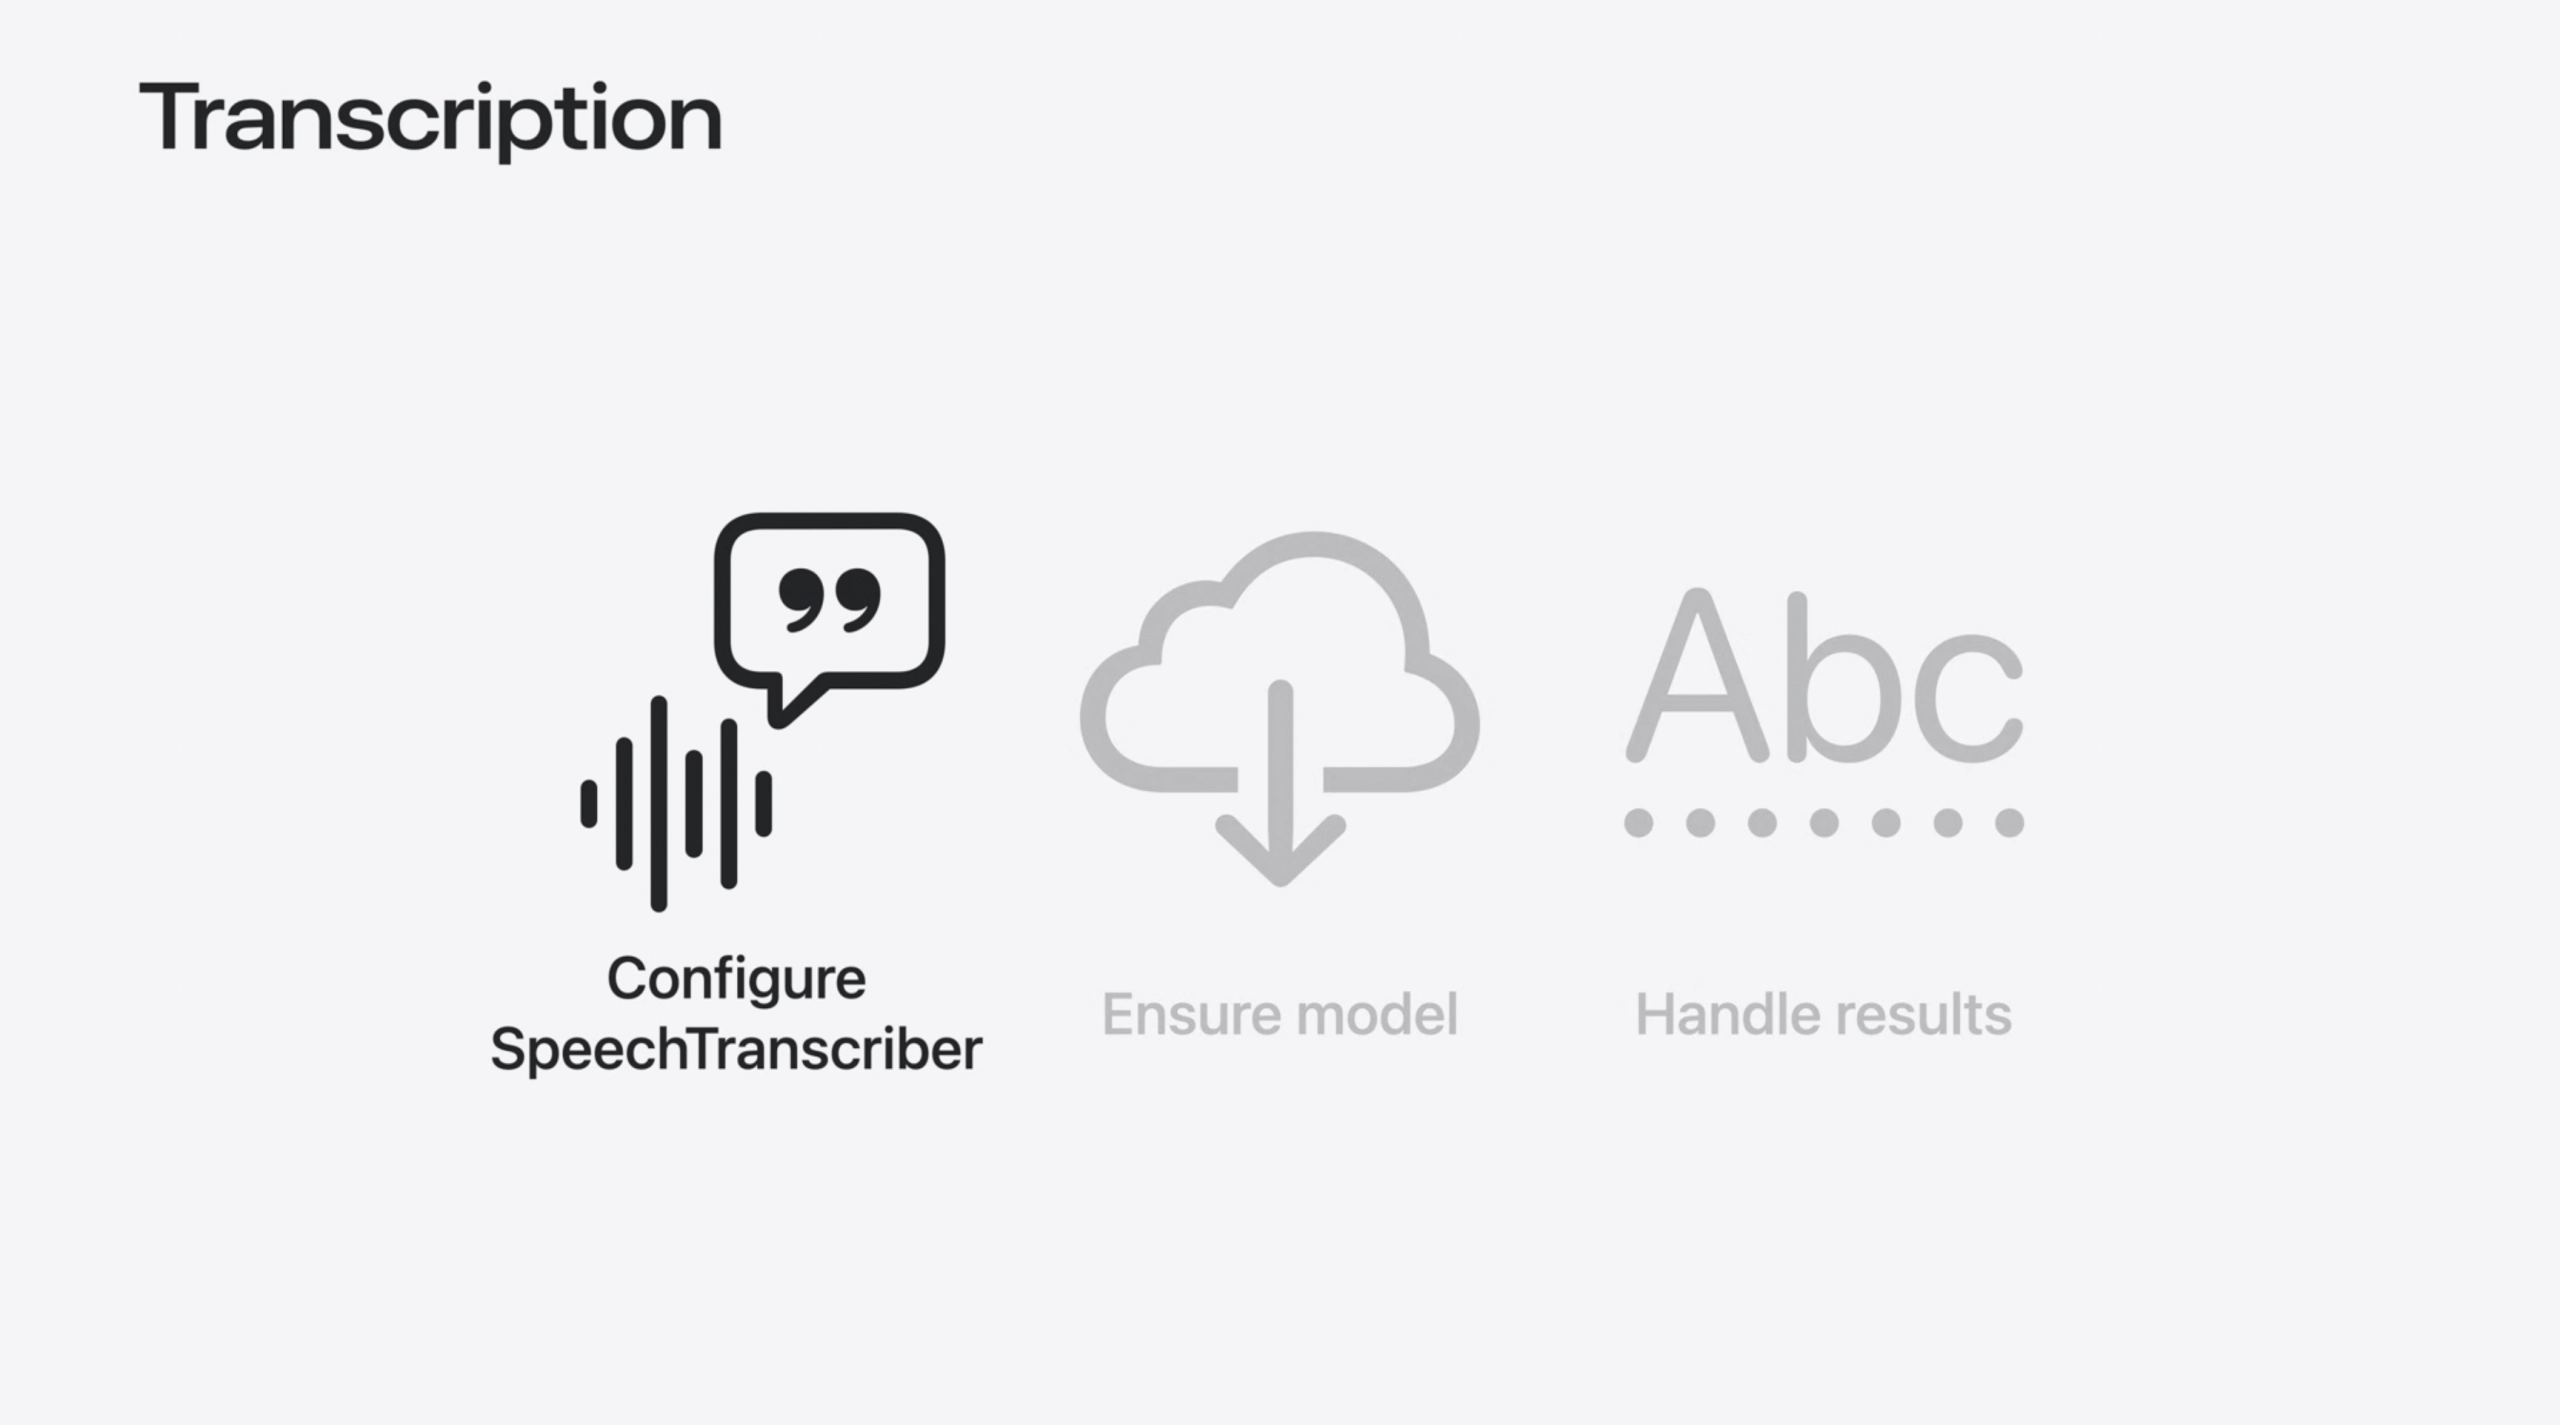
Ensure Model
When we wrote the SpeechTranscriber part, we wrote a method called ensureModel(). Let’s see why such a step is needed.
func ensureModel(transcriber: SpeechTranscriber, locale: Locale) async throws {
    guard await supported(locale: locale) else {
        throw TranscriptionError.localeNotSupported
    }

    if await installed(locale: locale) {
        return
    } else {
        try await downloadIfNeeded(for: transcriber)
    }
}

func supported(locale: Locale) async -> Bool {
    let supported = await SpeechTranscriber.supportedLocales
    return supported.map { $0.identifier(.bcp47) }.contains(locale.identifier(.bcp47))
}

func installed(locale: Locale) async -> Bool {
    let installed = await SpeechTranscriber.installedLocales
    return installed.map { $0.identifier(.bcp47) }.contains(locale.identifier(.bcp47))
}

func downloadIfNeeded(for module: SpeechTranscriber) async throws {
    if let downloader = try await AssetInventory.assetInstallationRequest(supporting: [module]) {
        self.downloadProgress = downloader.progress
        try await downloader.downloadAndInstall()
    }
}
We have a function called ensureModel() and 3 helper functions called supported(), installed(), downloadIfNeeded(). We will focus on our main function, ensureModel().
In ensureModel() function, we used async and throws keywords when defining it because of the language support and time-consuming operations. This function will work properly if it supports the device language, but in a situation where it does not support the device language, it will download the relevant language.
Handle Results
We’ve come to the last and most important task we have to do. Capture the results of the analysis!
var volatileTranscript: AttributedString = ""
var finalizedTranscript: AttributedString = ""
In order to capture the analysis result, we first need 2 variables. These are volatileTranscript and finalizedTranscript.
Now that we can keep the result in these variables, let’s start capturing the analysis result.
recognizerTask = Task {
    do {
        for try await case let result in transcriber.results {
            let text = result.text
            if result.isFinal {
                finalizedTranscript += text
                volatileTranscript = ""
                updateStoryWithNewText(withFinal: text)
            } else {
                volatileTranscript = text
                volatileTranscript.foregroundColor = .purple.opacity(0.4)
                print(result.text.audioTimeRange)
            }
        }
    }
}
Since the last part is asynchronous, we continue our operations in the Task body. We assign the transcriber result to our variable named text in a for loop. We continue to add the analysis result to our volatileTranscript variable until the result reaches the last word. When the analysis result is finished, we reset the volatileTranscript, update the text and the flow ends.
Use Foundation Models to make a title

import FoundationModels

func suggestedTitle() async throws -> String? {
    guard SystemLanguageModel.default.isAvailable else { return nil }
    let session = LanguageModelSession(model: SystemLanguageModel.default)
    let answer = try await session.respond(to: "Here is a children's story. Return your very best suggested title for it, with no other text. The title should be descriptive of the story. Story: \(text.characters)")

    return answer.content.trimmingCharacters(in: .punctuationCharacters)
}
In our suggestedTitle() method, we start a session using the standard language model after checking if the relevant language model is appropriate. Finally, we generate an answer by giving a sample text data and return it.
It’s that easy!
SpeechAnalyzer & SpeechTranscriber vs SFSpeechRecognizer
| Feature / Difference | SpeechAnalyzer & SpeechTranscriber (New – WWDC25) | SFSpeechRecognizer (Old) |
|---|---|---|
| Release Year | 2025 (Introduced at WWDC25) | 2016 (iOS 10) |
| Real-time Transcription | ✅ Yes, with .volatileResults for in-progress feedback | ✅ Yes, but limited and less responsive |
| Word Time Range Support | ✅ Yes, via result.text.audioTimeRange | ❌ Not directly supported |
| Multi-module Support | ✅ Yes, with SpeechAnalyzer(modules: [...]) | ❌ Not supported |
| Modern Async/Await Integration | ✅ Fully supported with for try await | ❌ Uses delegate/closure-based approach |
| Downloadable Model Management | ✅ Supported via AssetInventory | ❌ Relies only on built-in models |
| Localized Language Support Management | ✅ Check with supportedLocales and installedLocales | ❌ Limited dynamic control |
| Attributed Transcription (Colors, Styles) | ✅ Supported using AttributedString | ❌ Plain text only |
| Error Handling | Modern Swift-style throw/catch | Delegate-based error handling |
| Future Compatibility | ✅ Designed for future Apple platforms and AI integration | ❌ Risk of deprecation in future |
| Use Case Scope | Complex apps, live AI scenarios, health, education | Basic dictation features |
Summary
One of the most talked about topics among developers after WWDC25 was SpeechAnalyzer! After SFSpeechRecognizer, this innovation aroused great interest among developers. With real-time processing, modern structure, multiple control structure, it is sure to be talked about a lot in the coming years! iOS Developers are waiting for an exciting and passionate development process!
For more information:
https://developer.apple.com/documentation/speech/speechanalyzer
F.A.Q.
What is SpeechAnalyzer?
Introduced at WWDC25, Apple’s new audio processing framework with real-time audio processing, sentiment analysis and transcription.
What is SpeechTranscriber?
It is a sub-module of the SpeechAnalyzer framework. Thanks to SpeechTranscriber, it is the most important part of the audio processing flow by converting the audio data given as input into text.
When was SpeechAnalyzer introduced?
Introduced on June 9, 2025 at the WWDC25 event.
When should I choose which one?
If you need more detailed analysis, such as real-time voice processing, sentiment analysis, transcription, etc., you should definitely use SpeechAnalyzer.
But if you need a simpler analysis, SFSpeechRecognizer is still quite capable!

