Posts

A Complete Guide to Flutter CI/CD for iOS, Android and Web

A Complete Guide to Flutter CI/CD for iOS, Android and Web

We all know it—setting up CI/CD for Flutter (or any mobile app) is probably one of the last things you want to think about, right up there with writing tests. But here’s the truth: embracing Flutter Continuous Integration and Delivery isn’t just a good idea—it’s essential. It streamlines your workflow, improves your apps, and, believe it or not, saves you more hassle than ignoring it ever could.
Skipping CI/CD may seem tempting, but it’ll cost you hundreds of hours chasing bugs, rolling back botched releases, and sitting through awkward meetings explaining to stakeholders why things went off the rails. And let’s face it, Flutter developers—you’re not exempt. In Flutter, CI/CD is just as critical as in any other framework. So, instead of dreading it, think of CI/CD as the safety net that keeps your workflow smooth and your apps reliable.

What Are the Benefits of Mobile CI/CD? What’s in It for a Developer?

Higher Productivity and Lower Costs

First and foremost, CI/CD solutions supercharge productivity through automation. Think of it like a manufacturing line: repetitive tasks like application builds are handled by “automated workers” (your CI/CD solution), freeing developers to focus on things that can’t be automated… like attending endless meetings.

Faster Release Cycles

Building an app takes time—so much time, in fact, that developers who rely on manual local builds often fall victim to “just one more change” syndrome. It goes like this: knowing how long a build takes, a developer decides to add “just one more line” before starting the build. Then they notice something else, or get another idea… and suddenly, that single change has turned into hours of untested code.
When it all goes sideways, you’ll be stuck sifting through hours of changes to figure out what went wrong. And let’s be honest, you don’t want to be doing that on a Friday. At 16:30. While your teammates are already halfway to happy hour.
With a mobile CI/CD solution like Appcircle, builds happen automatically in the cloud. You can confidently push even the smallest code changes, knowing the system will handle everything for you. This keeps your workflow fast and uninterrupted, letting you dive right into your next big idea—no waiting, no hassle.

Faster Feedback and Response

Shorter release cycles and smaller code changes mean faster feedback. When something goes wrong, it’s much easier to identify the specific change that caused the issue. This is especially critical for larger teams, where code conflicts are a common pain point.
With CI/CD, your code is continuously integrated without manual handoffs. This ensures all the pieces fit together seamlessly—or identifies any misfits before they become big problems.

Increased Coding Discipline

Every pull request triggers a build before merging, followed by automated unit testing and code reviews after every push. This process ensures that your code is thoroughly inspected long before release, leading to higher-quality apps and cleaner commits. In other words, CI/CD is the gentle nudge toward better habits that every developer secretly appreciates.

Early Warnings

In a CI/CD pipeline, every change is tested immediately as part of the workflow. This allows issues to be identified earlier—when they’re still small and manageable. Instead of digging through hundreds of lines of code, you’re pinpointing the problem in a fraction of the time.
And yes, this is especially useful on Friday afternoons.

Better Visibility

Mobile CI/CD brings transparency to your development process in two major ways. First, you’ll receive notifications whenever something goes wrong (or even right, though that can lead to notification fatigue). Second, the build logs provide detailed data you might not have had access to before. This makes it easier to troubleshoot, spot trends, and solve problems proactively—before they escalate.

Complexities of Delivery Are Handled for You

Mobile app delivery comes with a unique set of challenges, especially for multi-platform apps. From building and signing to distributing and installing, each platform (iOS, Android) has its own rules and requirements. With a robust CI/CD solution, all these complexities are automated, letting you spend more time coding and less time wrestling with configurations.

Left Icon

Ready to simplify your Flutter CI/CD pipeline?

Right Icon Meet Our Experts

Setting Up a Flutter CI/CD Pipeline with GitHub

GitHub provides an excellent foundation for hosting source code and automating workflows. With GitHub Actions, you can define custom workflows to automate various tasks like building, testing, and deploying Flutter apps.
Key Steps for CI/CD Setup:

1. Organize Your Repository:

  • Use a structured branching strategy, such as Git Flow, for better collaboration.
  • Store all necessary dependencies in the repository for reproducible builds.

2. Configure a Workflow File:

  • Define automation steps in a YAML file (flutter.yaml), specifying tasks like installing dependencies, running tests, and building artifacts.

3. Automate Testing and Builds:

  • Integrate testing frameworks for unit, widget, and integration tests.
  • Configure builds for iOS, Android, and web to generate IPA, APK, and web artifacts.

4. Streamline Deployments:

  • Use GitHub Actions to trigger automated deployments to app stores or internal testing platforms.
For more details, refer to Flutter documentation.

Simplifying Flutter CI/CD with Appcircle

Flutter ci cd

While GitHub Actions provides flexibility, setting up and maintaining workflows for mobile projects can become complex. This is where Appcircle excels, offering a mobile-first CI/CD platform designed specifically for streamlined workflows.
How Appcircle Enhances Your Workflow:

Step-by-Step Guide: Flutter CI/CD Workflow with Appcircle

1. Connect Your GitHub Repository
  • Link your repository to Appcircle securely using token-based authentication.
  • Select the branch (e.g., main or develop) to automate CI/CD tasks.
2. Set Up Your Workflow

Use Appcircle’s graphical interface to configure workflows tailored for Flutter:

  • Clone Repository: Fetch the latest code from GitHub.
  • Install Flutter SDK: Ensure compatibility with your project requirements.
  • Run Tests: Automate unit, widget, and integration testing.
  • Build Artifacts: Generate APK, IPA, and web builds with pre-configured steps.
3. Automate Signing and Security
  • Manage certificates and provisioning profiles using Appcircle Signing Identities.
  • Enable automatic code signing for both iOS and Android builds.
4. Streamline Testing
5. Automate App Distribution
6. Monitor and Manage Artifacts
  • Define retention policies to manage build artifacts effectively.
  • Automatically clean up outdated builds to optimize storage usage.

Conclusion

Flutter’s ability to deliver apps for iOS, Android, and web from a single codebase makes it a powerful framework. However, automating CI/CD pipelines is essential for maximizing efficiency and minimizing errors.
Appcircle provides a tailored solution for Flutter CI/CD, integrating seamlessly with GitHub to offer faster builds, better testing, and effortless app distribution. Whether you’re targeting app stores or internal platforms, Appcircle ensures a smooth CI/CD experience.

FAQs

1. What is the benefit of using CI/CD for Flutter projects?

The benefit of using CI/CD for Flutter projects is that it automates testing, building, and deployment across multiple platforms, streamlining workflows while improving code quality, accelerating release cycles, and reducing manual errors. This results in consistent and reliable app delivery for iOS, Android, and web, enabling faster feature releases and early bug detection. Additionally, CI/CD enhances team collaboration and minimizes production risks by ensuring reproducible builds and efficient deployment processes.


2. Why should I choose a mobile-first CI/CD platform over generic ones for Flutter projects?

Choosing a mobile-first CI/CD platform for Flutter projects ensures faster, more reliable builds, testing, and deployments, especially for iOS and Android. These platforms are built specifically for mobile, handling complexities like macOS build environments, code signing, app store submissions, and platform-specific dependencies. Unlike generic CI/CD tools, mobile-focused solutions offer prebuilt mobile-native integrations and up-to-date stack support. Platforms like Appcircle include built-in signing identity management, visual workflows, app distribution, and publishing modules, reducing DevOps overhead and accelerating release cycles.


3. How does Appcircle help with Flutter testing and deployment?

Appcircle lets you run unit, widget, and integration tests directly within your workflow. It supports Testing Distribution to share builds with QA teams, an Enterprise App Store for in-house app distribution, and Publish Automation for releasing apps to the App Store, Google Play, Huawei AppGallery, Microsoft Intune, and TestFlight. This all-in-one approach simplifies testing, distribution, and deployment, accelerating your Flutter app delivery.

Kotlin Data Objects

Data objects just landed in with the Kotlin version 1.7.20 as an experimental feature.

You can try them out using Kotlin compiler with version 1.7.20 and -language-version 1.8 compiler argument.

Before checking out what a “data object” is and how it can be helpful, let’s remember what is an object declaration in Kotlin.

Object Declarations

An object declaration in Kotlin is a convenient way to create a well-defined singleton. They don’t have any constructors, can hold data, and can inherit from classes.

So when we only need to define a special instance of a class with some preset configuration, we inherit from that class and create an object instead of creating another subclass explicitly.

Also, creating another subclass means we may create multiple instances out of that subclass and that’s not always necessary.

Objects are great but they don’t pretty print their names.

Let’s see an example:

A common scenario for using objects is to create zero-property sealed class implementations.

AsyncResult sealed class and their implementations

The code above shows an AsyncResult sealed class and their implementations.

Objects are great here since using a subclass with zero constructors would be an overkill. However, when it comes to print them, they don’t look good.

AsyncResult sealed class and their implementations

To overcome this, one might override the toString() function and return a name but this also brings some boilerplate with so little value.

AsyncResult sealed class and their implementations

Data Objects

Kotlin intends to solve this with data objects.

Data objects have toString() functions implemented like data classes so that you don’t need to override toString() in objects anymore.

Data Objects

Overall, data objects are just objects with better toString() implementations which could be useful in logging or debugging.

Their equals() and hashCode() methods are not different than a normal object and also you can’t run copy() or componentN() functions on data objects like you can do on data classes.

You can read this chapter in Kotlin 1.7.20 changelogs or watch this video to learn more on the topic.

Please note that the data object feature is still experimental at the time this post is being written and may be subject to change.

Jetpack Compose Navigation and Deeplinks

Navigating between screens in mobile apps is essential knowledge. We’ll look at Jetpack Compose Navigation patterns and how to integrate it with deeplinks.

Why Need Navigation?

Android applications usually have more than one screen since they have multiple features. In case of a messaging application we have a contact list screen, a message list screen, a message screen, a settings screen, so on. It’s difficult to cram all these features into one screen and ViewModel. Your code will turn into spaghetti. To separate our features we use multiple fragments/composable and navigation connects them.

Navigation In Android

Let’s look at Android applications that doesn’t use Jetpack Compose. In the early days of Android, having multiple activities and using intents were the trend. Then, single activity with multiple fragments and using jetpack navigation made more sense. We won’t dive into the details of jetpack navigation in this article. But here is the android documentation if you would like to learn more about it. Finally, with Jetpack Compose, jetpack navigation had a different way of usage.

Navigation In Android

Left Icon

Empower Your Android Projects Now!

Right Icon Learn More

Navigating Compose Via Fragments

Before diving into navigation in compose, we can use fragments for using Jetpack navigation with graphs. Fragments will just call compose screens:

<?xml version="1.0" encoding="utf-8"?>
<LinearLayout
    xmlns:android="http://schemas.android.com/apk/res/android"
    android:orientation="vertical"
    android:layout_width="match_parent"
    android:layout_height="match_parent">

    <androidx.compose.ui.platform.ComposeView
        android:id="@+id/compose_view"
        android:layout_width="match_parent"
        android:layout_height="match_parent" />

</LinearLayout>
class ExampleFragment : Fragment() {

    private var _binding: FragmentExampleBinding? = null

    // This property is only valid between onCreateView and onDestroyView.
    private val binding get() = _binding!!

    override fun onCreateView(
        inflater: LayoutInflater,
        container: ViewGroup?,
        savedInstanceState: Bundle?
    ): View {
        _binding = FragmentExampleBinding.inflate(inflater, container, false)
        val view = binding.root

        binding.composeView.apply {
            // Dispose of the Composition when the view's LifecycleOwner
            // is destroyed
            setViewCompositionStrategy(DisposeOnViewTreeLifecycleDestroyed)
            setContent {
                // In Compose world
                MaterialTheme {
                    Text("Hello Compose!")
                }
            }
        }

        return view
    }

    override fun onDestroyView() {
        super.onDestroyView()
        _binding = null
    }
}

However, this is not a good way of implementing it. Because using fragments just for navigation will create performance problems and affect the code structure. It is against Jetpack Compose’s fundamentals. We explained performance test results in this article.

Jetpack Compose Navigation Basics

Jetpack Compose navigation requires implementation in the app-module Gradle file:

implementation "androidx.navigation:navigation-compose:$las_version"

First, we create a NavController instance to keep the back stack of our screens with their state and to navigate among them. We can say NavController is our compass.

val navController = rememberNavController()

Note: navController instance should also follow the state hoisting principle.

After creating a NavController, We need to connect with only one NavHost. We can say NavHost is our map.

NavHost(navController = navController, startDestination = "profile") {

    composable("profile") { Profile(/*...*/) }

    composable("friendslist") { FriendsList(/*...*/) }

    /*...*/

}

As we can see NavHost gets a NavController and a String called as startDestination.
startDestination describes NavHost to show which screen first. The string “profile” is a concept called a route. Routes are like addresses for screens we use routes to reach up to the screen.

composable("profile") { Profile(/*...*/) }

Here we say the composable screen’s route name is profile.

To navigate to a screen, just call .navigate with the name of your destination:

navController.navigate("friendslist")

Arguments

We can also pass arguments to any screen:

composable(
    route = "profile/?userId={userId}",
    arguments = listOf(navArgument("userId") {
        type = NavType.StringType
        defaultValue = ""
    })
) { backStackEntry ->
    Profile(navController, backStackEntry.arguments?.getString("userId"))
}

Now our profile screen can receive an argument with userID name.

Note: By default, all arguments are parsed as strings.

To pass argument during navigating:

navController.navigate("profile/?userId=user1234")

It’s like using RestfulAPI.

Note: Passing a minimum amount of arguments is the right way because the navigation concept does not cover data-related logic.

Screen Class Usage

The previous example seems nice, but typing hard-coded strings for routes is not a good practice. Instead, we need to use sealed classes:

sealed class Screen(val route: String) {

    object Profile : Screen(route = "profile/?userId={userId}") {

        fun userId(userId: String) = "profile/?userId=$userId"
    }
}

Now we can refactor our navigation code:

composable(
    route = Screen.Profile.route,
    arguments = listOf(navArgument("userId") {
        type = NavType.StringType
        defaultValue = ""
    })
) { backStackEntry ->
    Profile(navController, backStackEntry.arguments?.getString("userId"))
}

// Bir yerde navigasyonu tetiklemek için
navController.navigate(Screen.Profile.userId("user1234"))

Nested Navigation

We might want to group and modularize routes. Let’s say we want to group onboarding, login, and register screen into a graph:

NavHost(navController, startDestination = "home") {

    // Navigating to the graph via its route ('login') automatically
    // navigates to the graph's start destination - 'username'
    // therefore encapsulating the graph's internal routing logic
    navigation(startDestination = "username", route = "login") {

        composable("username") { 
            // Username screen content
        }

        composable("password") { 
            // Password screen content
        }

        composable("registration") { 
            // Registration screen content
        }

    }

}

Extraction Of Graphs

Be aware that having a lot of graphs still can turn code into a huge mess. We can separate graphs into different files by using NavGraphBuilder:

fun NavGraphBuilder.loginGraph(navController: NavController) {

    navigation(startDestination = "username", route = "login") {

        composable("username") { 
            // Username screen content
        }

        composable("password") { 
            // Password screen content
        }

        composable("registration") { 
            // Registration screen content
        }

    }

}

Deeplink Routing In Compose

Compose navigation supports implicit deep links, here is how:

val uri = "https://www.example.com"

composable(
    "profile?id={id}",
    deepLinks = listOf(navDeepLink { uriPattern = "$uri/?id={id}" })
) { backStackEntry ->
    Profile(navController, backStackEntry.arguments?.getString("id"))
}

By default, deeplinks are not exposed to external apps. To expose them, we add an intent filter to the manifest file:

<activity ...>

    <intent-filter>
        <data android:scheme="https" android:host="www.example.com" />
    </intent-filter>

</activity>

Conclusion

In this article, we learned why we are using the navigation in android, how navigation changed throughout the years, how we can use compose in fragment navigations, and why we should not really use that way.

Then dived into jetpack compose navigation with arguments, nested graphs, and graph extraction.

Finally, we learned how to use deep links in jetpack compose navigation.

Where to Go From Here?

Since we learned a lot of information from this article it is better to put theory into practice.

For this android suggests:

References

  1. Navigation | Android Developers
  2. Jetpack Compose 101: The Basics – Appcircle Blog
  3. Interoperability APIs | Jetpack Compose | Android Developers
  4. Navigating with Compose | Jetpack Compose | Android Developers
  5. Navigating in Jetpack Compose
  6. Jetpack Compose Navigation | Android Developers
  7. Now In Android Repository
Customizing Switch Button in Android can be tricky. Let's see how it's done. First, we'll look at the methods to change the colors

Customizing the Switch Button in Android

Hi everyone! I love colors and use them in my apps to direct different emotions to the user.  Customizing Switch Button in Android can be tricky. Let’s see how it’s done. First, we’ll look at the methods to change the colors. ✨ After that, we will use this button to change app theme.

Add SwitchCompat to XML

You can see default view below the code of added SwitchCompat view in XML file:

<?xml version="1.0" encoding="utf-8"?>
<androidx.constraintlayout.widget.ConstraintLayout
    xmlns:android="http://schemas.android.com/apk/res/android"
    xmlns:app="http://schemas.android.com/apk/res-auto"
    xmlns:tools="http://schemas.android.com/tools"
    android:layout_width="match_parent"
    android:layout_height="match_parent"
    tools:context=".MainActivity">

    <androidx.appcompat.widget.SwitchCompat
        android:id="@+id/switchButton"
        android:layout_width="wrap_content"
        android:layout_height="wrap_content"
        app:layout_constraintBottom_toBottomOf="parent"
        app:layout_constraintEnd_toEndOf="parent"
        app:layout_constraintHorizontal_bias="0.5"
        app:layout_constraintStart_toStartOf="parent"
        app:layout_constraintTop_toTopOf="parent"
        app:showText="false" />
</androidx.constraintlayout.widget.ConstraintLayout>

android switch button

The switch button consists of 2 parts. These are Thumb and Track. We can customize each part with some attributes.Thumb and Track example


Final version of XML will be:

<?xml version="1.0" encoding="utf-8"?>
<androidx.constraintlayout.widget.ConstraintLayout
    xmlns:android="http://schemas.android.com/apk/res/android"
    xmlns:app="http://schemas.android.com/apk/res-auto"
    xmlns:tools="http://schemas.android.com/tools"
    android:layout_width="match_parent"
    android:layout_height="match_parent"
    tools:context=".MainActivity">

    <androidx.appcompat.widget.SwitchCompat
        android:id="@+id/switchButton"
        android:layout_width="wrap_content"
        android:layout_height="wrap_content"
        android:thumb="@drawable/thumb_layerlist"
        app:layout_constraintBottom_toBottomOf="parent"
        app:layout_constraintEnd_toEndOf="parent"
        app:layout_constraintHorizontal_bias="0.5"
        app:layout_constraintStart_toStartOf="parent"
        app:layout_constraintTop_toTopOf="parent"
        app:showText="false"
        app:track="@drawable/track_backgrounds" />
        
</androidx.constraintlayout.widget.ConstraintLayout>

We can create drawable files and add them for shaping track and thumb with app:track and android:thumb attributes.

Left Icon

Experience Automated Mobile DevOps for Android Now!

Right Icon Contact Us

Customize Track

We need to create new Drawable Resource File for track backgrounds in each state.Customize Track in android

<?xml version="1.0" encoding="utf-8"?>
<selector xmlns:android="http://schemas.android.com/apk/res/android">

    <item android:state_checked="true">
        <shape android:shape="rectangle">
            <solid android:color="@color/blue_soft" />
            <corners android:radius="100dp" />
            <stroke android:width="2dp" android:color="@color/blue_moon" />
            <size android:height="20dp" />
        </shape>
    </item>

    <item android:state_checked="false">
        <shape android:shape="rectangle">
            <solid android:color="@color/yellow_soft" />
            <corners android:radius="100dp" />
            <stroke android:width="2dp" android:color="@color/gray" />
            <size android:height="20dp" />
        </shape>
    </item>

</selector>

Two different item created with same shape but different states and colors. All the dimension, color information to be added for this background can be defined here. After that we can use app:track and pass track_backgrounds.xml file.

Customize Thumb

If you want to add cute icons to thumb as mine ?, firstly we can create these icons with Vector Asset. You can select any icon and customize its color and size.Customize Thumb vector asset

Our moon icon XML will be:

<vector xmlns:android="http://schemas.android.com/apk/res/android"
    android:width="56dp"
    android:height="56dp"
    android:tint="@color/blue_moon"
    android:viewportWidth="24"
    android:viewportHeight="24">

    <path
        android:fillColor="@android:color/white"
        android:pathData="M12.34,2.02C6.59,1.82 2,6.42 2,12c0,5.52 4.48,10 10,10c3.71,0 6.93,-2.02 8.66,-5.02C13.15,16.73 8.57,8.55 12.34,2.02z" />

</vector>

And our Sun Icon:

<vector xmlns:android="http://schemas.android.com/apk/res/android"
    android:width="56dp"
    android:height="56dp"
    android:tint="@color/orange_sun"
    android:viewportWidth="24"
    android:viewportHeight="24">

    <path
        android:fillColor="@android:color/white"
        android:pathData="M6.76,4.84l-1.8,-1.79 -1.41,1.41 1.79,1.79 1.42,-1.41zM4,10.5L1,10.5v2h3v-2zM13,0.55h-2L11,3.5h2L13,0.55zM20.45,4.46l-1.41,-1.41 -1.79,1.79 1.41,1.41 1.79,-1.79zM17.24,18.16l1.79,1.8 1.41,-1.41 -1.8,-1.79 -1.4,1.4zM20,10.5v2h3v-2h-3zM12,5.5c-3.31,0 -6,2.69 -6,6s2.69,6 6,6 6,-2.69 6,-6 -2.69,-6 -6,-6zM11,22.45h2L13,19.5h-2v2.95zM3.55,18.54l1.41,1.41 1.79,-1.8 -1.41,-1.41 -1.79,1.8z" />

</vector>

Now, we should define which icon will be shown in selected state and unselected state. Let’s create another drawable resource called thum_icons.xml like below.

<?xml version="1.0" encoding="utf-8"?>
<selector xmlns:android="http://schemas.android.com/apk/res/android">

    <item android:drawable="@drawable/ic_moon" android:state_checked="true" />
    <item android:drawable="@drawable/ic_sunny" android:state_checked="false" />

</selector>

But as you can see, there is also background layer in thumb under the icon. And this background layer can also change for each state. For example if check state is true, thumb’s stroke color is dark blue. But when check state is false, stroke color is gray. Background colors can also changeable but I chose to use white for both selection.

<?xml version="1.0" encoding="utf-8"?>
<selector xmlns:android="http://schemas.android.com/apk/res/android">

    <item android:state_checked="true">
        <shape android:shape="oval">
            <solid android:color="@color/white" />
            <stroke android:width="2dp" android:color="@color/blue_moon" />
            <size android:width="100dp" android:height="100dp" />
        </shape>
    </item>

    <item android:state_checked="false">
        <shape android:shape="oval">
            <solid android:color="@color/white" />
            <stroke android:width="2dp" android:color="@color/gray" />
            <size android:width="100dp" android:height="100dp" />
        </shape>
    </item>

</selector>

Drawable files have created for both layers. So how do we combine these files? Of course with layer-list!

<?xml version="1.0" encoding="utf-8"?>
<layer-list xmlns:android="http://schemas.android.com/apk/res/android">

    <item android:gravity="fill"
        android:drawable="@drawable/thumb_backgrouds" />

    <item android:gravity="center"
        android:drawable="@drawable/thumb_icons"
        android:top="20dp"
        android:bottom="20dp"
        android:left="20dp"
        android:right="20dp" />

</layer-list>

Finally, drawable file can pass with android:thumb attribute.

Switch Button in Android, Final Result, Animated

Switch Button in Android, Final Result

I used Shared Preferences to save the final state of the button in the MainActivity.kt file. So when the user reopen it, the app will be shown in the last selected theme.

package com.yagmurerdogan.customswitch

import android.content.SharedPreferences
import android.os.Bundle
import androidx.appcompat.app.AppCompatActivity
import androidx.appcompat.app.AppCompatDelegate
import com.yagmurerdogan.customswitch.databinding.ActivityMainBinding

class MainActivity : AppCompatActivity() {

    private lateinit var binding: ActivityMainBinding

    override fun onCreate(savedInstanceState: Bundle?) {
        super.onCreate(savedInstanceState)

        binding = ActivityMainBinding.inflate(layoutInflater)
        setContentView(binding.root)

        val sharedPreferences = getSharedPreferences(PREF_KEY, MODE_PRIVATE)
        val editor = sharedPreferences.edit()

        updateUI(sharedPreferences)

        binding.switchButton.setOnCheckedChangeListener { _, isChecked ->
            if (isChecked) {
                editor.putBoolean(SWITCH_BUTTON_KEY, true).apply()
                updateUI(sharedPreferences)
            } else {
                editor.putBoolean(SWITCH_BUTTON_KEY, false).apply()
                updateUI(sharedPreferences)
            }
        }
    }

    private fun updateUI(sharedPreferences: SharedPreferences) {
        binding.switchButton.apply {
            isChecked = sharedPreferences.getBoolean(SWITCH_BUTTON_KEY, false)
            if (isChecked) {
                AppCompatDelegate.setDefaultNightMode(AppCompatDelegate.MODE_NIGHT_YES)
            } else {
                AppCompatDelegate.setDefaultNightMode(AppCompatDelegate.MODE_NIGHT_NO)
            }
        }
    }

    companion object {
        const val SWITCH_BUTTON_KEY = "switch"
        const val PREF_KEY = "pref"
    }
}

And that’s it! Customizing Switch Button in Android may seem tricky, but it’s fairly easy once you know the tricks.

Sources

12 Android Studio Tips and Shortcuts to Navigate Your Codebase Faster Header Image

12 Android Studio Tips and Shortcuts to Navigate Your Codebase Faster

We Android developers spend most of our time in Android Studio. In my case, coding mostly means wandering in the codebase from one file to another. I spend more time reading code than writing and you probably are the same.

You need to figure out the context, and find the perfect place to add code that does what you intended. This requires a lot of navigating between files.

Navigating the codebase faster speeds up the overall development. Here are my tips and shortcuts that make navigating the codebase a breeze.

Android Studio Tips and Shortcuts to Navigate Your Codebase Faster

Cmd + Click

If you don’t know already you can Cmd + Click on so many things to get awesome help from Android Studio. Clicking a declaration would list you all the usages or list them if there are more than one. Clicking a variable or a function would beam your caret to its declaration point.

If you want to learn one thing from this article, it should be this.

Jump between parent and child classes

When you are overriding a function in a child class or implementing an interface, you may want to go back and forth. Android Studio has mini buttons available for your convenience. Use them to quickly jump from the overriding function and overridden one.

Navigate dependency injection graph

If you are using Dagger or Hilt, you would want to navigate in the dependency injection graph. Finding where an injected instance is provided or listing all dependency-related files is easy in Android Studio.

Use the graph icons to navigate the dependency graph conveniently.

Find classes or files to navigate

This is one of the shortcuts I use repetitively every day to navigate around. If you want to jump to a class of which you know the name, Cmd + O is your best friend. You can also hit Shift to go to the next tab and search for a file instead.

Use camel case search when finding files

Camel case search is a really powerful text-based search functionality in Android Studio. You can use it in autocomplete or use it when you’re looking for a file to navigate. In the below example we have two very similarly named files: BlueLinePickingViewModel and BlueLinePackingViewModel. You don’t need to type the whole name to jump to this file. You can use just the initials of every word and also the differentiating letter “i” after “P”.

So BLPaVM will return BlueLinePackingViewModel whereas BLPiVM will find BlueLinePickingViewModel in the codebase.

Search some text in the codebase

When I don’t know the file name I’m looking for, I search some text instead.

Hitting Cmd + Shift + F keys to open the Find in Files dialog, I can quickly find the part of the project I want to take a look.

Jump to a line within the file

When you want to visit a specific line in a long file, sometimes it could be easier to move with the Go To Line dialog. Especially, if you are reading source code and not very familiar with that particular file. Hit Cmd + L and write the line number to move your caret there.

Jump to a specific line in any file

You can use the Find a File or File a Class dialogs to jump to a specific line in that file. This could be useful when you are reviewing code in the browser and you want to open that exact location in the IDE. What you need to do is to use # character after writing your query and postfix it with the line number. For example, if you want to go to line 42 of SignInFragment you can write SignInFragment#42 and jump directly to that line.

Also, don’t forget that this becomes more powerful with the use of camel case search.

Navigate caret history back and forth

When I learned about this feature my efficiency in navigating the codebase almost doubled!

Android Studio keeps a history of your caret position within a file and among many files. So if you want to go back (or forward) to see that thing you were looking for seconds ago, you don’t have to remember the file name or the line number.

You can just use Back (Cmd + [) and Forward (Cmd + ]) shortcuts to move your caret in time!

See recent files

This shortcut is not something I’ve known of until recently. If you’re like me and don’t know about this gem yet, here it is: you can hit Cmd + E to list recent files to pick one from.

This would save you some time if you’re working on projects with many many files.

Spot the open file in the project hierarchy

Let’s say you navigated a file using the search or caret history and you would like to jump to the files nearby. This is a common scenario when you want to jump from a Fragment to its ViewModel or to other classes within the same package.

The easiest way to do it is to spot the file in the project hierarchy to get some visuals of the surroundings of the file.

Android Studio has a small button with a sniper scope icon for that.

When I learned about this button, I was really happy.

Also, don’t forget to use Collapse All button at the same row to hide everything to remove the clutter in your project view.

Close all tabs but one

Speaking of removing the clutter, I sometimes hate finding myself trying to reach a tab in the tab bar. That’s when I use an Option + Click to remove all tabs but the open one and breathe a sigh of relief.

I hope these small tips and shortcuts add up and make your life a little bit better when navigating in the codebase in an Android project.

7 Android Studio Tips to Improve Productivity

7 Android Studio Tips to Improve Productivity

Android Studio is a complex IDE with many features, shortcuts, and plugins.

As an experienced Android developer, I have some habits built around using the IDE after spending long years with it.

These are some of my favorite Android Studio tips that I believe improve my productivity and save me a lot of my valuable time.

1. Use a Physical Test Device Instead of an Emulator

This may sound a bit odd if you are a fan of using the emulator for your daily development.

After all these years of seeing the emulator getting in really good shape, I can understand you.

However, after switching back and forth between an emulator and a test device during my Android Development career, I finally found peace by always relying on my test device.

Test devices are fast, don’t bring any CPU or RAM load on your development machine, can be tested for real-life scenarios (like getting a call, putting the device to sleep, locking/unlocking) better, and allows you to touch and use what you just created.

If you haven’t had a physical test device as your programming companion, you should definitely give it a shot.

2. Use Wireless Debugging

There’s another tip for test devices: use the wireless debugging option!

Having a USB cable connected all the time to your computer is no bueno.

After Android 11, the wireless debugging and QR pairing are working like a breeze. I’ve been using it for almost a year now and I’m pretty happy with its performance and reliability.

Besides, I’m using a dock to keep my test device charged all the time so my workspace setup can stay sane and clean.

Bonus: You can use Developer Tiles to create a shortcut to enable wireless debugging right from your notification tray!

Android Wireless Debugging

3. Navigate the Codebase Faster with Shortcuts

If you are maintaining a huge codebase you’ll know finding the correct place to write code is as time-consuming as writing the code itself.

You may find yourself jumping between parent and child classes, abstract functions and their implementations, injected instances and their providers, etc.

Android Studio offers mini buttons to help you navigate between all these. If you haven’t started using these buttons they are time-savers!

Also, you can Cmd + Click (or Ctrl + Click) variable, function, and class declarations to find their usages or you can click the usages to jump to the declarations.

Android Studio Tips: Use Wireless Debugging

Another shortcut I use hundreds of times each day is Navigate > Back (Cmd + [) and Navigate > Forward (Cmd + ]) actions.

Using these actions Android Studio moves you through your caret history. If you jump from one file to another, Android Studio remembers it. If you have moved your caret to different positions within a file Android Studio remembers it.

So if you are working on multiple files, going back and forth several times will be a breeze with these.

There are other useful shortcuts to navigate, check out the “Navigating and searching within Studio” section of the official shortcuts page to learn more about them.

4. Deal with Imports on the Fly

When writing code or copying & pasting snippets, dealing with imports will always be a pain.

Luckily Android Studio can figure out the package you want to import in most cases and can do it for you.

You just need to enable the “Add unambiguous imports on the fly” preference under Preferences > Editor > General > Auto Import menu to let Android Studio add the correct imports for the code you are adding to the codebase.

Preferences > Editor > General > Auto Import menu

From time to time, I tried to check the “Optimize imports on the fly” option too but that option causes trouble for certain scenarios when I try to bulk edit strings or do other advanced operations.

So, feel free to experiment with that option too if you’re feeling adventurous.

But remember, you can always optimize imports before committing your code with another setting, which is safer than using this option.

5. Master Effective Editor Usage

All operating systems have keyboard shortcuts to jump a word or a line. Combining it with a selection shortcut you can easily navigate through lines and modify them.

On macOS I use the following:

Option + Left / Right Arrow > Jump Left / Right Word by Word

Cmd + Left / Right Arrow > Jump to Start / End of the Line

Shift + Option + Left / Right Arrow > Jump Left / Right Word by Word and Select

Shift + Cmd + Left / Right Arrow > Jump to Start / End of the Line and Select

To up your game in effective editor usage, you can learn some additional shortcuts.

You can use Shift + Cmd + Up / Down Arrow to move a line, up and down in the file.

You can use Cmd + D to duplicate a line or Cmd + Backspace to remove it.

Another one I use frequently is Control + G (Add selection for next occurrence) shortcut. After selecting a word, you can keep hitting Control + G to keep adding more instances of the same text.

Android studio keymaps

There are a lot of editor shortcuts to discover in Android Studio, take a look at the Preferences > Keymap > Editor Actions section to learn some keyboard skills.

As a bonus, check out the String Manipulation plugin and thank me later.

6. Utilize the Version Control Support of the IDE

I’m a big fan of using Git without any GUI and staying on the terminal. However, Android Studio has great tooling around Git so even I can’t resist using them.

The commit dialog (Cmd + K) is a really convenient way to commit the files you wish with some powerful settings.

After you hit the gear icon in the commit dialog you can enable some actions for Android Studio to run before each commit.

My favorites are “Reformat code”, “Optimize imports” and “Check TODO”.

Version Control Support

Other than the commit dialog I use the push dialog, interactive rebase dialog and conflict resolution screens to ease my daily git routine.

I totally recommend giving it a shot, even if you love using git on the CLI!

7. Create Live Templates

My last productivity tip is to create live templates for repetitive structures in your codebase.

Live templates allow placing boilerplate snippets with editable areas into which Android Studio will guide your caret.

For my last project, I have two templates: one for creating test functions and the other for creating ViewModels with preset configurations.

Android studio Create Live Templates

Don’t forget to see this article (which includes a video too) to see how to write code faster by utilizing live templates.

Thank you for reading and stay tuned for more Android Studio tips and productivity articles!

What’s New at Android Studio Electric Eel (Google I/O 2022)

Google announced quite a lot of new features, APIs and new devices at Google I/O 2022. One of the main focus of the developer keynote was for Android Studio. We’ve created a comprehensive list of everything new announced for Android Studio at Google I/O 2022. Here’s what’s new at Android Studio Electric Eel Canary:

Better stability

Of course with every version there is some kind of work to improve the stability. This year, Google claims that they’ve fixed over 1600 bugs, 20 UI hangs and 12 memory leaks.

Run Jetpack Benchmark

Microbenchmark is a Jetpack library that measures the execution time of your Kotlin or Java code. It’s especially good for code that runs repeatedly like RecyclerView scrolling, data manipulation and such.

Macrobenchmark

Macrobenchmark library is used for testing larger use-cases of your application, such as application startup and complex UI manipulations. It can be run on CI systems as well.

Macrobenchmark

Baseline Profilers

Adding Baseline Profilers to your app lets Android to improve startup speed, method call performance and make your app faster in general.

Crashlytics in Android Studio

Firebase Crashlytics will directly display its reports in Android Studio. You can access the reports through App Quality Insights window. You can see where your app crashed, and go to the line responsible for that crash in Android Studio.

Crashlytics in Android Studio

Resizable Emulators

A new Android emulator type, resizable is available. Instead of running apps for various sized screen devices, you can test your apps by resizing the emulator window to desired size.

Resizable Emulators

Live Edit

If you’re building using Jetpack Compose, you can see the results of your code changes in your Compose Preview, running emulators and connected physical devices. This feature is experimental, so look out for bugs.

Live Edit

Animation Preview

Previewing animation required a lot of building and running the app. Those who tweak animations to perfect parameters know that most of the time is spent on waiting for the changes to build. New Android Studio adds previewing animations for Jetpack Compose. You can see a timeline of animations running and tweak them.

Animation Preview

Dependency Insights

You can view popular dependencies and how they are used by other developers from Android Studio. If a dependency is marked as outdated, Android Studio will warn you to update to a supported version. More info on Google Play SDK Index, check out its developer page: https://goo.gle/play-sdk

Dependency Insights

There are many more improvements to Android Studio Electric Eel like wearOS emulators, wearOS device connect, and so on. For a full list of improvements, check out Android Developers Blog page: https://android-developers.googleblog.com/2022/05/whats-new-in-android-studio.html

Sending Push Notifications On React Native Using Firebase

Sending Push Notifications to React Native Using Firebase

On any mobile app, sending push notifications is an important way to communicate with the users. Setting up a push notification system and distributing notification is a tedious process. Services like Google’s Firebase aims to make this process easy. Let’s look at how we can integrate Firebase into a React Native app.

First, let’s create a project and run it:

npx react-native init SampleRNPushNotifications --template react-native-template-typescript
cd SampleRNPushNotifications
yarn ios

Then, download the necessary libraries:

yarn add react-native-push-notification 
@react-native-firebase/[email protected] 
@react-native-community/push-notification-ios 
@types/react-native-push-notification

To clarify what each library does:

  • React-native-push-notification: Necessary to send local notifications
  • @react-native-firebase/app@11.2.0: Main library required to use Firebase services
  • @react-native-firebase/messaging@11.2.0: Required to use Firebase Cloud Messaging (FCM)
  • @react-native-community/push-notification-ios: Required to get notification permissions in iOS
  • @types/react-native-push-notification: Contains type definitions for Push Notifications

Next step is to download and install Cocoapods for iOS dependencies:

npx pod-install

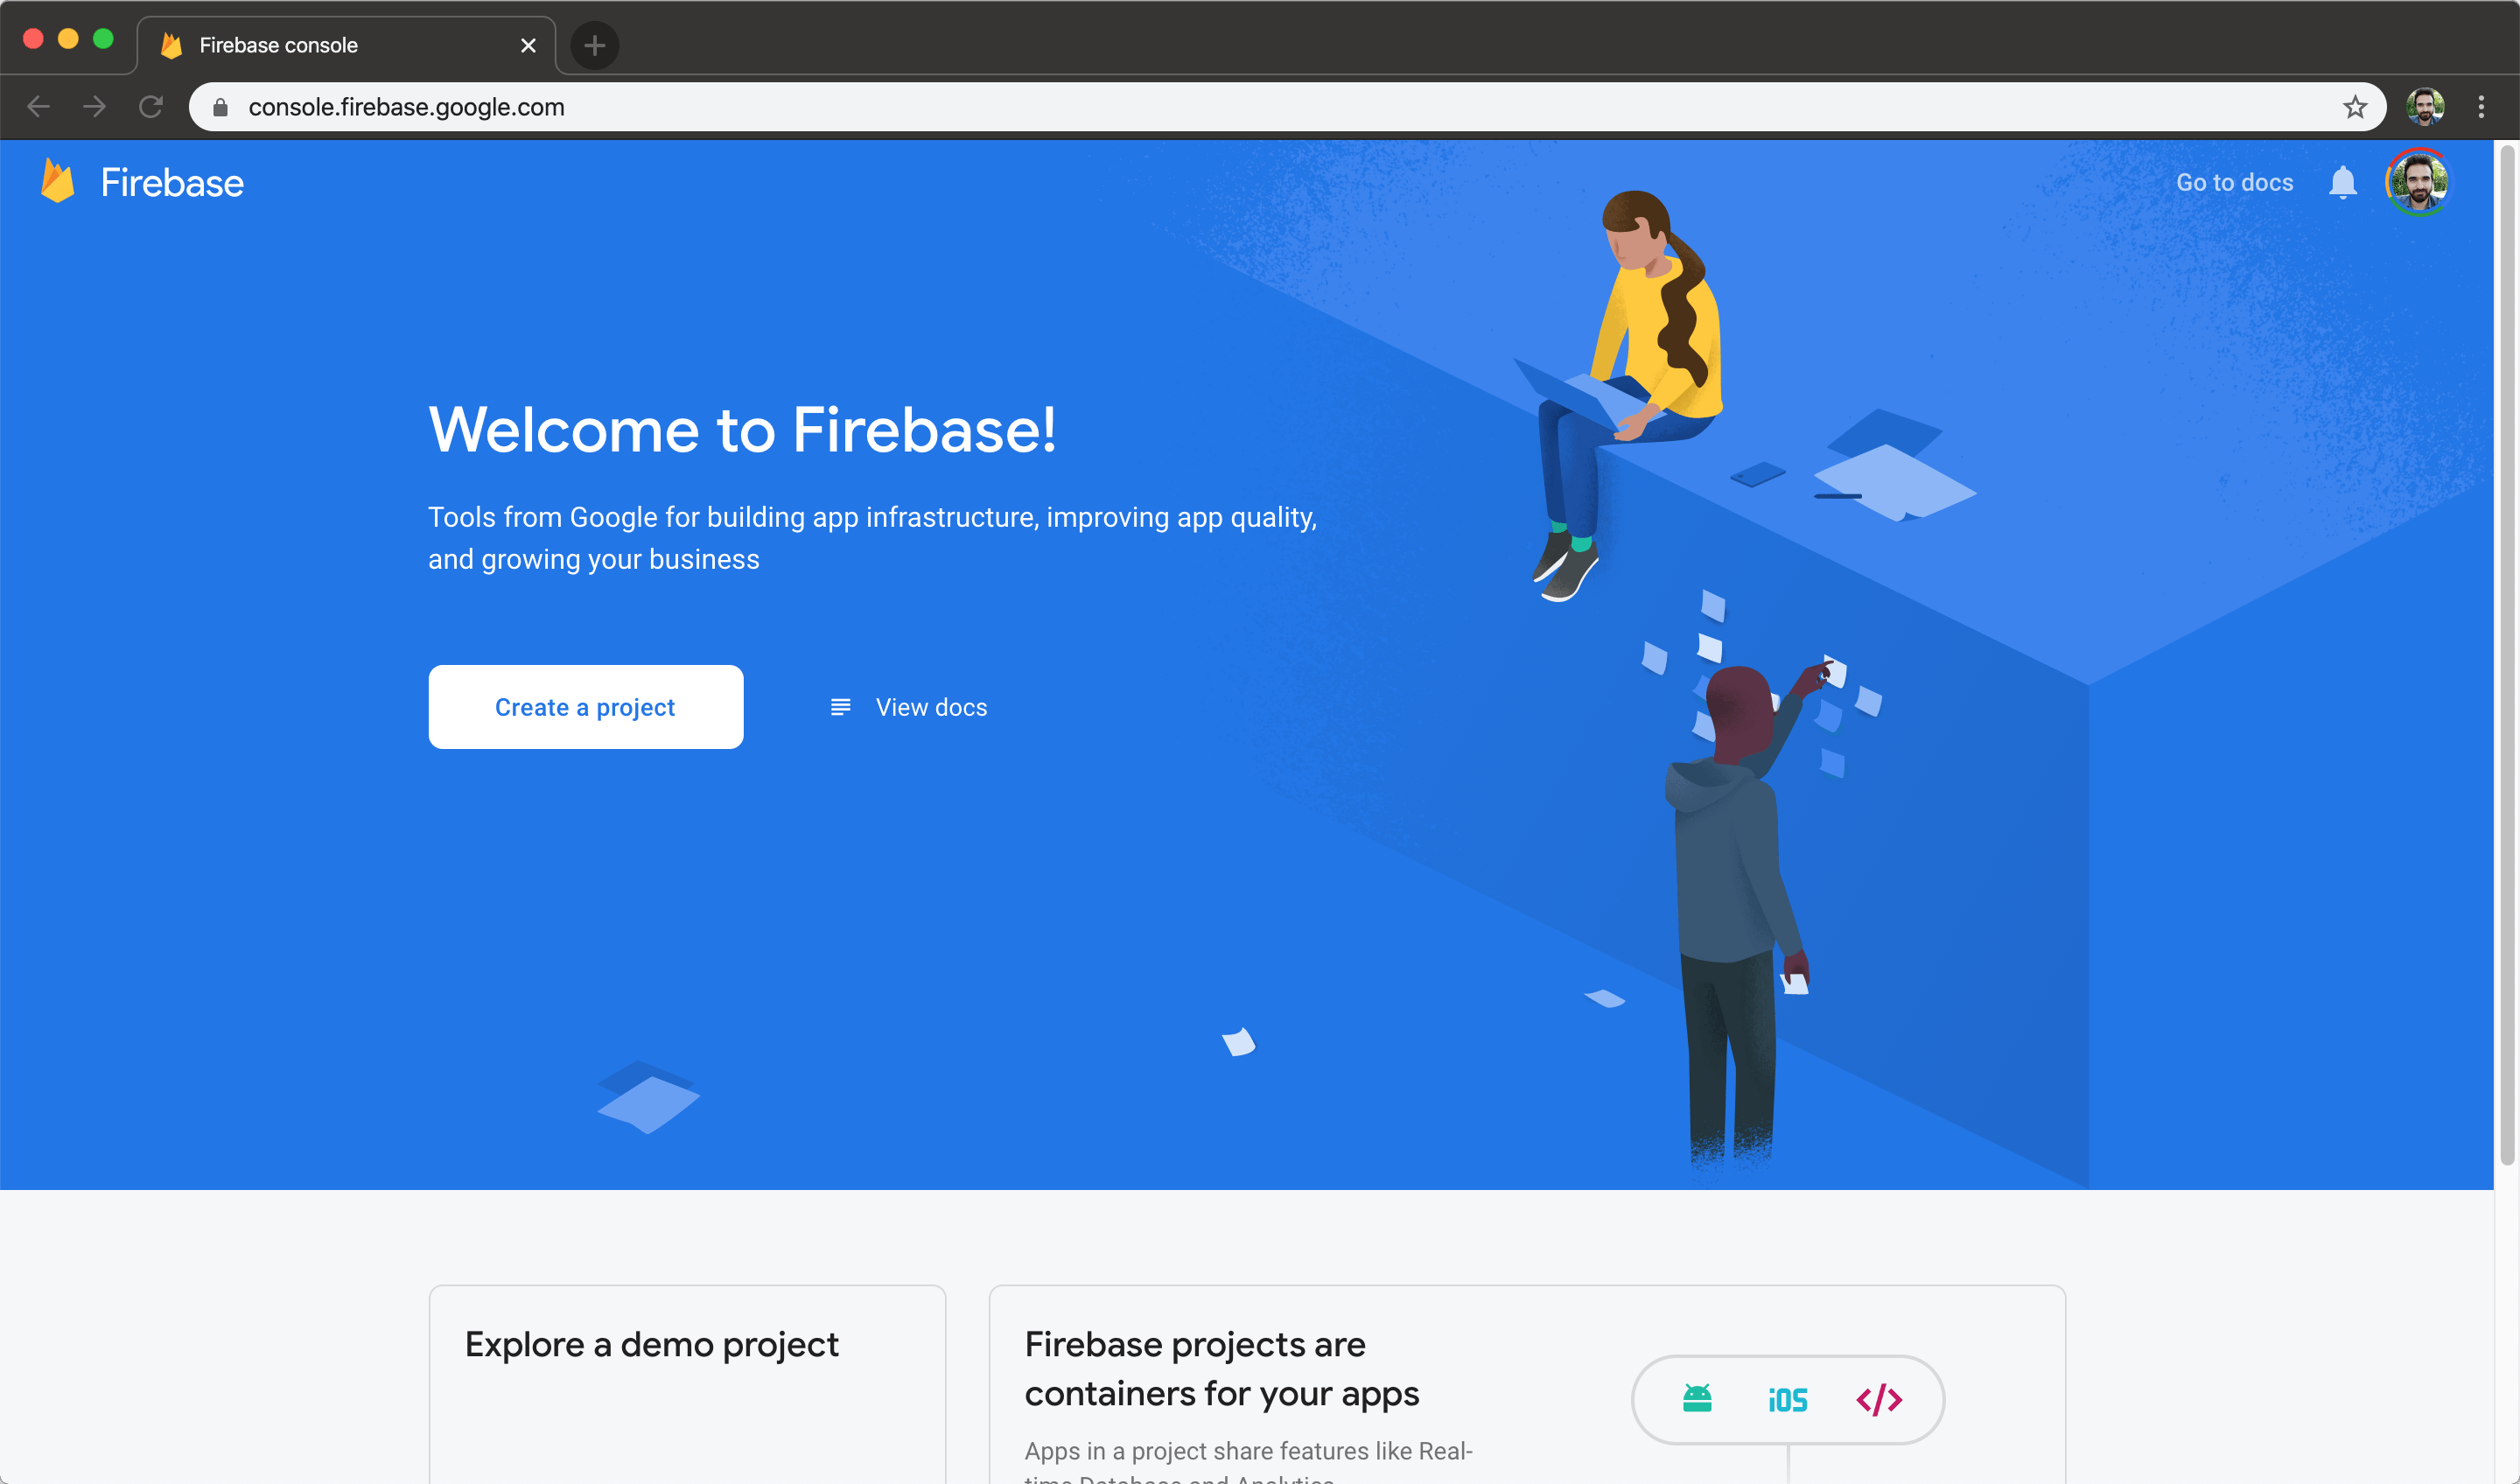
Now it’s time to create a new Firebase project:

Creating a Firebase Project

Go to console.firebase.google.com, and create a project:


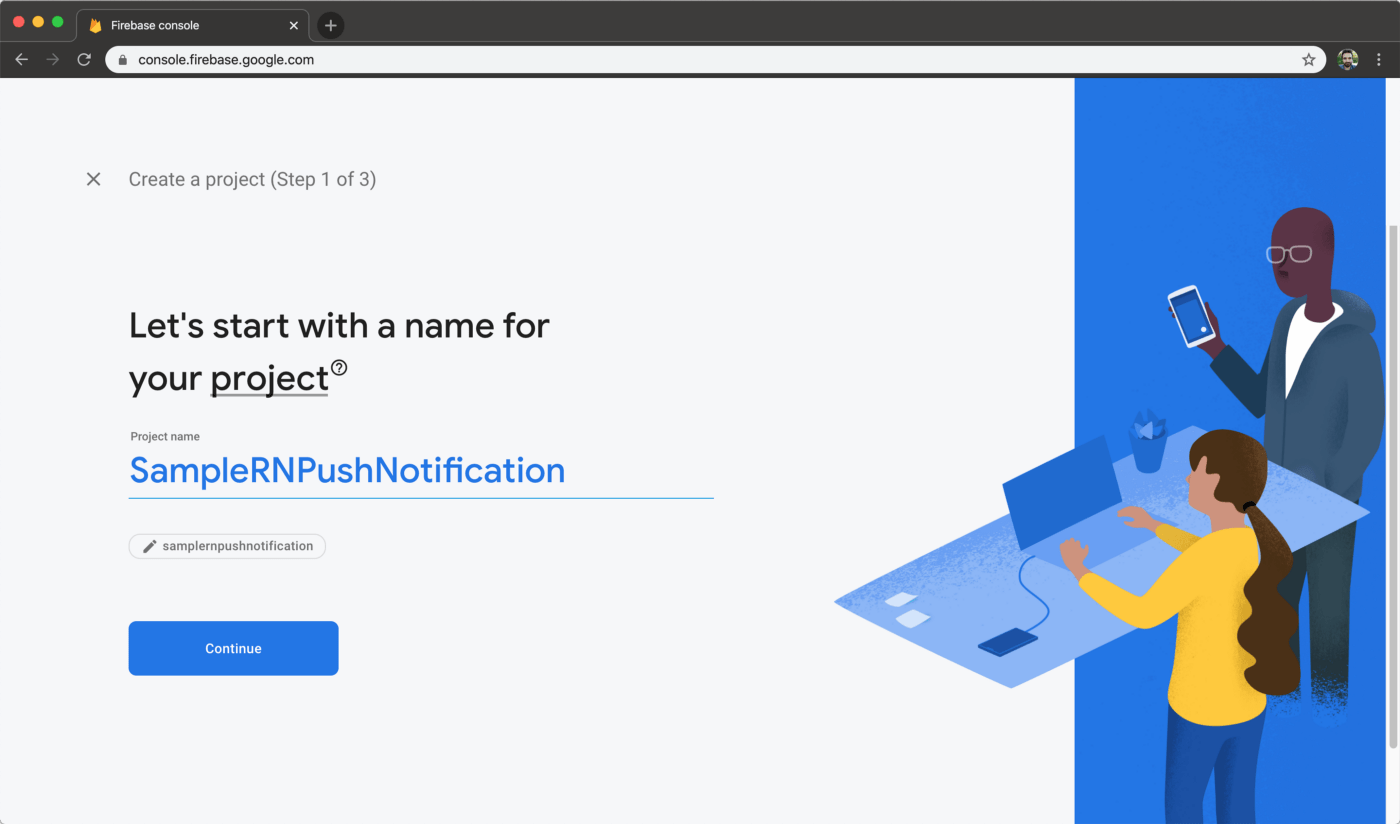
Choose a name for your project. I chose SampleRNPushNotification:


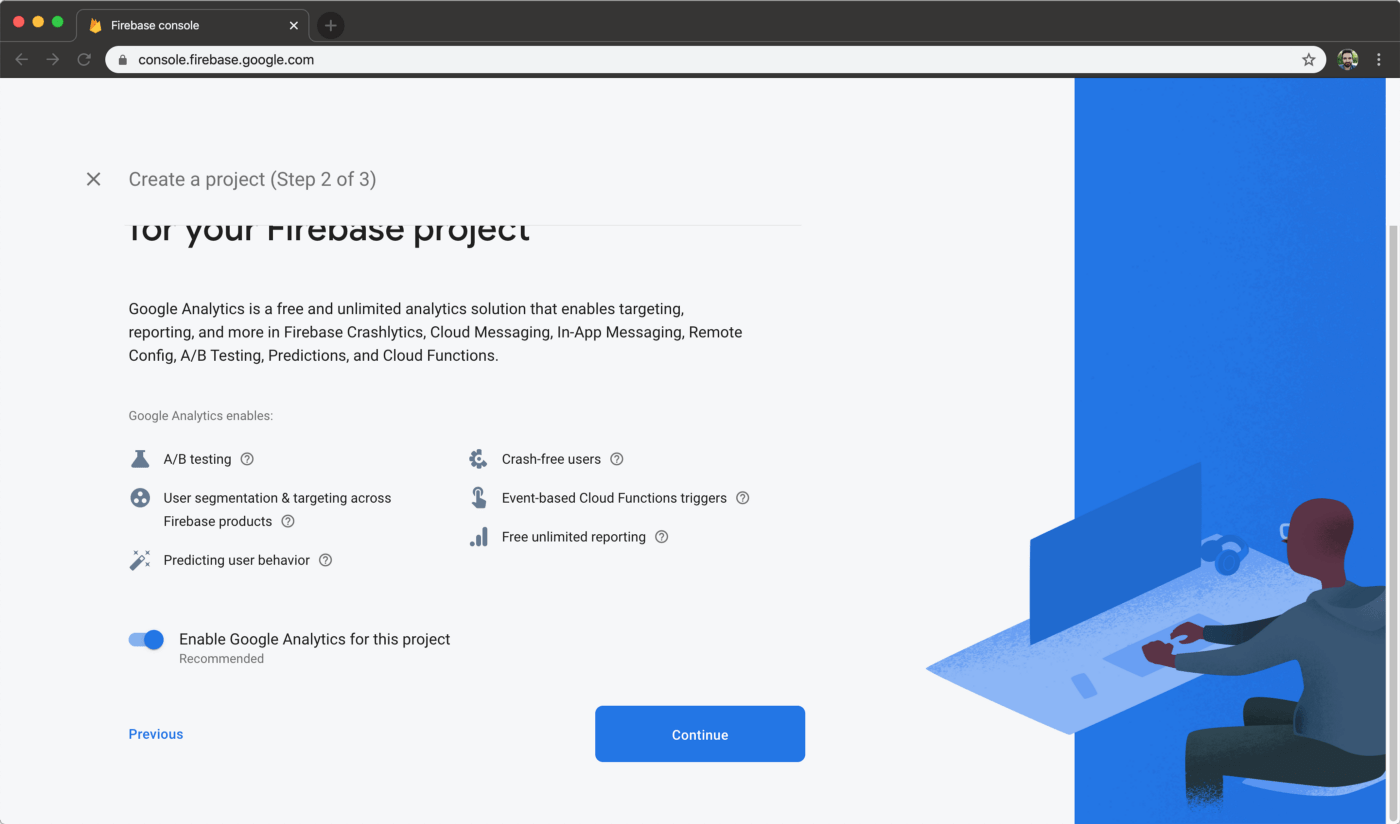
There will be an option to choose whether you’ll use Firebase analytics tools. Select enable and continue:


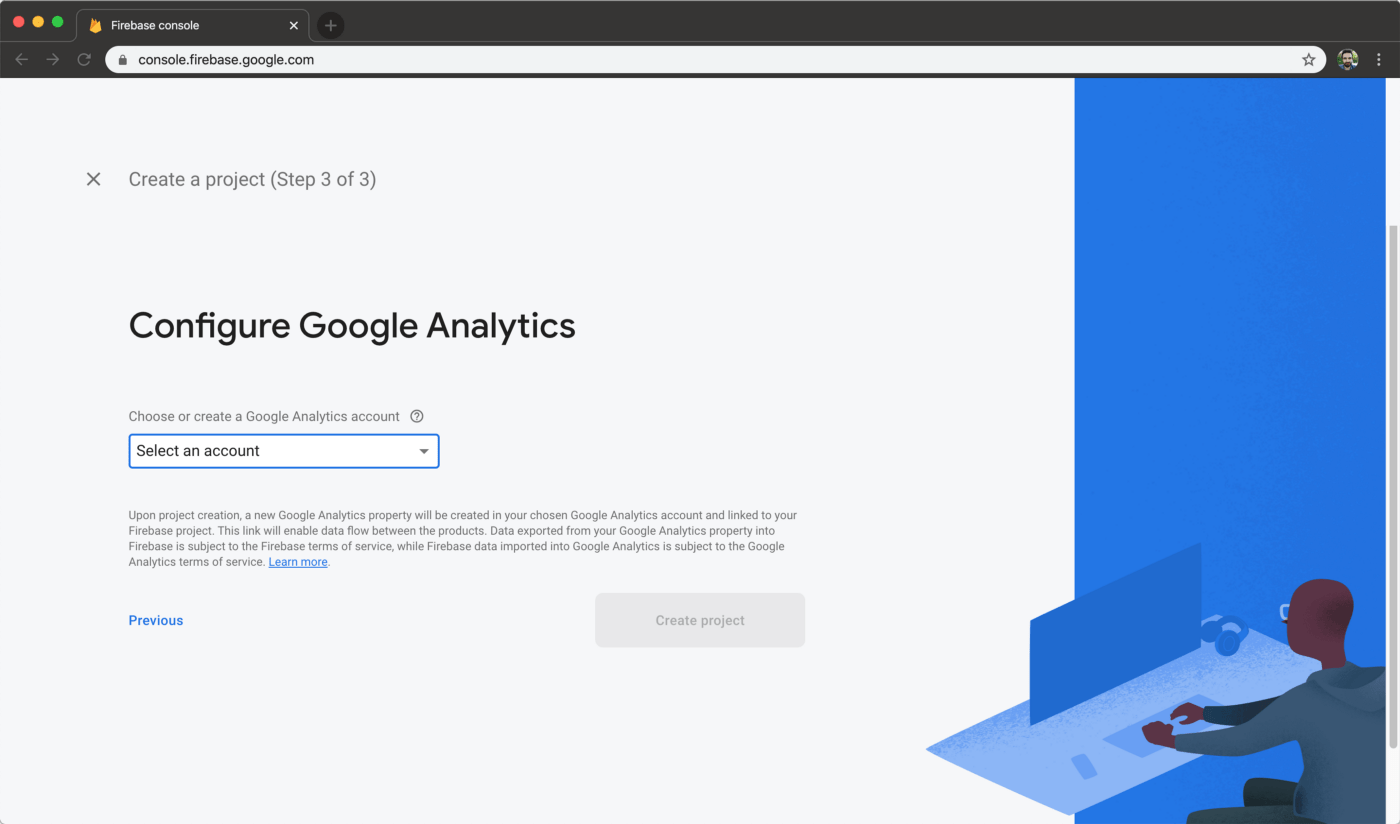
Now select a Google Analytics account:

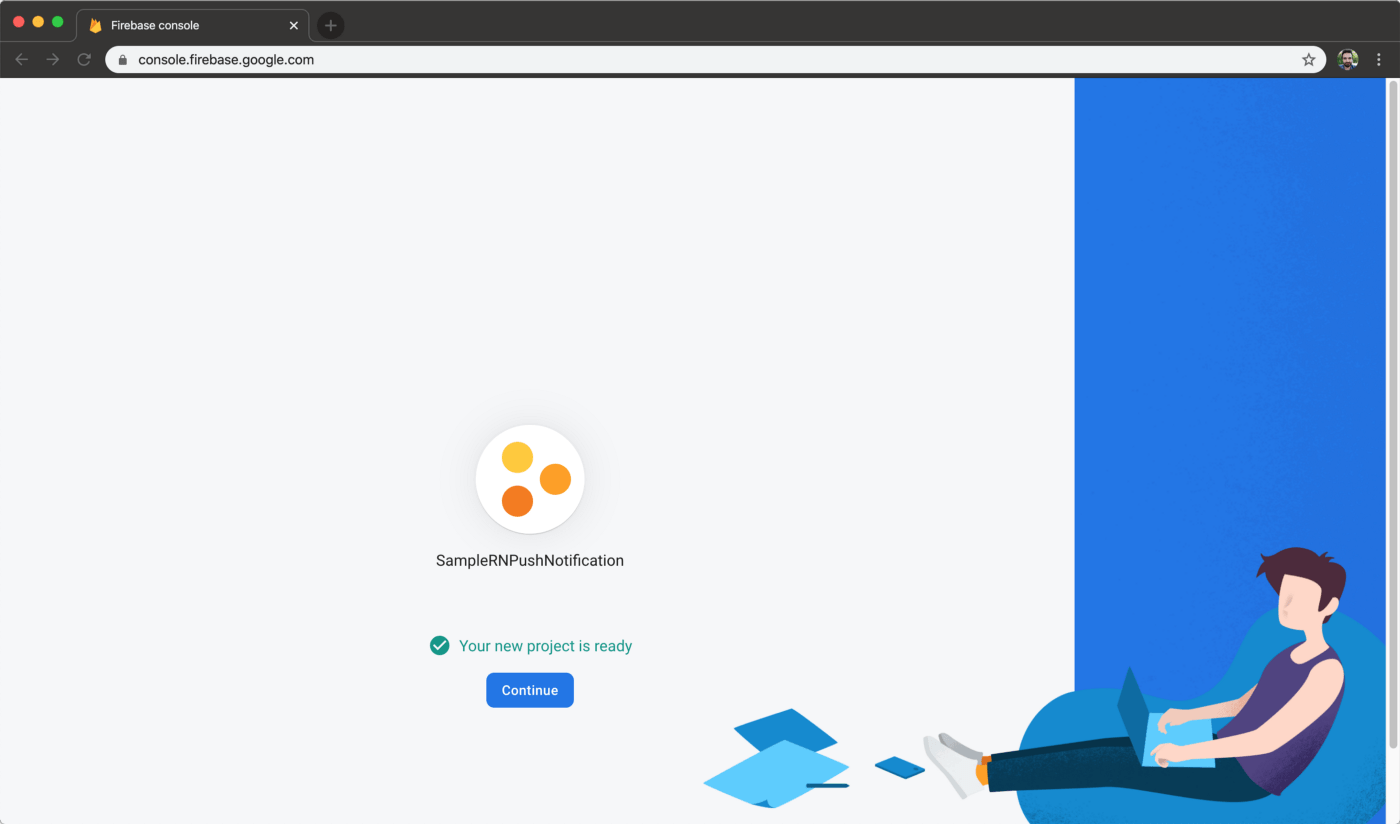
When your project is created, you will be informed with the message ‘’Your project is ready’’:

Creating Push Notifications for Android

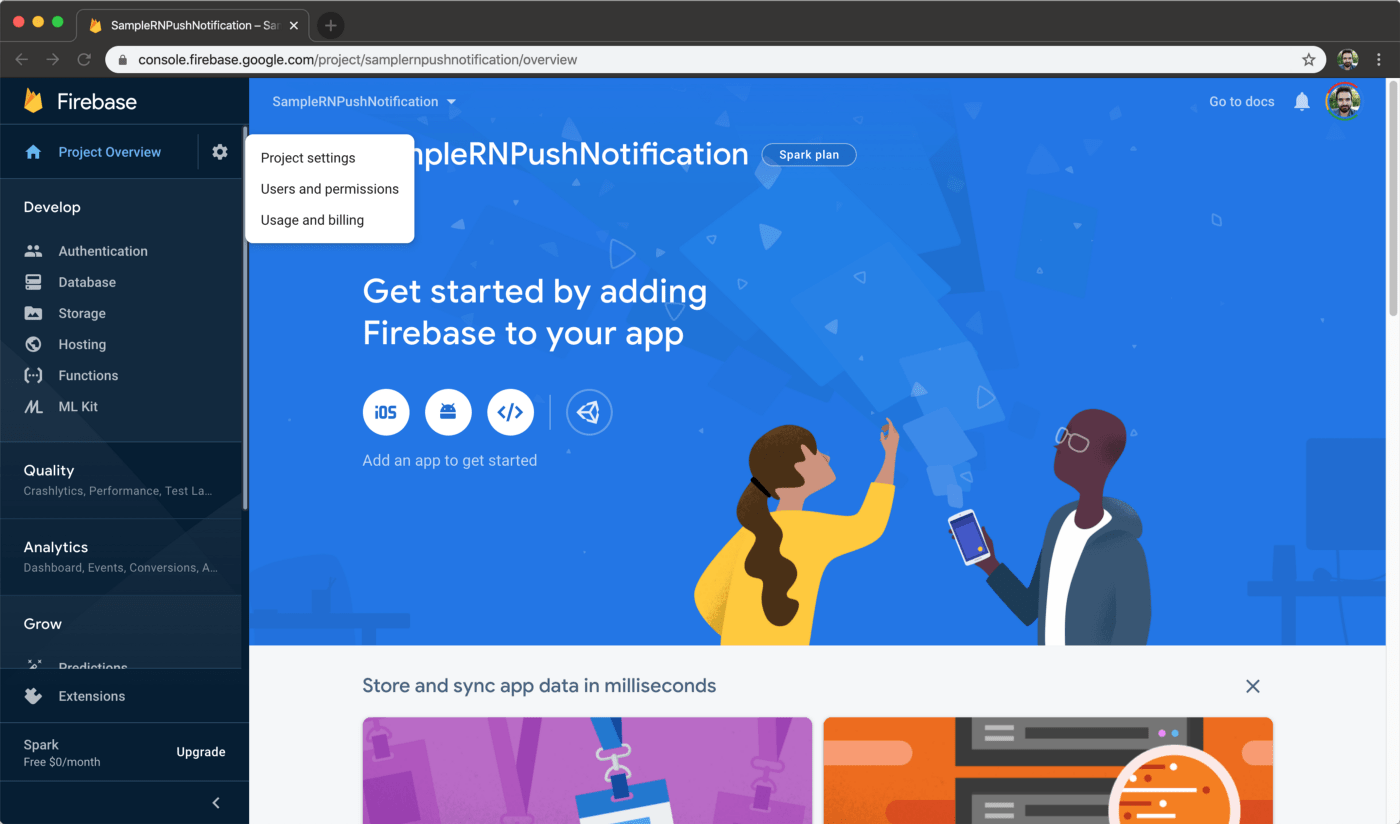
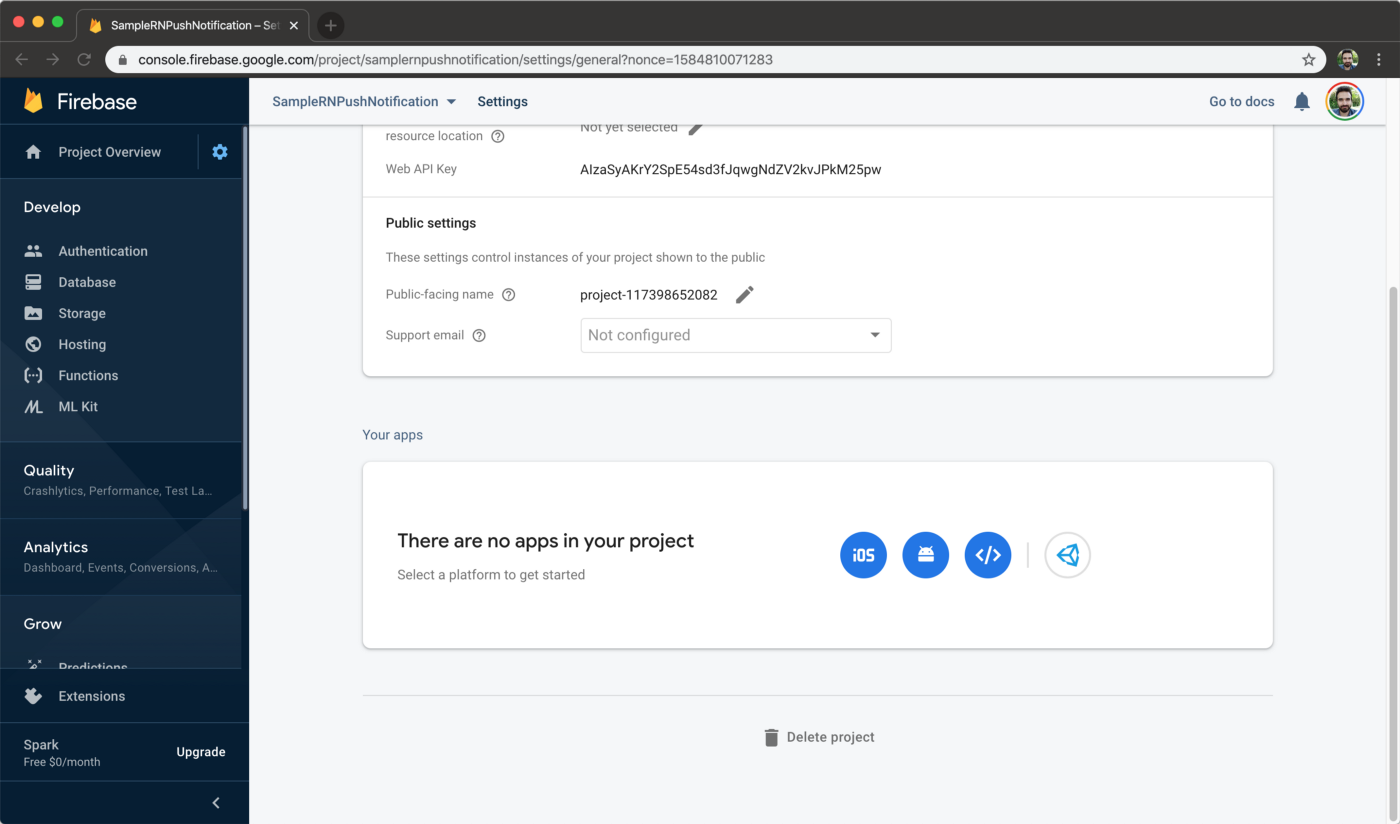
From the left sidebar, select the gear icon next to Project Overview and then select Project Settings:

Scroll down to Your apps section and select the Android button:

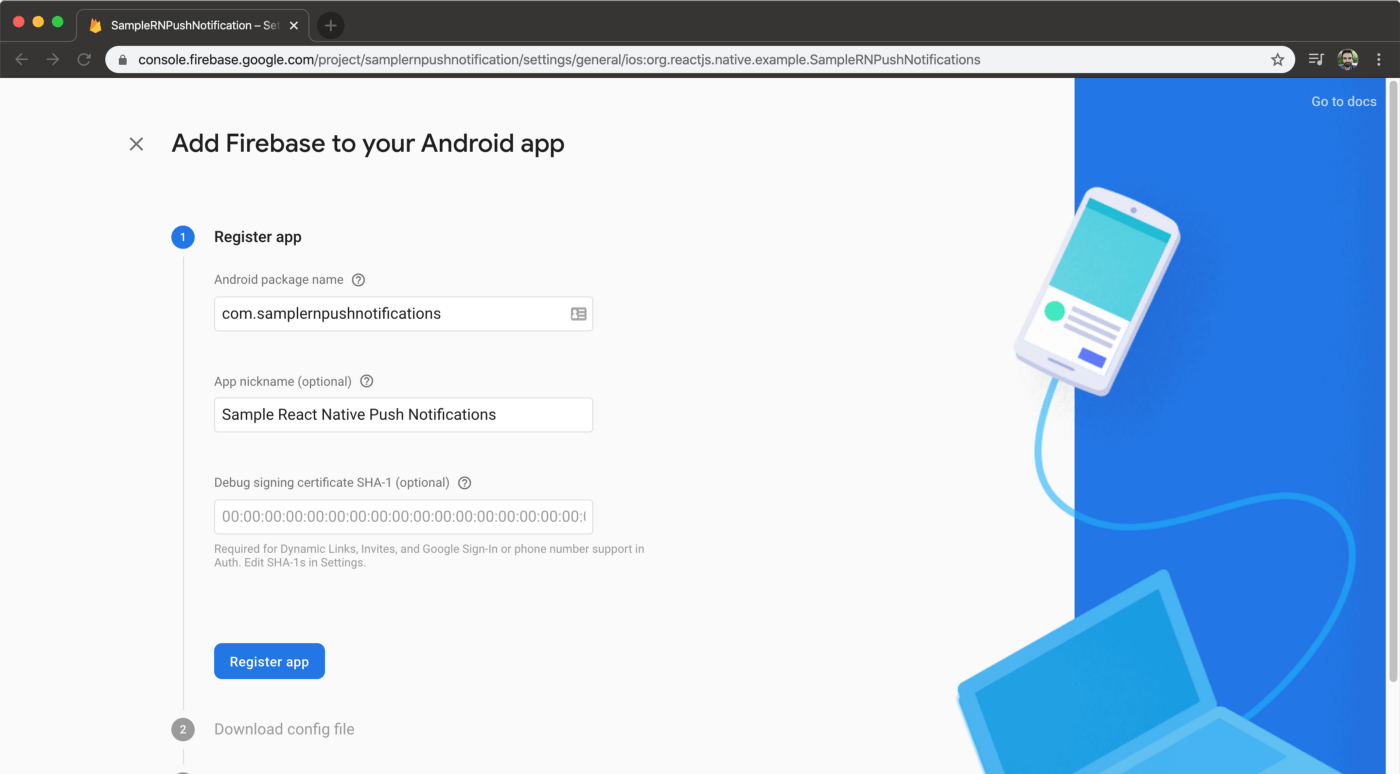
Step 1. On the Register App section, enter the package name of your Android app. Find the package name by opening Android Studio, navigating to build.gradle (Module: app) file. It’s under the defaultConfig section, with the applicationId key:

cat android/app/build.gradle |pcregrep -o1 "applicationId \"(.+)\""

App nickname field is a given name for your app on Firebase console.

For Debug signing certificate field, you can get the SHA1 code by entering following command to the command line:

keytool -list -v -keystore ./android/app/debug.keystore -storepass android |pcregrep -o1 "SHA1: (.+)"

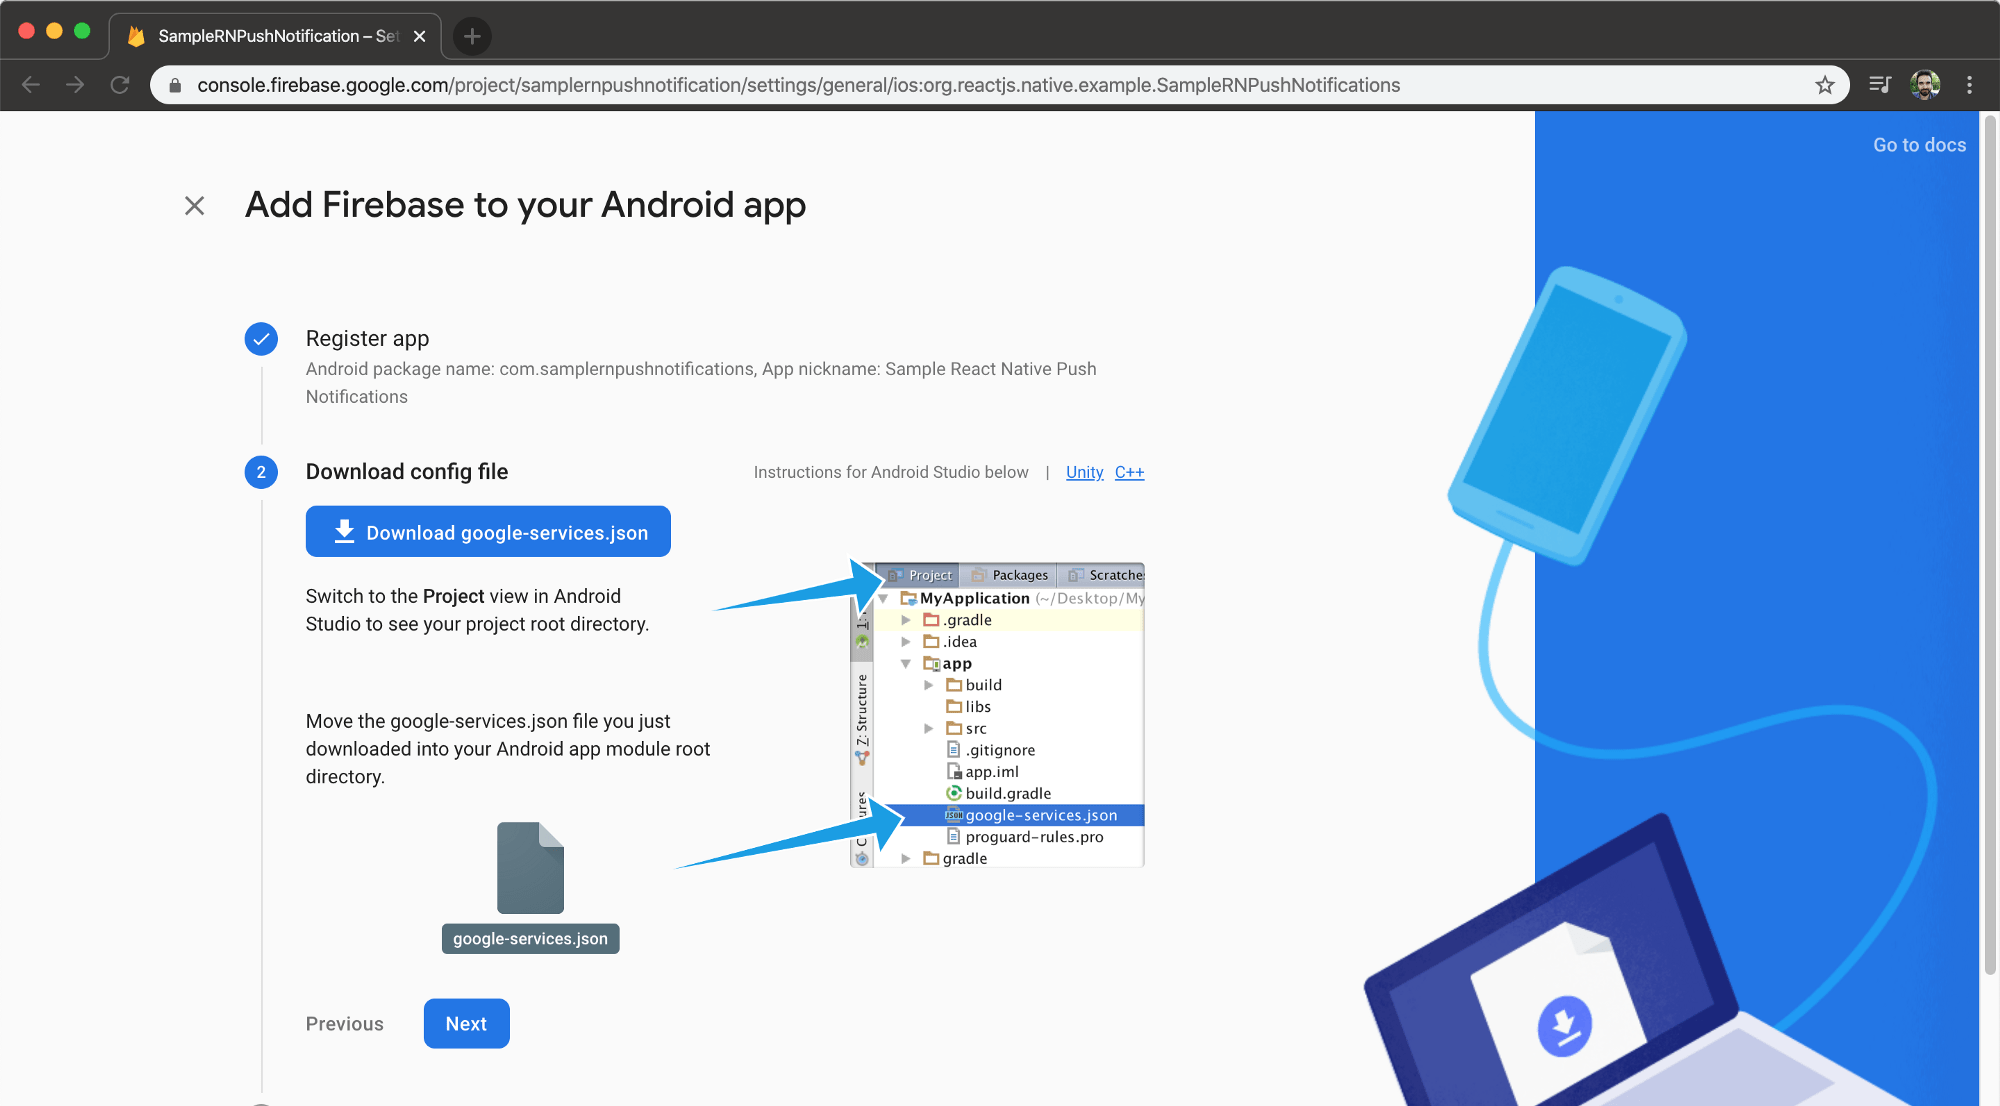
Step 2. Download config file will give you a Firebase configuration file. Drag the file on top of app folder on Android Studio. To open your project in Android Studio, enter the following command on your command line (Mac):

open -a /Applications/Android\ Studio.app ./android

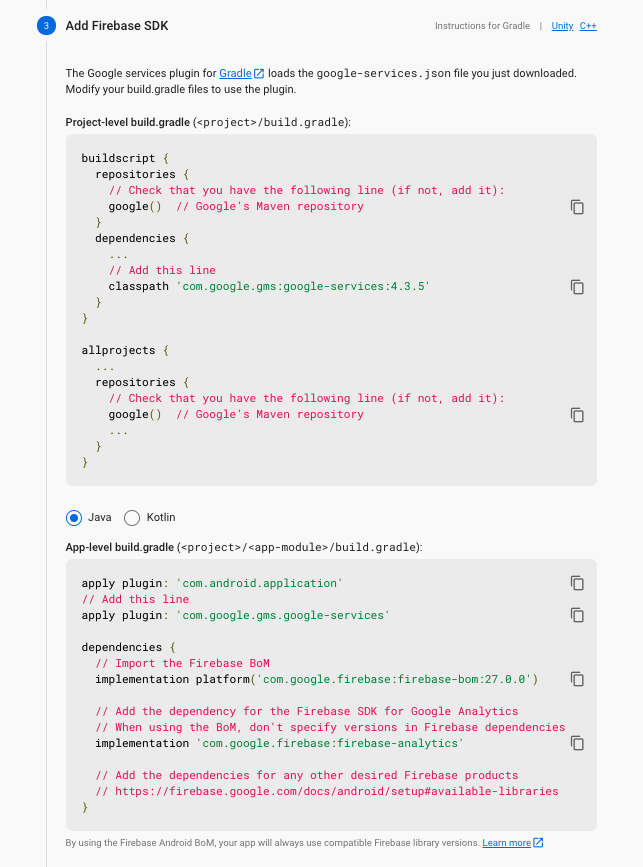
Step 3. Add Firebase SDK step is where we need to add Google Analytics dependency to our Android app. Here’s how you can do it:

dependencies {
  classpath("com.android.tools.build:gradle:4.1.0") 
  classpath 'com.google.gms:google-services:4.3.5' 
  // NOTE: Do not place your application dependencies here, 
  // they belong in the individual module build.gradle files 
}

At the very bottom of the app/build.gradle file, add google services plugin:

apply plugin: "com.google.gms.google-services"

Afterwards, on the same file, under dependencies there will be lines that start with implementation. Add firebase analytics libraries under the last implementation statement there:

implementation platform('com.google.firebase:firebase-bom:27.0.0')
implementation 'com.google.firebase:firebase-analytics'

After all is complete, you’ll see a Sync Now button on Android Studio. Click it and synchronize the project with gradle.

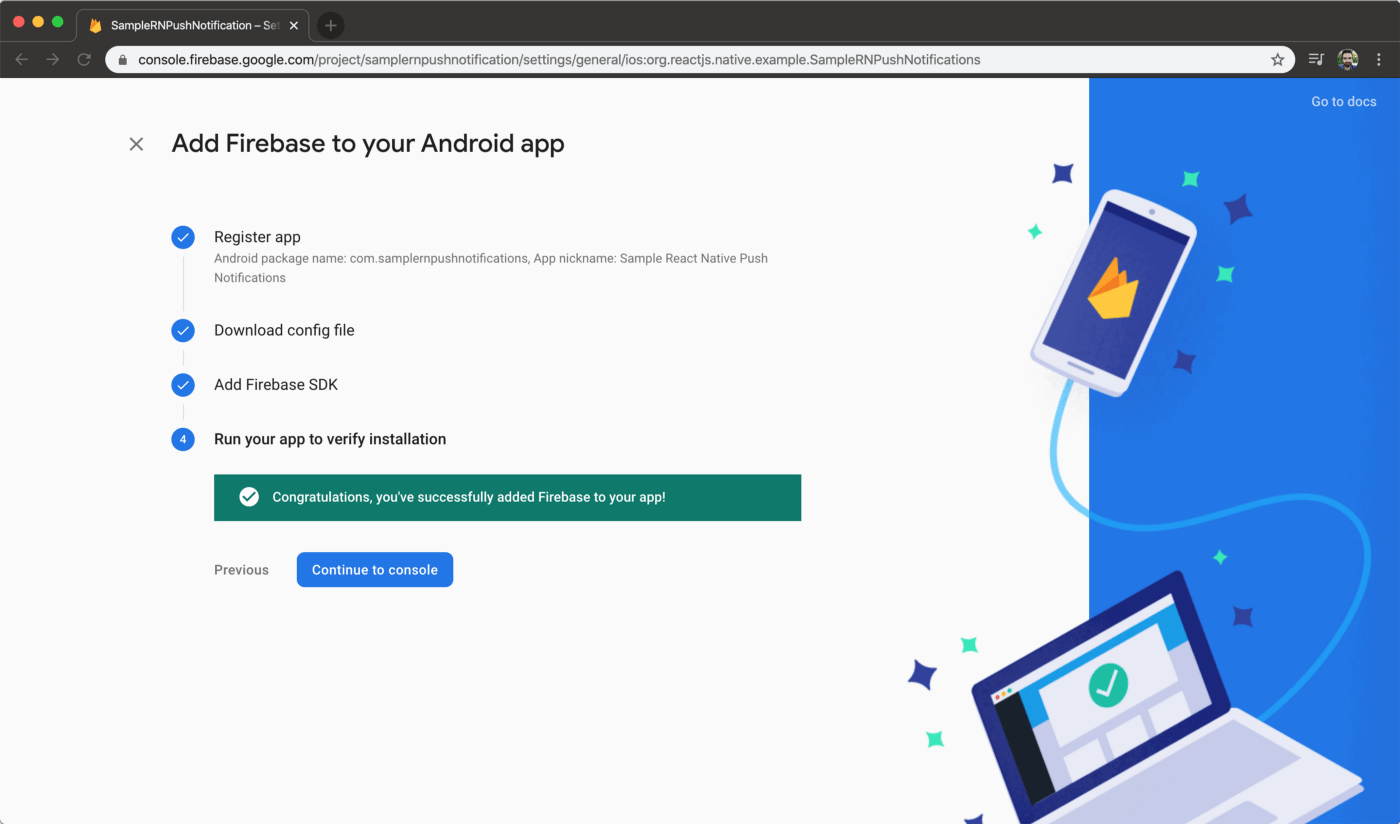
Step 4. Run your app to verify installation so that Firebase Analytics is set up properly. Run it using the command and make the “Congratulations” part active on Firebase Console:

yarn run android

Configuring Firebase on React Native App

To get the device’s token, let’s open the App.tsx file and make the following changes:

import React, {useEffect} from 'react'; 
import firebase from '@react-native-firebase/app'; 
import messaging from '@react-native-firebase/messaging'; 
const App = () => { 
    useEffect(() => { 
        messaging().getToken(firebase.app().options.messagingSenderId) 
        .then(x => console.log(x)) 
        .catch(e => console.log(e)); 
    }, []); 
    return <></>; 
}; 

export default App;

Then, run the project:

yarn android

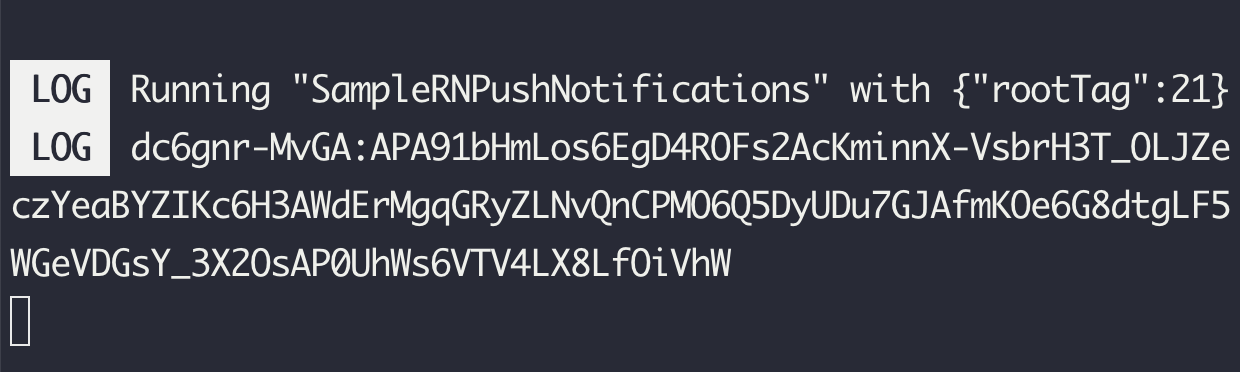
When the project starts running, you’ll see the device’s token on the Metro Bundler terminal:

Note: We’ll use this token to send test notifications to our device.

To display the notification on screen while the app is open, update App.tsx file as follows:

import React, {useEffect} from 'react'; 
import firebase from '@react-native-firebase/app'; 
import '@react-native-firebase/messaging'; 
import PushNotification from 'react-native-push-notification'; 
import {Platform} from 'react-native'; 
import PushNotificationIOS from '@react-native-community/push-notification-ios'; 
import {FirebaseMessagingTypes} from '@react-native-firebase/messaging'; 

const App = () => { 
    useEffect(() => { 
        firebase.messaging().onMessage(response => { 
            console.log(JSON.stringify(response));
            if (Platform.OS !== 'ios') { 
                showNotification(response.notification!); 
                return; 
            } 
            PushNotificationIOS.requestPermissions().then(() => 
                showNotification(response.notification!), 
            ); 
        }); 
    }, 
    []
    ); 
    const showNotification = ( notification: FirebaseMessagingTypes.Notification, ) => { 
        PushNotification.localNotification({ title: notification.title, message: notification.body!, }); 
    }; 
    return <></>; 
}; 

export default App;

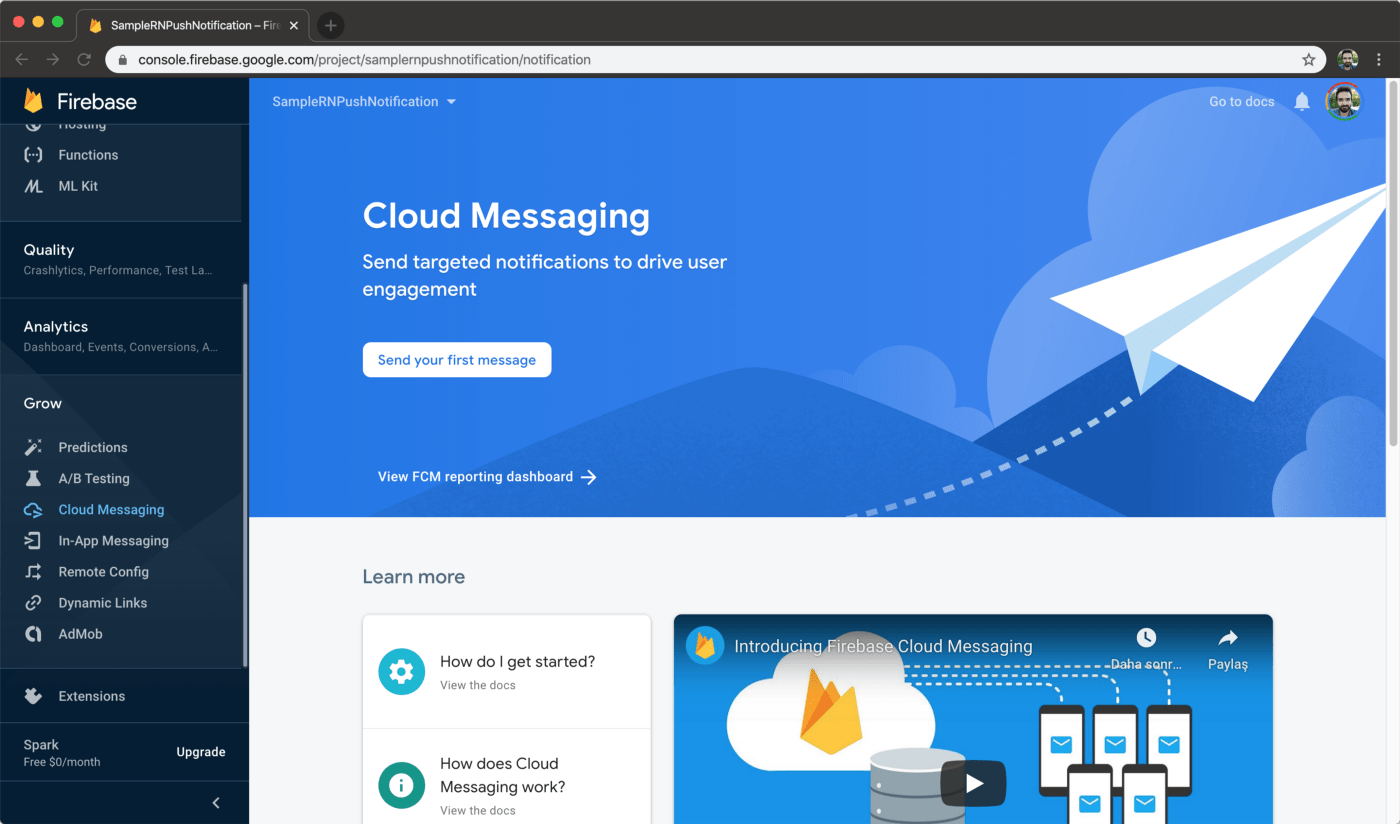
All done! Now let’s navigate to Firebase console to test whether sending notifications work. Select Cloud Messaging under Grow section on the left. Then, select Send your first message button.

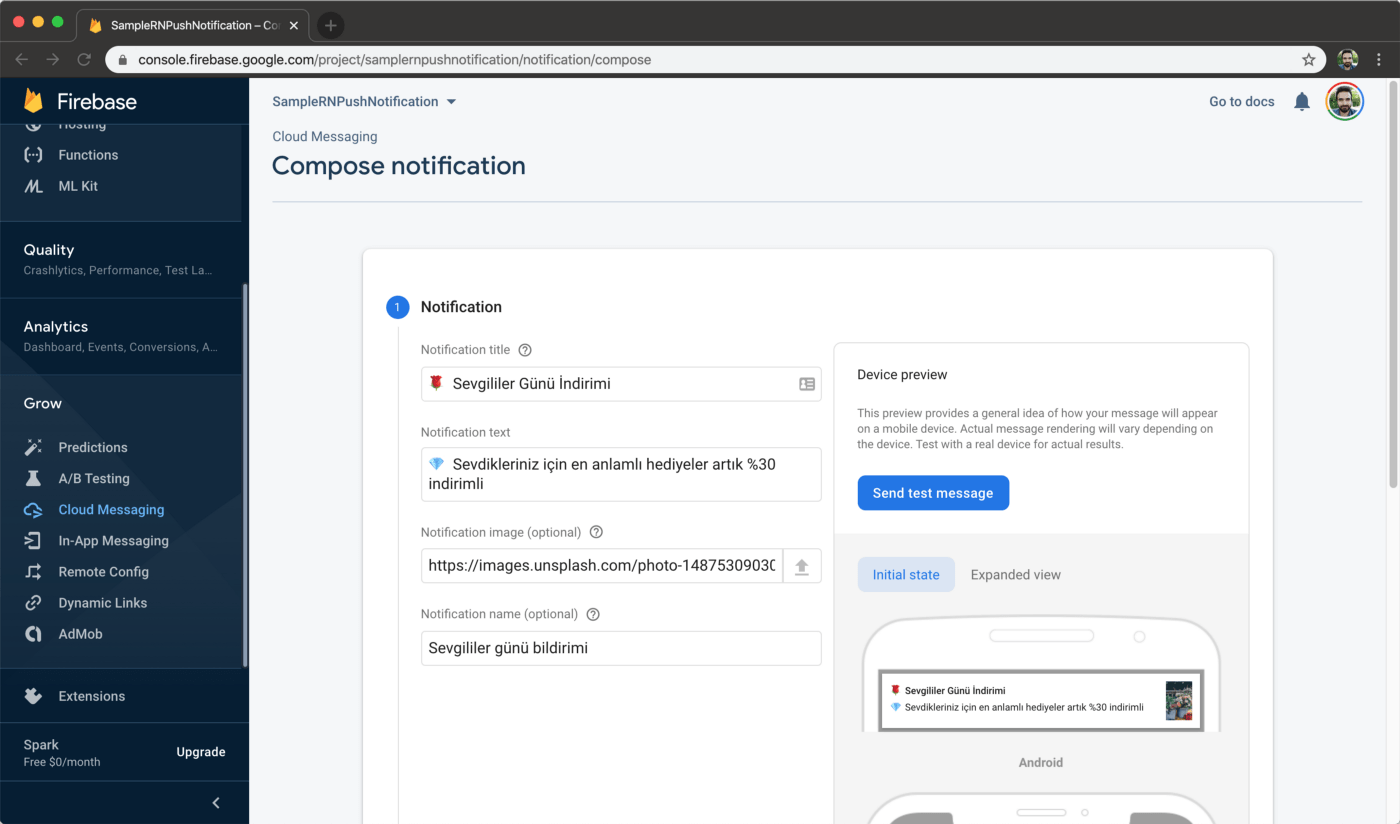
1. Under Notification section, fill in the content for your notification. To add images to your notification, you must be on a paid plan on Firebase. You can get the test image from unsplash.

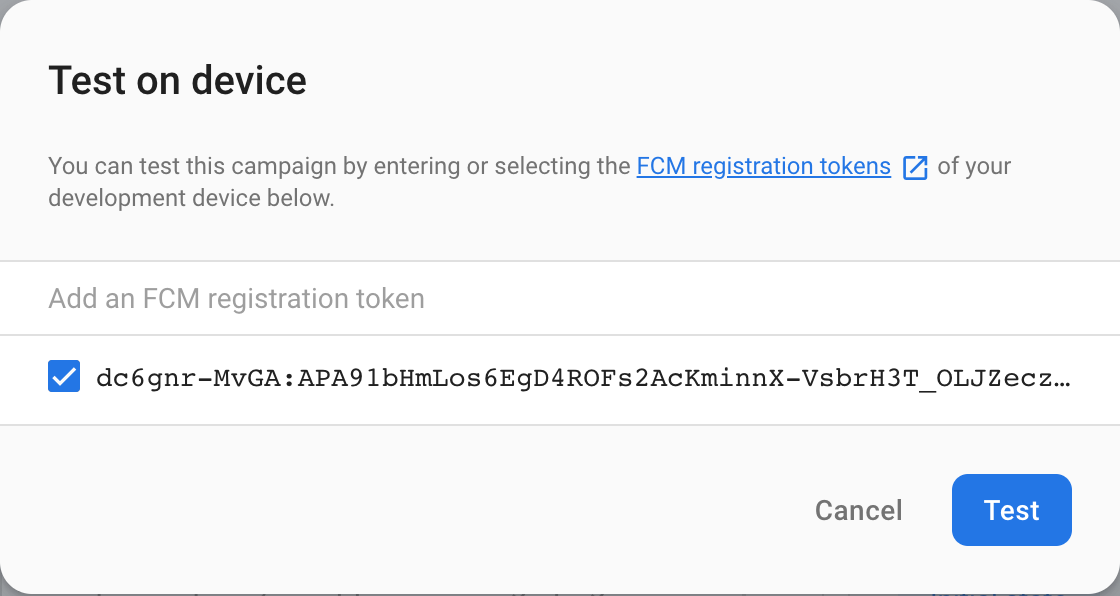
2. Select Send test message. Then on the next field, you can enter the device token you got from the last section to send a test notification:

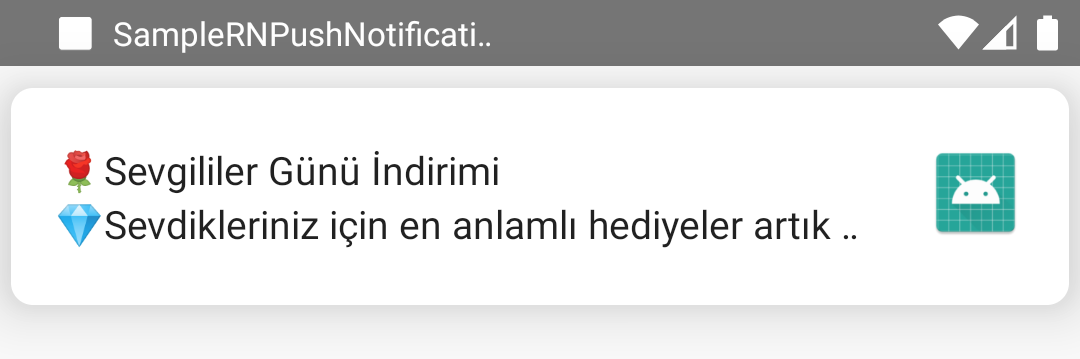
Make sure the app ran at least once on your device before sending. Do all the adjustments and tap Review. Verify the content and tap Publish. After sending, you’ll see the notification like this:

Creating Firebase Push Notifications on iOS

Open the iOS project in Xcode:

open ios/SampleRNPushNotifications.xcworkspace

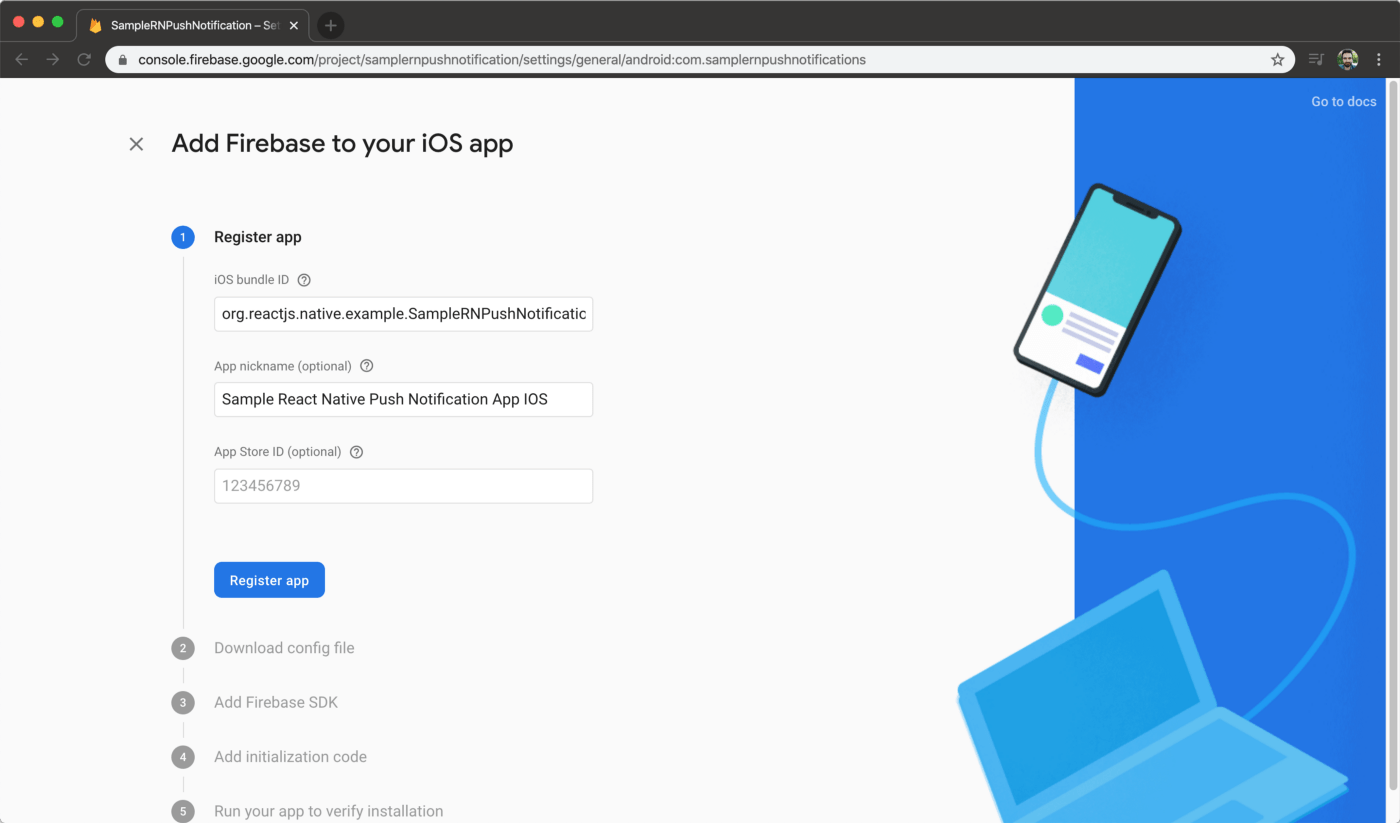
Navigate to Firebase console, and add an iOS app:

Follow the steps there afterwards.

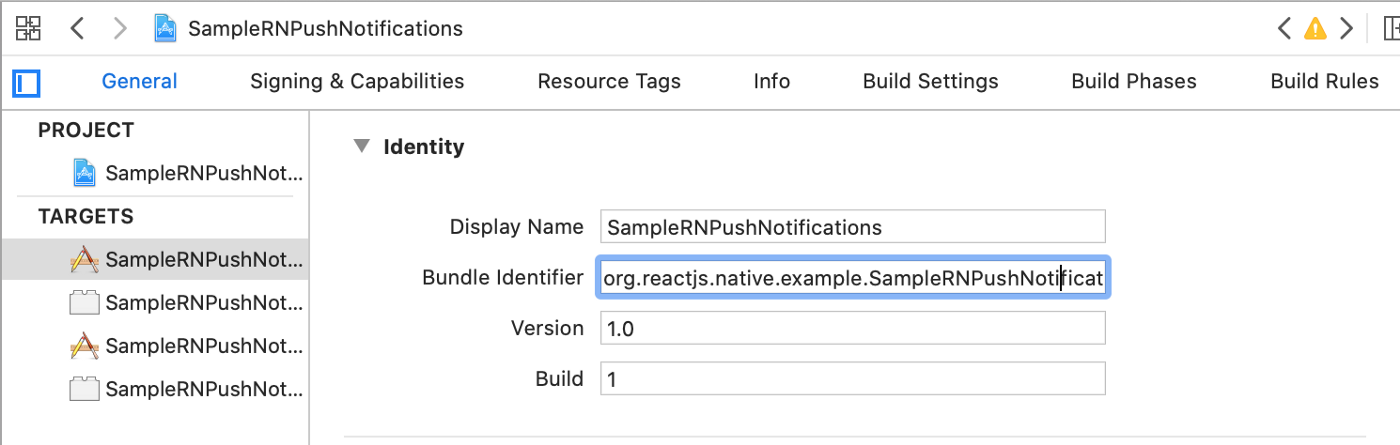
Step 1. Register app: First, you need to find your app’s bundle identifier. It can be found from Xcode:


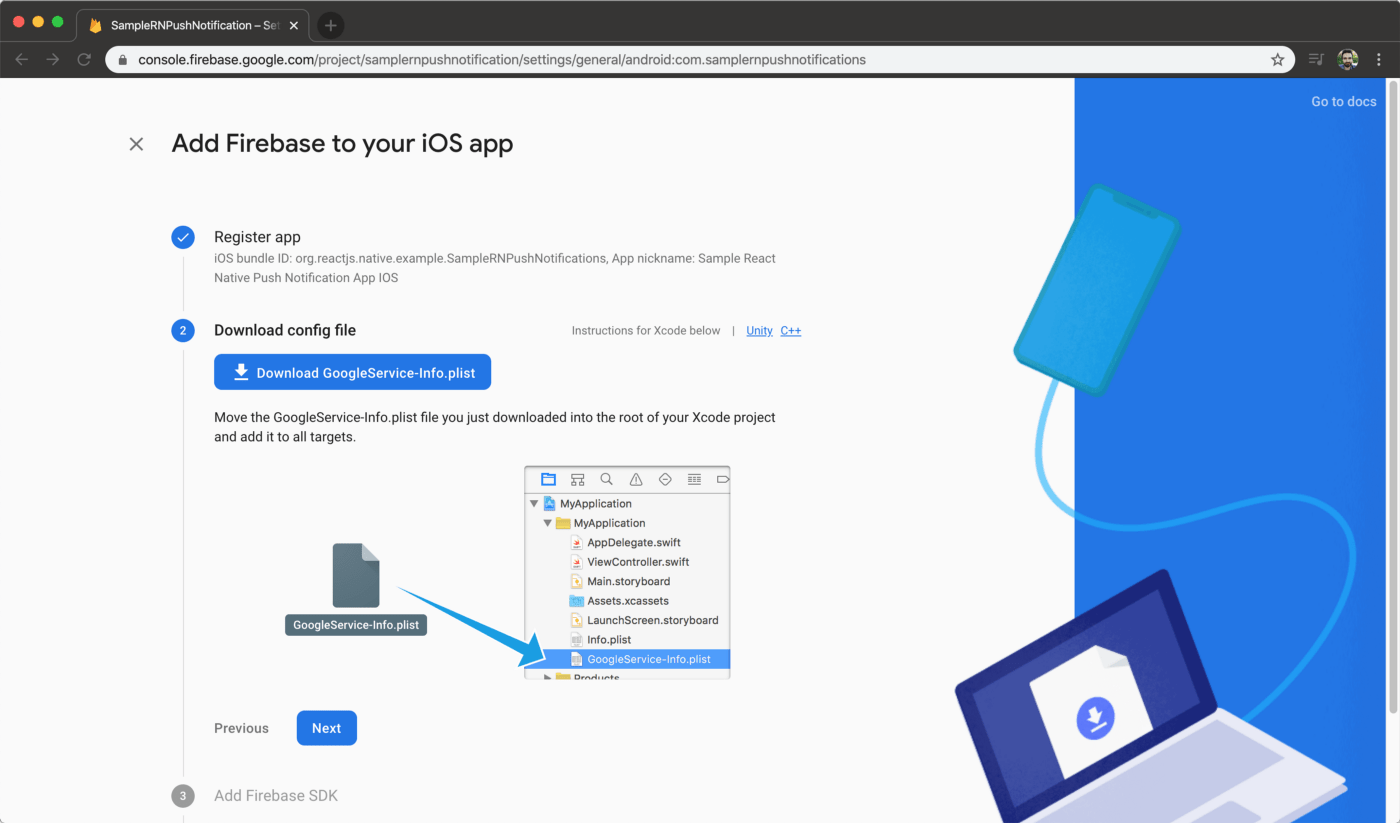
Step 2. Download config file: Download the plist file and drag it into SampleRNPushNotifications folder. Pick all 4 targets on the panel that follows:


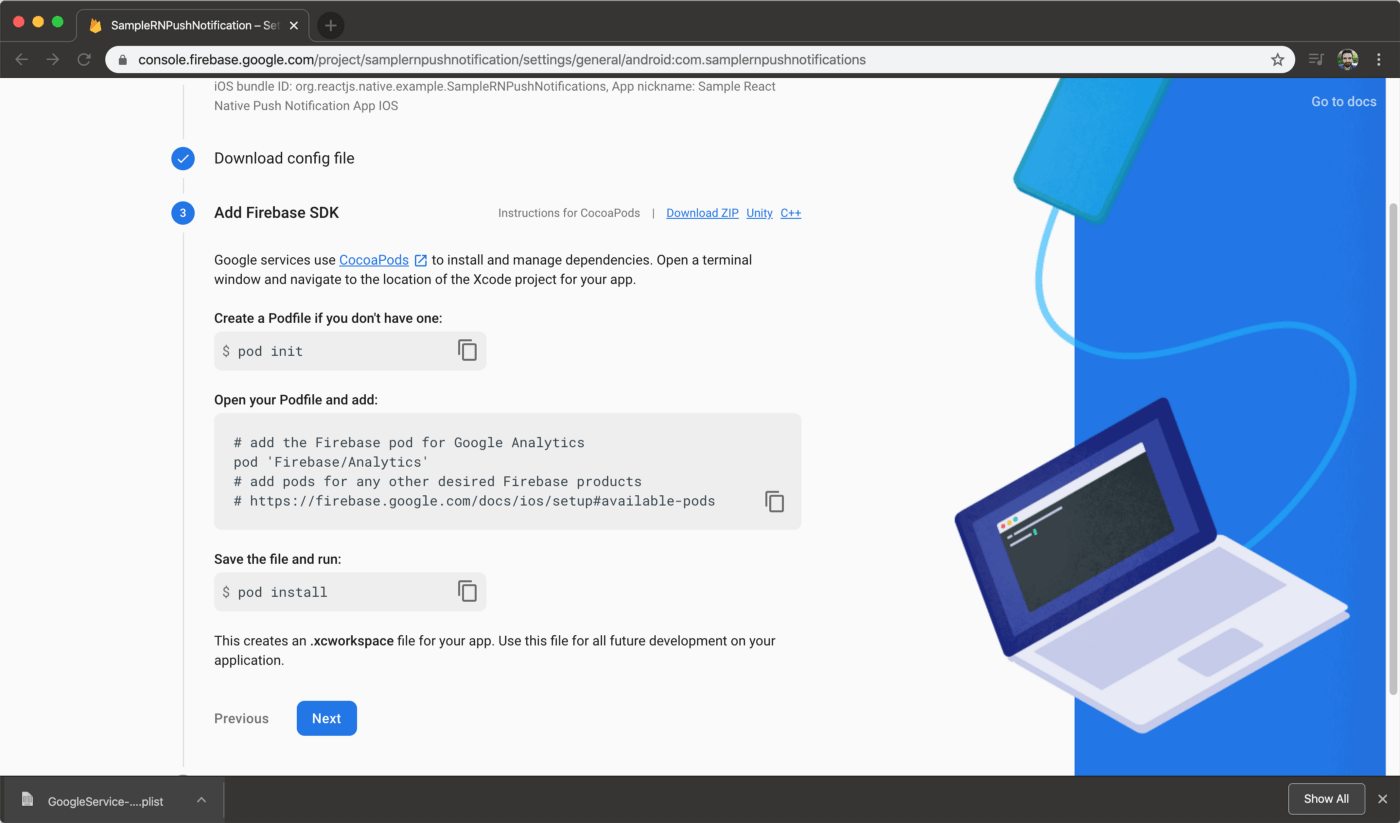
Step 3. Add firebase SDK: All you need to do is to add the following line to your Podfile file (not Podfile.lock):

pod 'Firebase/Analytics'

then run Cocoapods:

pod install --project-directory=ios/

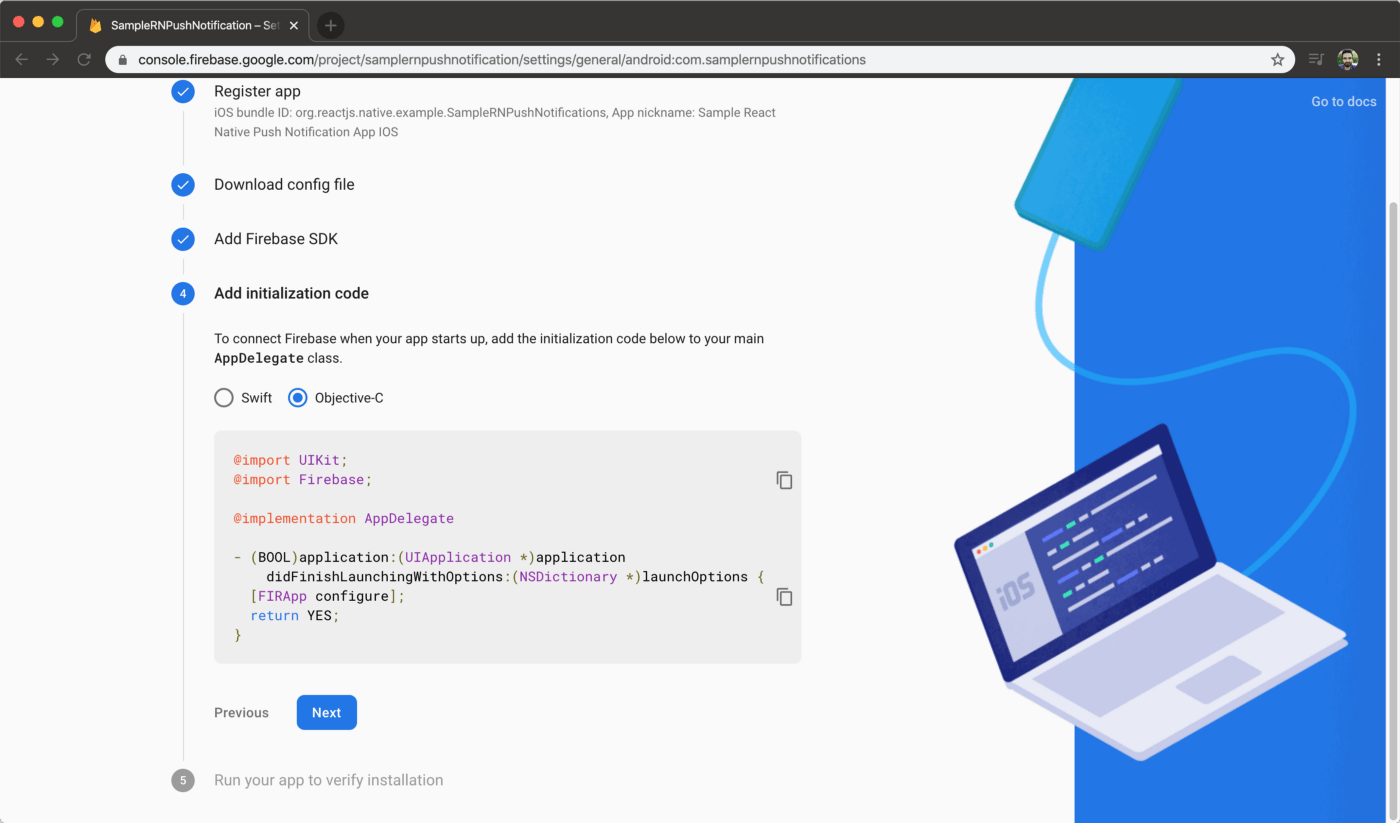
Step 4. Add initialization code: Go to AppDelegate.m file and import Firebase to the bottom of the imports:

@import Firebase;

then find the didFinishLaunchingWithOptions method and inside call initialize on Firebase:

[FIRApp configure];

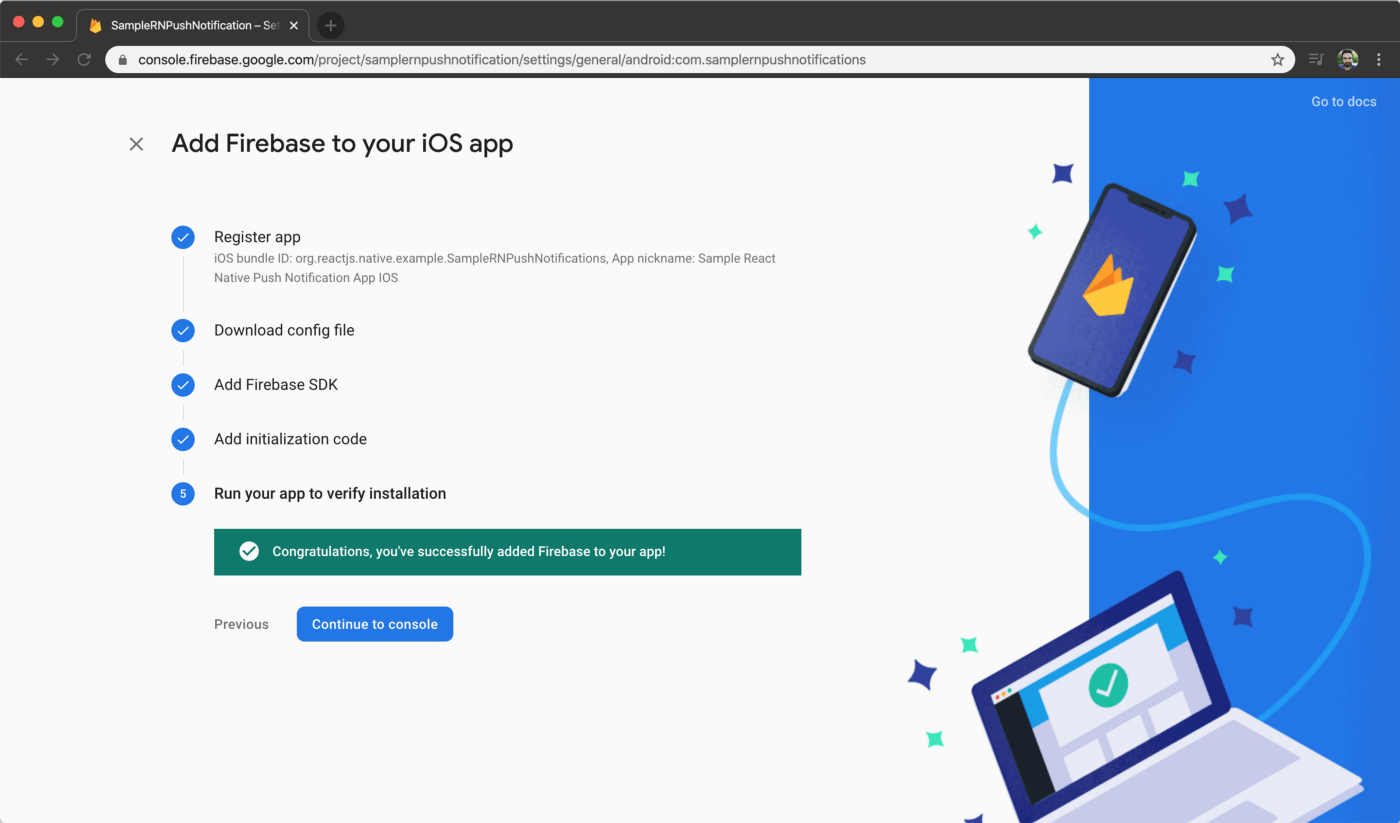
Step 5. Run your app to verify installation: Run the app and see whether everything works:

npx react-native run-ios

Making changes to React Native App

If you’re using the iOS simulator to test, you might see a warning like the one below.

Apple now allows to test push notifications on the iOS simulators. For a detailed guide, check out SwiftLee’s article.

Make modifications to App.tsx file to make it work on iOS. This is the final file:

import React, {useEffect} from 'react'; 
import firebase from '@react-native-firebase/app'; 
import '@react-native-firebase/messaging'; 
import PushNotification from 'react-native-push-notification'; 
import {Platform} from 'react-native'; 
import {FirebaseMessagingTypes} from '@react-native-firebase/messaging'; 
import PushNotificationIOS from '@react-native-community/push-notification-ios'; 

const App = () => { 
    const getToken = () => { 
        firebase .messaging() 
        .getToken(firebase.app().options.messagingSenderId) 
        .then(x => console.log(x)) 
        .catch(e => console.log(e)); 
    }; 
    const registerForRemoteMessages = () => { 
        firebase 
        .messaging() 
        .registerDeviceForRemoteMessages() 
        .then(() => { 
            console.log('Registered'); 
            requestPermissions(); 
        }) 
        .catch(e => console.log(e)); 
    }; 
    const requestPermissions = () => { 
        firebase 
        .messaging() 
        .requestPermission() 
        .then((status: FirebaseMessagingTypes.AuthorizationStatus) => { 
            if (status === 1) { 
                console.log('Authorized'); 
                onMessage(); 
            } else { 
                console.log('Not authorized'); 
            } 
        }) 
        .catch(e => console.log(e)); 
    }; 
    const onMessage = () => { 
        firebase.messaging()
        .onMessage(response => { 
            showNotification(response.data!.notification); 
        }); 
    }; 
    const showNotification = (notification: any) => { 
        console.log('Showing notification'); 
        console.log(JSON.stringify(notification)); 
        PushNotification.localNotification({ 
            title: notification.title, message: notification.body!, 
        }); 
    }; 
    getToken(); 
    if (Platform.OS === 'ios') { 
        registerForRemoteMessages(); 
    } else { 
        onMessage(); 
    } 
    return <></>; 
}; 

export default App;

Where to Go From Here?

Sending push notifications gets easy with rnfirebase plugin. With a few minutes of configuration and little code, we’ve implemented the ability to send push notifications to our React Native app via Firebase.

You can check https://github.com/mikehardy/rnfbdemo project to create boilerplate React Native apps with Firebase. All you need to do is to create a new app on Firebase for ‘com.rnfbdemo’ and add GoogleServices-Info.plist and json files into the project. The rest is handled by make-demo.sh file.

You can find the final project we’ve built here at react-native-push-notification-firebase repo.

Use Appcircle to build, test and distribute your React Native apps. From creating an account to starting your first build takes less than 30 seconds. Start for free.

Happy coding!