Jetpack Compose Navigation and Deeplinks
Navigating between screens in mobile apps is essential knowledge. We’ll look at Jetpack Compose Navigation patterns and how to integrate it with deeplinks.
Why Need Navigation?
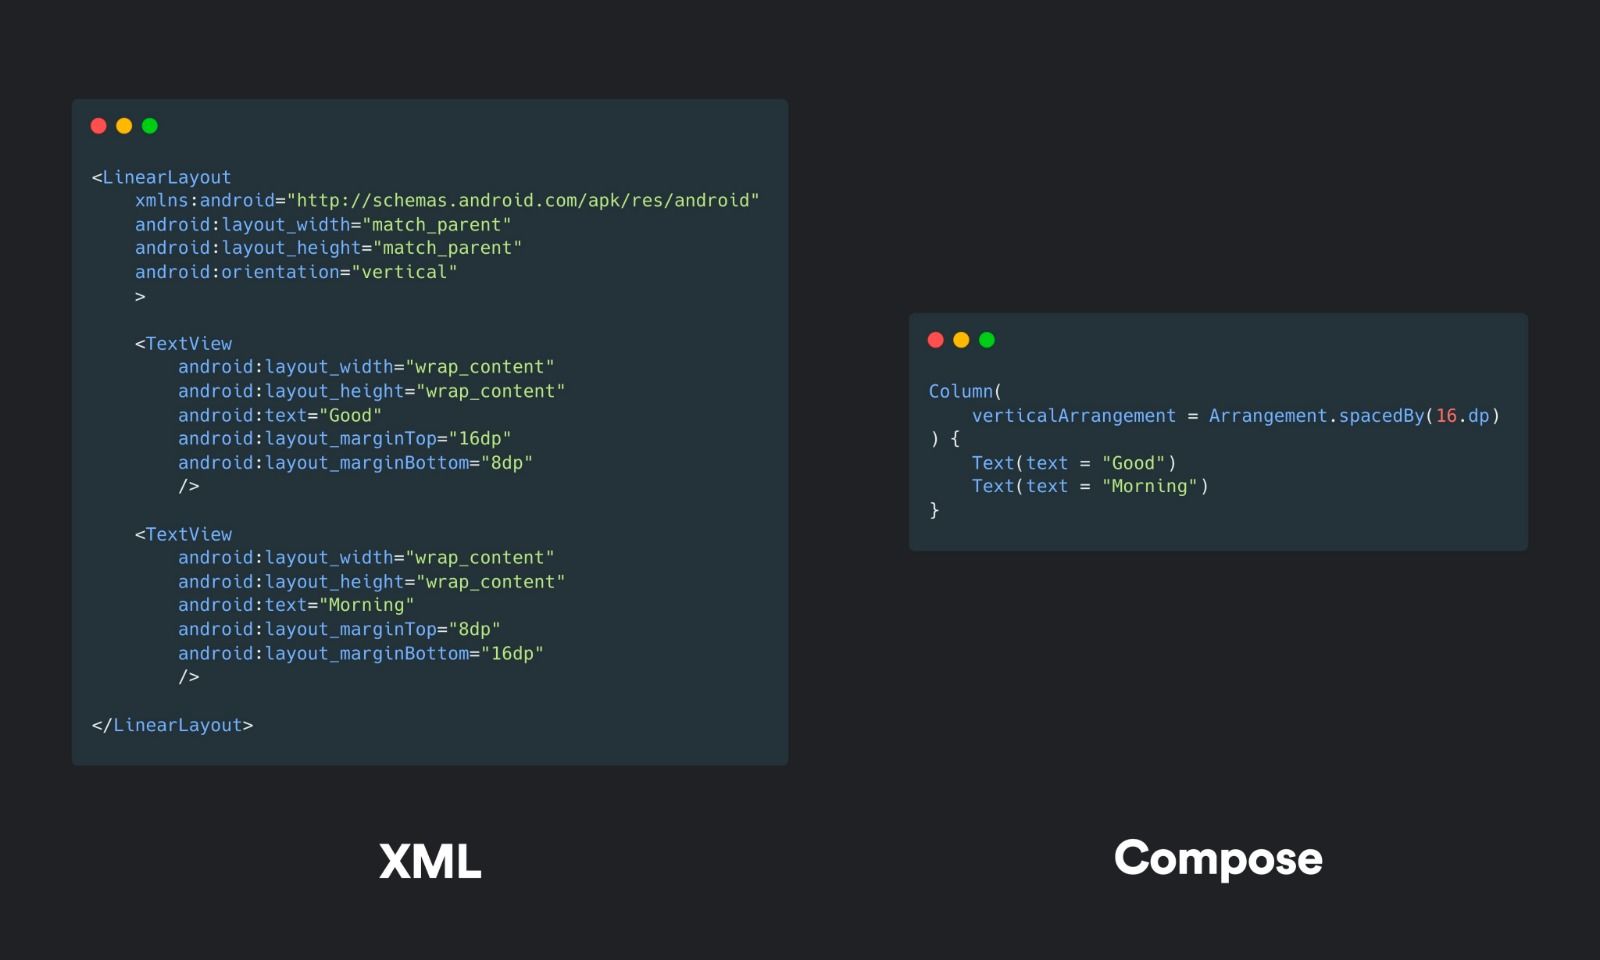
Android applications usually have more than one screen since they have multiple features. In case of a messaging application we have a contact list screen, a message list screen, a message screen, a settings screen, so on. It’s difficult to cram all these features into one screen and ViewModel. Your code will turn into spaghetti. To separate our features we use multiple fragments/composable and navigation connects them.
Navigation In Android
Let’s look at Android applications that doesn’t use Jetpack Compose. In the early days of Android, having multiple activities and using intents were the trend. Then, single activity with multiple fragments and using jetpack navigation made more sense. We won’t dive into the details of jetpack navigation in this article. But here is the android documentation if you would like to learn more about it. Finally, with Jetpack Compose, jetpack navigation had a different way of usage.

Navigating Compose Via Fragments
Before diving into navigation in compose, we can use fragments for using Jetpack navigation with graphs. Fragments will just call compose screens:
<?xml version="1.0" encoding="utf-8"?>
<LinearLayout
    xmlns:android="http://schemas.android.com/apk/res/android"
    android:orientation="vertical"
    android:layout_width="match_parent"
    android:layout_height="match_parent">

    <androidx.compose.ui.platform.ComposeView
        android:id="@+id/compose_view"
        android:layout_width="match_parent"
        android:layout_height="match_parent" />

</LinearLayout>
class ExampleFragment : Fragment() {
private var _binding: FragmentExampleBinding? = null
// This property is only valid between onCreateView and onDestroyView.
private val binding get() = _binding!!
override fun onCreateView(
inflater: LayoutInflater,
container: ViewGroup?,
savedInstanceState: Bundle?
): View {
_binding = FragmentExampleBinding.inflate(inflater, container, false)
val view = binding.root
binding.composeView.apply {
// Dispose of the Composition when the view's LifecycleOwner
// is destroyed
setViewCompositionStrategy(DisposeOnViewTreeLifecycleDestroyed)
setContent {
// In Compose world
MaterialTheme {
Text("Hello Compose!")
}
}
}
return view
}
override fun onDestroyView() {
super.onDestroyView()
_binding = null
}
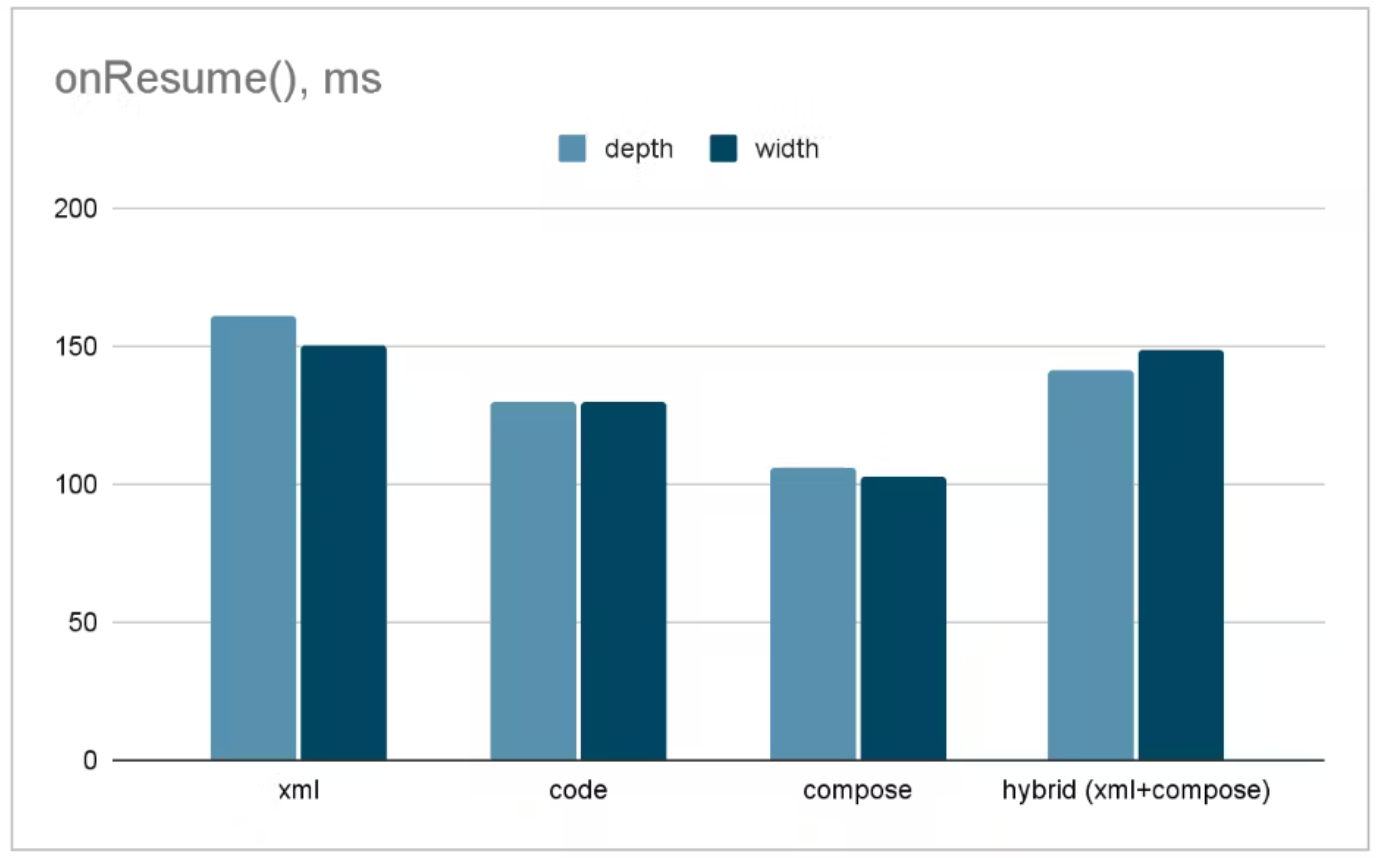
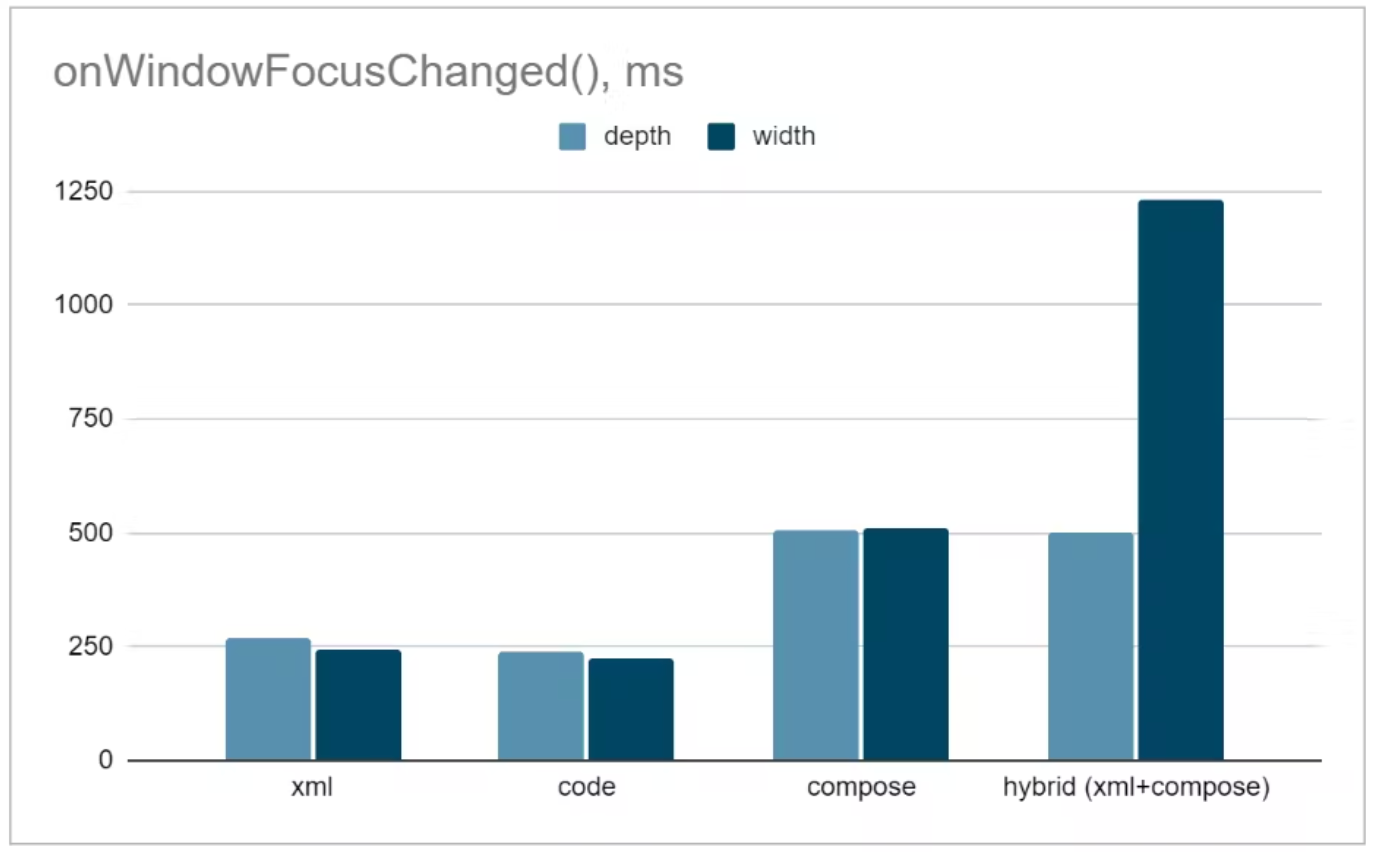
}However, this is not a good way of implementing it. Because using fragments just for navigation will create performance problems and affect the code structure. It is against Jetpack Compose’s fundamentals. We explained performance test results in this article.
Jetpack Compose Navigation Basics
Jetpack Compose navigation requires implementation in the app-module Gradle file:
implementation "androidx.navigation:navigation-compose:$las_version"First, we create a NavController instance to keep the back stack of our screens with their state and to navigate among them. We can say NavController is our compass.
val navController = rememberNavController()Note: navController instance should also follow the state hoisting principle.
After creating a NavController, We need to connect with only one NavHost. We can say NavHost is our map.
NavHost(navController = navController, startDestination = "profile") {

    composable("profile") { Profile(/*...*/) }

    composable("friendslist") { FriendsList(/*...*/) }

    /*...*/

}
As we can see NavHost gets a NavController and a String called as startDestination.
startDestination describes NavHost to show which screen first. The string “profile” is a concept called a route. Routes are like addresses for screens we use routes to reach up to the screen.
composable("profile") { Profile(/*...*/) }Here we say the composable screen’s route name is profile.
To navigate to a screen, just call .navigate with the name of your destination:
navController.navigate("friendslist")Arguments
We can also pass arguments to any screen:
composable(
    route = "profile/?userId={userId}",
    arguments = listOf(navArgument("userId") {
        type = NavType.StringType
        defaultValue = ""
    })
) { backStackEntry ->
    Profile(navController, backStackEntry.arguments?.getString("userId"))
}
Now our profile screen can receive an argument with userID name.
Note: By default, all arguments are parsed as strings.
To pass argument during navigating:
navController.navigate("profile/?userId=user1234")It’s like using RestfulAPI.
Note: Passing a minimum amount of arguments is the right way because the navigation concept does not cover data-related logic.
Screen Class Usage
The previous example seems nice, but typing hard-coded strings for routes is not a good practice. Instead, we need to use sealed classes:
sealed class Screen(val route: String) {

    object Profile : Screen(route = "profile/?userId={userId}") {

        fun userId(userId: String) = "profile/?userId=$userId"
    }
}
Now we can refactor our navigation code:
composable(
    route = Screen.Profile.route,
    arguments = listOf(navArgument("userId") {
        type = NavType.StringType
        defaultValue = ""
    })
) { backStackEntry ->
    Profile(navController, backStackEntry.arguments?.getString("userId"))
}

// Bir yerde navigasyonu tetiklemek için
navController.navigate(Screen.Profile.userId("user1234"))
Nested Navigation
We might want to group and modularize routes. Let’s say we want to group onboarding, login, and register screen into a graph:
NavHost(navController, startDestination = "home") {

    // Navigating to the graph via its route ('login') automatically
    // navigates to the graph's start destination - 'username'
    // therefore encapsulating the graph's internal routing logic
    navigation(startDestination = "username", route = "login") {

        composable("username") {
            // Username screen content
        }

        composable("password") {
            // Password screen content
        }

        composable("registration") {
            // Registration screen content
        }

    }

}
Extraction Of Graphs
Be aware that having a lot of graphs still can turn code into a huge mess. We can separate graphs into different files by using NavGraphBuilder:
fun NavGraphBuilder.loginGraph(navController: NavController) {

    navigation(startDestination = "username", route = "login") {

        composable("username") {
            // Username screen content
        }

        composable("password") {
            // Password screen content
        }

        composable("registration") {
            // Registration screen content
        }

    }

}
Deeplink Routing In Compose
Compose navigation supports implicit deep links, here is how:
val uri = "https://www.example.com"

composable(
    "profile?id={id}",
    deepLinks = listOf(navDeepLink { uriPattern = "$uri/?id={id}" })
) { backStackEntry ->
    Profile(navController, backStackEntry.arguments?.getString("id"))
}
By default, deeplinks are not exposed to external apps. To expose them, we add an intent filter to the manifest file:
<activity ...>

    <intent-filter>
        <data android:scheme="https" android:host="www.example.com" />
    </intent-filter>

</activity>
Conclusion
In this article, we learned why we are using the navigation in android, how navigation changed throughout the years, how we can use compose in fragment navigations, and why we should not really use that way.
Then dived into jetpack compose navigation with arguments, nested graphs, and graph extraction.
Finally, we learned how to use deep links in jetpack compose navigation.
Where to Go From Here?
Since we learned a lot of information from this article it is better to put theory into practice.
For this android suggests:
References
- Navigation | Android Developers
- Jetpack Compose 101: The Basics – Appcircle Blog
- Interoperability APIs | Jetpack Compose | Android Developers
- Navigating with Compose | Jetpack Compose | Android Developers
- Navigating in Jetpack Compose
- Jetpack Compose Navigation | Android Developers
- Now In Android Repository